Chocolate Caramel Nougat Tart

Processed with VSCOcam with f2 preset Processed with VSCOcam with f2 preset

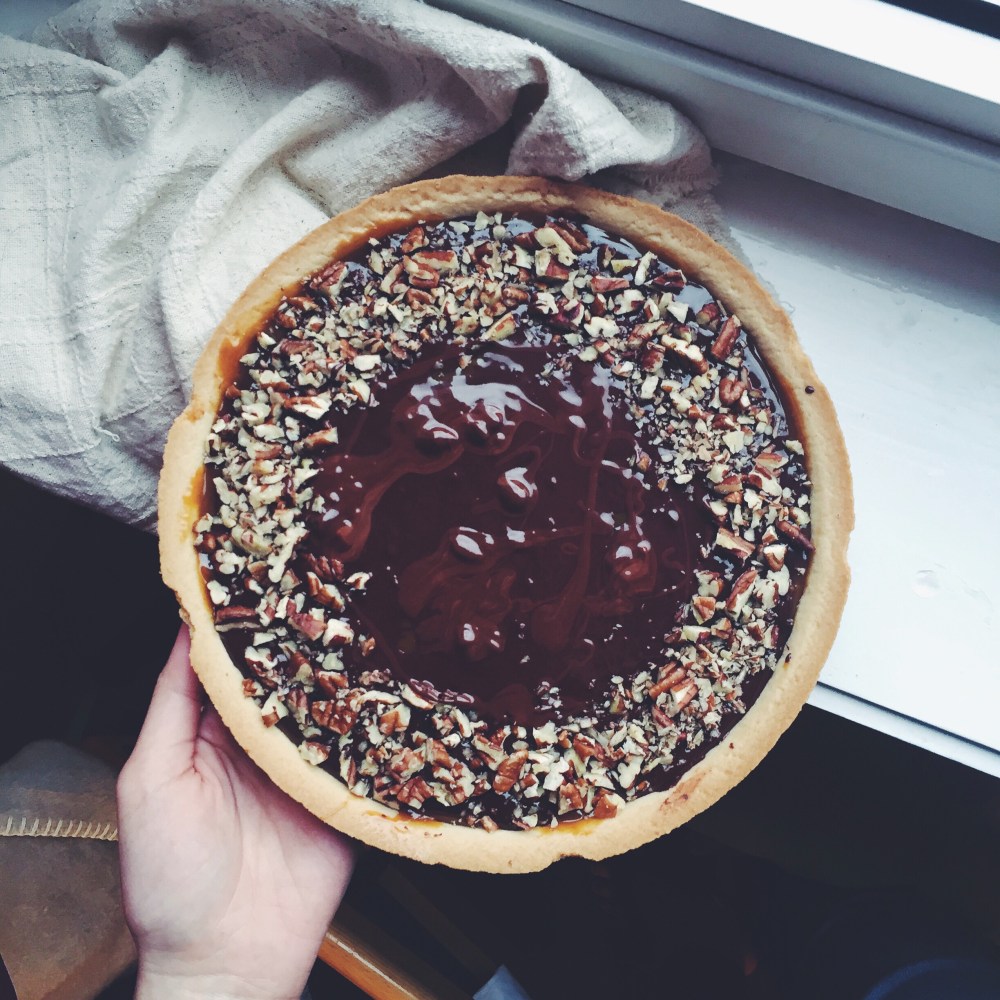
Sweet shortcrust pastry filled with dark and milk chocolate, melted chocolate nut bars, caramel, topped with chopped pecans and peanuts

There’s little space for mistake(s) when it comes to food pairings made for each other. Rich, dark chocolate filling, chewy bits of nougat, the occasional crunch, smooth caramel. Contemplating the meaning of life earlier on this week whilst scavenging my brain for some coherent essay material, I knew I needed to make something sweet, and good, soon. The brain needs glucose, after all.

Magic results lie in the temperature of your butter (cold cold cold, please), and the speediness of all the hand work involved. It all seems a bit of a hassle at first, but I encountered nothing more therapeutic the past week. The movement of my hands in a bowl, rubbing butter into flour and salt and the works is like a welcome slowing down of all the motions you’re forced to go through in life. If you just take an hour out for yourself, make something, have a cup of coffee, or even just think about nothing, everything around you, everything you experience, becomes brighter and more beautiful. I’d hate to sound too much of a yogi because I’m no more the wiser, but the truth only came with experience.

Also, you’re probably wondering why there’s one picture in this entire blog post. Now I know as a blogger one is obligated, expected to take a million photos of the entire process, for the reader’s pleasure and benefit. It’s true, I know, but having hall-mates all around means the lifespan of anything baked (especially with chocolate) is circa half an hour, if not just a little less.

It was too delicious for too many shots. The waiting had to wait. I’ll leave it at that, and hopefully the next time I won’t disappoint.


Chocolate caramel tart (makes one 9-inch tart)

Ingredients

For the crust: ingredients may be found here, minus the black sesame powder

70g dark chocolate, broken up into large chunks

60g milk chocolate, broken into large chunks

one large chocolate nut candy nougat bar (Snickers works well), or substitute with 10g more milk chocolate and a handful of chopped peanuts  (though you won’t get the bits of sticky nougat this way)

14g (1 tbsp) unsalted butter

50g (around 1/3 cup) chopped pecans and peanuts (optional)

For the salted caramel: ingredients and procedure may be found here. You will need 80ml (1/3 cup) of the stuff.


Directions

Prepare pie crust as stated in aforementioned recipe. At the bit where it says ‘preheat the oven and cover with aluminium foil’ preceding the blind bake, don’t! Just bake it normally, then remove once done and let cool, during which time you can prepare the other components. Prepare salted caramel and let cool for a half hour, so it solidifies just a little.

In a medium microwave-safe bowl, melt together both types of chocolate, butter and the chocolate bar in 30-second intervals, until everything has nicely melted together. There will be a few sticky bits if you’re using a Snickers bar  thanks to the nougat, but that’s what makes it all the more pleasurable. Into the cooled tart crust, pour in the salted caramel and spread into an even layer. Then pour in the chocolate mixture, and sprinkle chopped pecans and peanuts around the edges (optional). This tart need not set in the fridge, but leave to set and stiffen more at room temperature for at least half an hour. Cut using a sharp knife, wiping with a wet towel between each slice.

Serve on its own or with whipped cream and more chopped nuts.

Blackberry Pillow Pancakes

Processed with VSCOcam with f2 preset Processed with VSCOcam with f2 preset

And if you thought I would stop with the pillows, I’m sorry to let you down (not really).

It’s been more than half a year since I discovered what I think is the best base pancake recipe, and goodness have I made so many flat, soggy things in my bleak past. This is merely a twist on a classic favourite buttermilk version, only this time I didn’t even use buttermilk, since I didn’t have any on hand and I had no white vinegar to make any of my own. Still, the results were beyond moreish. One must make do with present circumstance, no matter how dire. The results may be surprising, and even pleasant.

Processed with VSCOcam with f2 presetProcessed with VSCOcam with f2 preset

Even without maple syrup, yoghurt and brownie bits (as may be observed above), the pancake alone holds a mildly sweet flavour, with plentiful air pockets, rise (each is at least an inch in height), and all sorts of loveliness. Tart blackberries offset the plain flavour a tad, each bite dripping with tenderness and bits of melted fruit. I paired a small stack with yoghurt to further enhance this tartness, and the syrup made all the components sing in perfect harmony.

This fluff is unreal. Perfect wake-up call.

Processed with VSCOcam with f2 presetProcessed with VSCOcam with f2 preset Processed with VSCOcam with f2 presetProcessed with VSCOcam with f2 preset

Blackberry Pillow Pancakes (makes 10-12 medium-sized blackberry darlings)

Ingredients and Directions

Place a large handful of fresh or frozen blackberries (around 7-8 whole blackberries) into a microwave-safe bowl. Microwave on high for 2 minutes, or until they are easy to mash and the juices seep out.

Follow the directions on how to make my favourite sky-high pancakes here. Before cooking the pancakes, swirl the microwaved berries into the batter. The batter will become darker, with bits of blackberry strewn throughout. Cook the pancakes as usual, on medium heat and flipping before bubbles are fully formed on the surface of the pancake. Place cooked pancakes on a paper towel, and any left over can be frozen. Serve with more berries, chocolate, yoghurt and maple syrup. Or whatever floats your boat. Enjoy, and make again soon.


10-minute Chocolate Brownies with Chocolate Peanut Butter Caramel Frosting

Processed with VSCOcam with f2 preset

Look down at my boots. The wind gets through even those. Tights? Never thick enough. But thank God for Barbours. It’s getting colder… And colder. Despite the bitter air and occasional drizzle that somehow makes the situation 5 times worse, I’m embracing the sudden transition into proper fall here in the UK. Couldn’t believe it when a friend posted a video of soft snow right outside her window, here in South Kensington. It’s happening!

Processed with VSCOcam with f2 presetProcessed with VSCOcam with f2 preset

The cold means more warm chocolate somethings, topped with chocolate caramel peanut butter frosting. Chocolate anythings. Some days just demand brownies, and only brownies. The first time I made this and followed the initial recipe, the whole 20 minutes made it much too dry for my liking, so I adjusted proportions and timing. Lo and behold, everything was gooey and beautiful in less than 10. The excitement was too much. Too much.

You need that rich goo. A dark, deep, intense pleasure. If I want a good, fudgy brownie that’s chewy around the edges, my go-to recipe is right here, so I implore you to check that out as well; it’s just as simple and almost as quick. This is more a mix between a gooey mud pie and dense cake, but the change is welcome and delicious. Topped with caramel peanut buttery goodness, it really doesn’t get much better than this. What do I love so much about this recipe?

  1. It takes 10 minutes. And in my case, just 7, because sometimes miracles happen.
  2. You can use either natural or processed peanut butter (crunchy, if you may) without any disastrous consequence.
  3. You won’t stop licking and picking.


Chocolate Brownies with Chocolate Peanut Butter Caramel Frosting (adapted from Sorted Food’s Swedish Chocolate Brownie recipe- serves 9-12)

Ingredients

For the brownies:

110g (half cup) salted, melted butter (or use unsalted, and add a pinch of salt into wet ingredients later)

200g white caster sugar

2 eggs

130g plain, all-purpose flour

1 tsp vanilla extract

55g cocoa powder

40g dark chocolate, melted in a microwave in 30-second bursts


For the frosting:

90g ( slightly more than 1/4 cup) chunky/smooth peanut butter; natural peanut butter works perfectly here as well, just make sure it’s properly mixed through

50 dark chocolate chunks, melted in a microwave

75ml (1/4 cup) caramel sauce, store-bought or homemade


Directions

Preheat your oven to 180C (350F) and grease a square/round 23cm baking pan. In a bowl and with a whisk, mix together the melted butter, sugar, melted dark chocolate and vanilla extract. Add the salt here if you used unsalted butter. Whisk in the eggs and cocoa powder, and continue whisking until the mixture is visibly and texturally stickier and glossier. At this point, add the flour and mix until everything is just combined. Pop the pan into the oven and bake for 7-10 minutes. Whilst it’s baking, mix together the frosting ingredients. You need a fork and self-trust (that you won’t finish the whole bowl before the brownies are even out).

Check the brownies at 7 minutes- there should still be a slight wobble in the middle. Remove from the oven and let cool for a half hour before frosting. Cut into as many squares as you want, then eat and be happy.


Coffee Chocolate Chunk Yeasted Waffles (overnight recipe)

Been a while, waffles.

As the start of university looms above like a great monstrous cloud (a more welcome one though, at that), I’ve been battling my hefty attachment to certain breakfast foods, because I’m pretty sure I know my days in hall will mainly comprise ready-made Chinese microwave meals and Tesco convenience sandwiches. So I’m savouring the time I have left with my waffle-maker and pan, the time pockets in the mornings that give leeway to luxury.

It’s a weird thing to think about, moving to a whole new country for an extended period of time, having to assimilate once more into another set of news, yet somehow it’s all incredibly comforting, like a house that’s been waiting too long for me to knock on its door. And now that the time has come to finally leave, the emotions are amplified, nostalgia aggravating, the future a deck of cards I can only hope to play to my advantage. It feels like I’m leaving so much behind, but the anticipation is only growing stronger.

Uh so yes, the hefty attachment. Breakfast. Namely french toast, french toast, pancakes, and… waffles. All my loves deserve your love, too. In the name of all things waffly, I present to you

Crisp, buttery yeasted waffles flavoured with a punch of espresso and chocolate chunks.

If you like waffles with ridiculously crisp edges, this is for you. A little on the thinner side, so the fluff factor is slightly reduced, but the aeration thanks to the yeast yields a light and tender inside. This recipe is inspired by another recipe I put up more than a year ago, and I implore you to check it out, maybe even before giving these guys a shot.

The best part? You whack everything together the night before, so you need not labour over things like whipping egg whites or careful folding or sifting in the morning. All you need to do is chuck a few basic ingredients together in a bowl, pop it in the fridge, and the next morning you’ve got a waffle batter ready and waiting for you. It’s just a matter of heating and buttering your waffle iron, and then going through the trouble of taking out a ladle to scoop the batter and spread it on the iron faces.

Ooh, and the moment you get a pocket of gooey chocolate in a coffee-scented bite? No words, just lots of feelings and silent pleasure.

Conclusion: I love chocolate and coffee. I love waffles. Do it for the blissful marriage.

Yeast Waffles (makes 4-5 thin waffles, adapted from a previous recipe on brown butter waffles)

30g unsalted butter

125g (1 cup) all-purpose flour

1 egg

1 tbsp white sugar (either granulated or castor is fine)

1 tsp fine salt

1 tsp instant yeast

1 tsp coffee grounds dissolved in 1 tbsp hot water

30g (a healthy handful) chopped dark chocolate

200ml milk (I use whole)

The night before

Melt the butter in a microwave and set aside to cool. Put your chocolate chunks in a small bowl and mix with a tablespoon of the flour. This will prevent the chunks from sinking to the bottom of the bowl after being mixed with the other ingredients.

In a bowl, whisk together the flour, sugar, salt and yeast. Whisk in the egg, and before it’s fully incorporated (it’ll look like a groggy mess of egg-white and yellow splotches), add the milk in thirds. Add a third, whisk. Add the second third, whisk. Whisk in the melted butter and coffee. The batter will be slightly thin. If it looks too thick, add a tablespoon or two more of milk. Mix in the chocolate chunks (mixed with flour). Cover the bowl with a piece of cling film or aluminium foil and pop it in the fridge.

The morning after

Preheat your oven (this is the important step!) to 160C (320F). Remove the bowl from the fridge and turn on your waffle maker. Mine is preheated within five minutes, and turn it to a high setting. Use a small ladle or quarter-cup measurement to ladle in the batter, spreading it evenly. It helps to use a tablespoon when spreading. Follow the instructions on your own iron’s manual for heating and cooking. Mine take 5 minutes exactly to reach that perfect brown shade. Once your waffles are nicely browned, immediately remove it from the iron using a spatula and pop it into the hot oven. This is when your waffle will go from slightly soft and tender to crisp and hard on the outside. Ladle in more batter for your second waffle. The waffle will be perfectly crisp and golden after a couple minutes in the oven, but just check on them to be sure, and don’t burn them.

Serve with maple syrup, butter, fruit… And maybe more chocolate. Store any uneaten waffles in the freezer. Take out and toast whenever you like. These keep well for up to 2 weeks.

Rustic Grape Tart

Processed with VSCOcam with f2 preset

It feels as if I’m caught in a storm right now, papers flying everywhere, head quite the mess. I told myself I’d buckle down 110% (those same words!) today, and yet, I feel a strong sense of guilt as I look over all my past recipe posts, the embodiment of one of my main passions in life. It’s funny because I actually read an excellent article on procrastination in the papers today; and yet, I don’t see this as a form of such a term, but more so a physical and mental extension of what I love wholeheartedly. It’s small things like the juxtaposition of fruit and custard cream which to be are akin to that of life and love, or books and work, or friends and family.

This grape tart, as you can see above, is not perfect. The shell has shrunk, the grapes aren’t all luscious and plump, but it is through these imperfections that I am willing to share what I’ve learnt to bolster your own attempt in the kitchen. The shrunken shell is my fault really, because I failed to spread the baking beans evenly during the blind baking process. That, together with the fact that I sort of wanted the whole rustic appeal of pseudo-slipshod work. Hey, it’s a tart!

Processed with VSCOcam with f2 preset Processed with VSCOcam with f2 preset Processed with VSCOcam with f2 preset

The pastry is abominably crisp, the sort which shatters and melts in your mouth real quick. And I have only recently discovered just how darn easy pastry cream is to make, and I used a simple recipe which yields a smooth and decadent texture and flavour. I attempted to keep cooking the cream until it was thick, and thus hold itself better in the fridge, or when cut through with a knife during serving. If possible, use fresh, thick grapes, which I unfortunately didn’t have on hand at that point in time (hence the tiny little blobs you see pictured!) Since I was trying out my new fluted rectangular tart tin, I was forced to leave out a significant amount of crust, but it would also be perfect in a round 9-inch pie tin.

Rustic Grape Tart

Ingredients

For shortcrust pastry:

157g all-purpose flour

125g cold, unsalted butter, cut into cubes

1/2 teaspoon salt

1/2 teaspoon sugar

2-3 tablespoons water

For pastry cream:

355ml whole milk (around 1.5 U.S. cups)

2 egg yolks

68g white castor sugar

1 tablespoon cornstarch

1/2 tablespoon all-purpose flour

1 teaspoon vanilla extract

optional: zest of half a lemon and a splash or brandy/cognac

For the topping:

around 100g of grapes, cut in half (or you can cut as you fill the top, after pouring in the pastry cream)

2-3 tablespoons grape/apricot jam, warmed in the microwave for a minute or so

Make the pastry. It’s extremely versatile and can be used for things like quiches and other sweet or savoury tarts as well. My mum uses it all the time for her savoury wild mushroom and blue cheese quiche. Anyways. Freeze the cubed butter for at least a half hour. If you’re using a food processor, combine flour, salt and sugar, and pulse to mix. Add the butter and pulse around 6-8 times until the mixture resembles a course meal with pea-sized pieces of butter. Add the iced water, 1 tablespoon at a time, pulsing until the mixture just begins to clump together. The dough should hold together when pinched lightly. If you’re just using your good old hands and a bowl, rub the cold butter into the flour mix, rubbing across the knuckles, and quickly, so the heat doesn’t melt the butter at a faster rate. Continue until you get the aforementioned result. Remove dough from machine/bowl and place on a clean work surface. Shape into a disk and wrap with cling film. Refrigerate for at least an hour, and up to 2 days (so you can make this way ahead of time, hoorah).

When ready to use, remove the disc and leave on the counter for around 10 minutes, just to soften a little. Roll out on a lightly floured surface with a rolling pin, according to the size of the tart tin you are using. For my own rectangular one, I rolled it out to around 9×11 inches, around 1/8-inches thick, so there could be sufficient dough hanging over the edges. Press the dough into your tin (no need to grease) and press down so it reaches all the corners and sides. Trim the edge, leaving about 1/2 an inch excess from the edges. Put the crust in the fridge for around 10 minutes and preheat the oven to 177C (350F). Line the chilled crust with parchment/wax paper and fill with pie weights. Bake for 20 minutes in the oven. Remove to cool for a few minutes. Remove the weights, poke the bottom with little holes and return to oven for another 10 minutes. Cool completely before adding any filling.

During the baking time, make the custard. In other words, the most fun part! In a saucepan, medium or large, over medium heat, warm the whole milk until it comes to a simmer. Whilst waiting for that, whisk the eggs, sugar, cornstarch, optional alcohol and lemon zest, flour and vanilla in a bowl. Whisk a little of the hot milk into the egg mixture, and then slowly, very slowly, whisk the slightly tempered egg mixture into the rest of the milk, constantly stirring. Continue to stir for around 3-5 minutes, until the mixture thickens and you have what rightly resembled a luscious, thick custard. It will be a fine, pale yellow, which leaves a slightly slimy trace when you sneak a lick off the back of your wooden spoon. Remove from the heat and let it cool for around half an hour.

Once cool, spread the custard onto the pie shell. Cut up your grapes and assemble them, cut-side down, onto the cream. It will take a while, yes, but it’s absolutely worth it in the end. Place your gorgeous little tart in the fridge, and cover with plastic wrap. Just before serving, warm some jam in a saucepan over light heat or in the microwave for a few minutes. Brush over little butts of grapes, remove from the tin and prepare yourself for a light and slightly unorthodox dessert.

Who doesn’t love grapes.