Brown Butter Chocolate Chip Cookies

A restful holiday break has come and gone, but cookies and hot drinks in the winter are here to stay.

Oxford in the winter is still a sight for sore eyes after a hot Singapore break

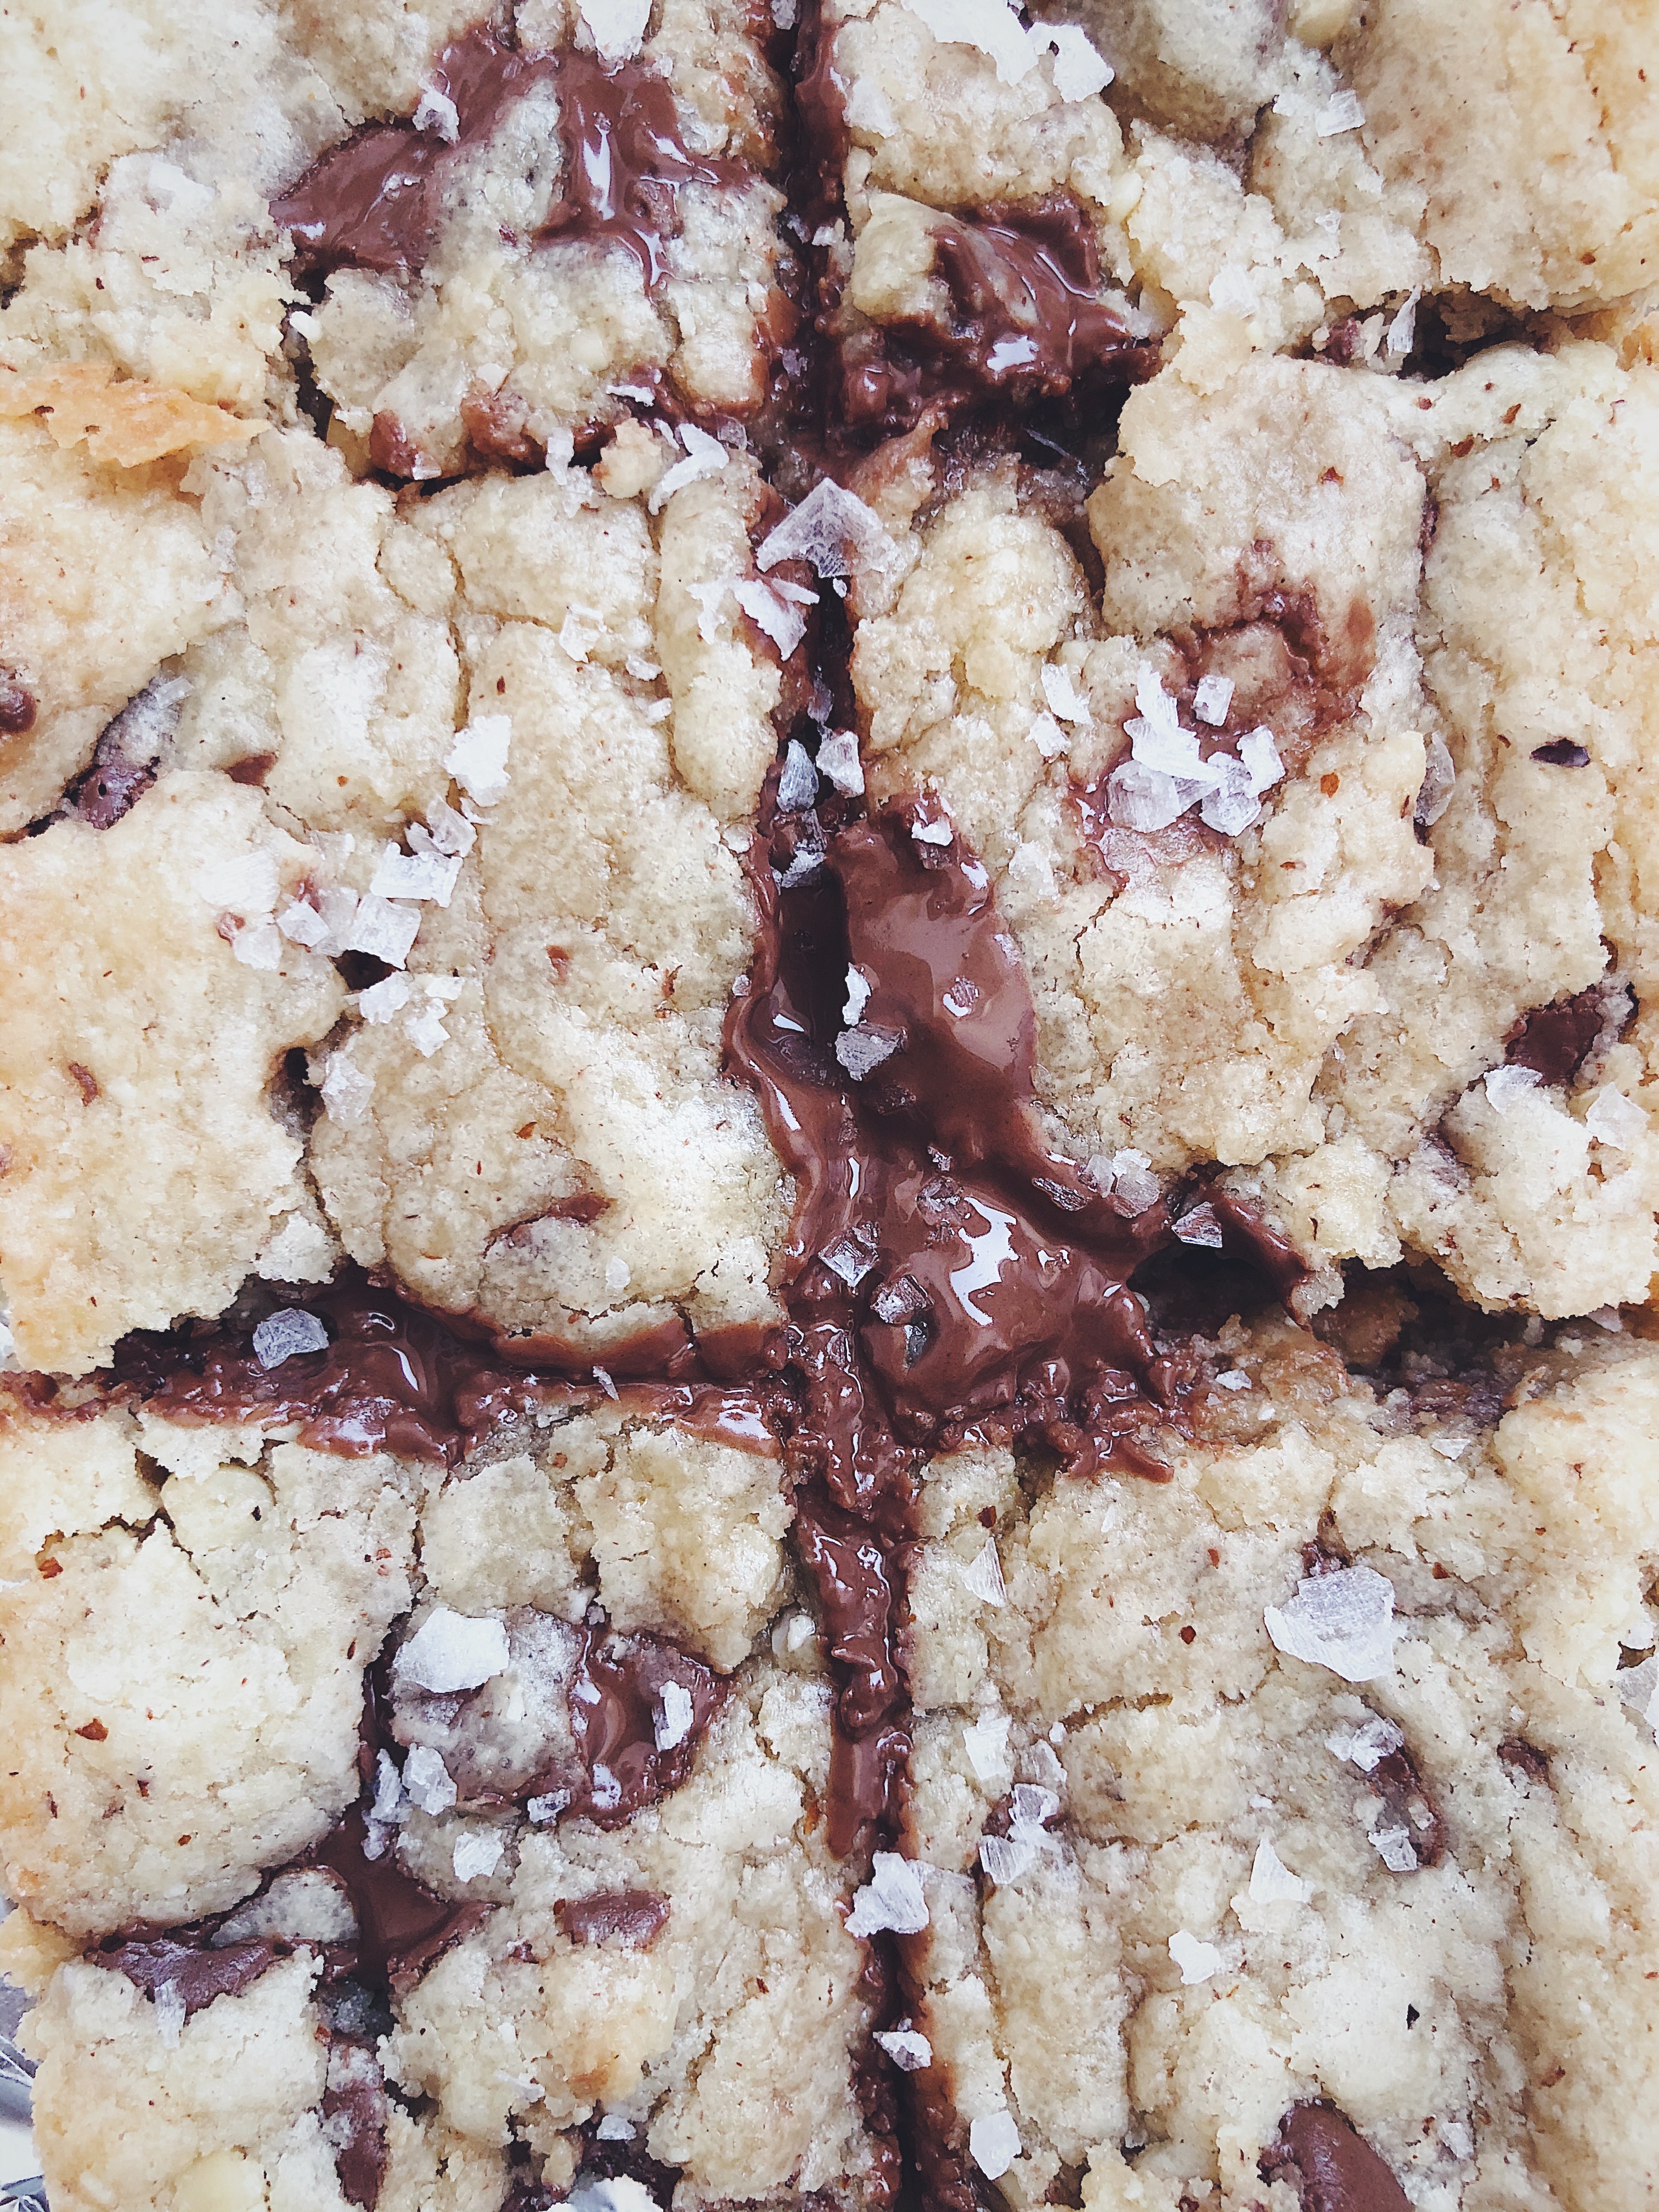
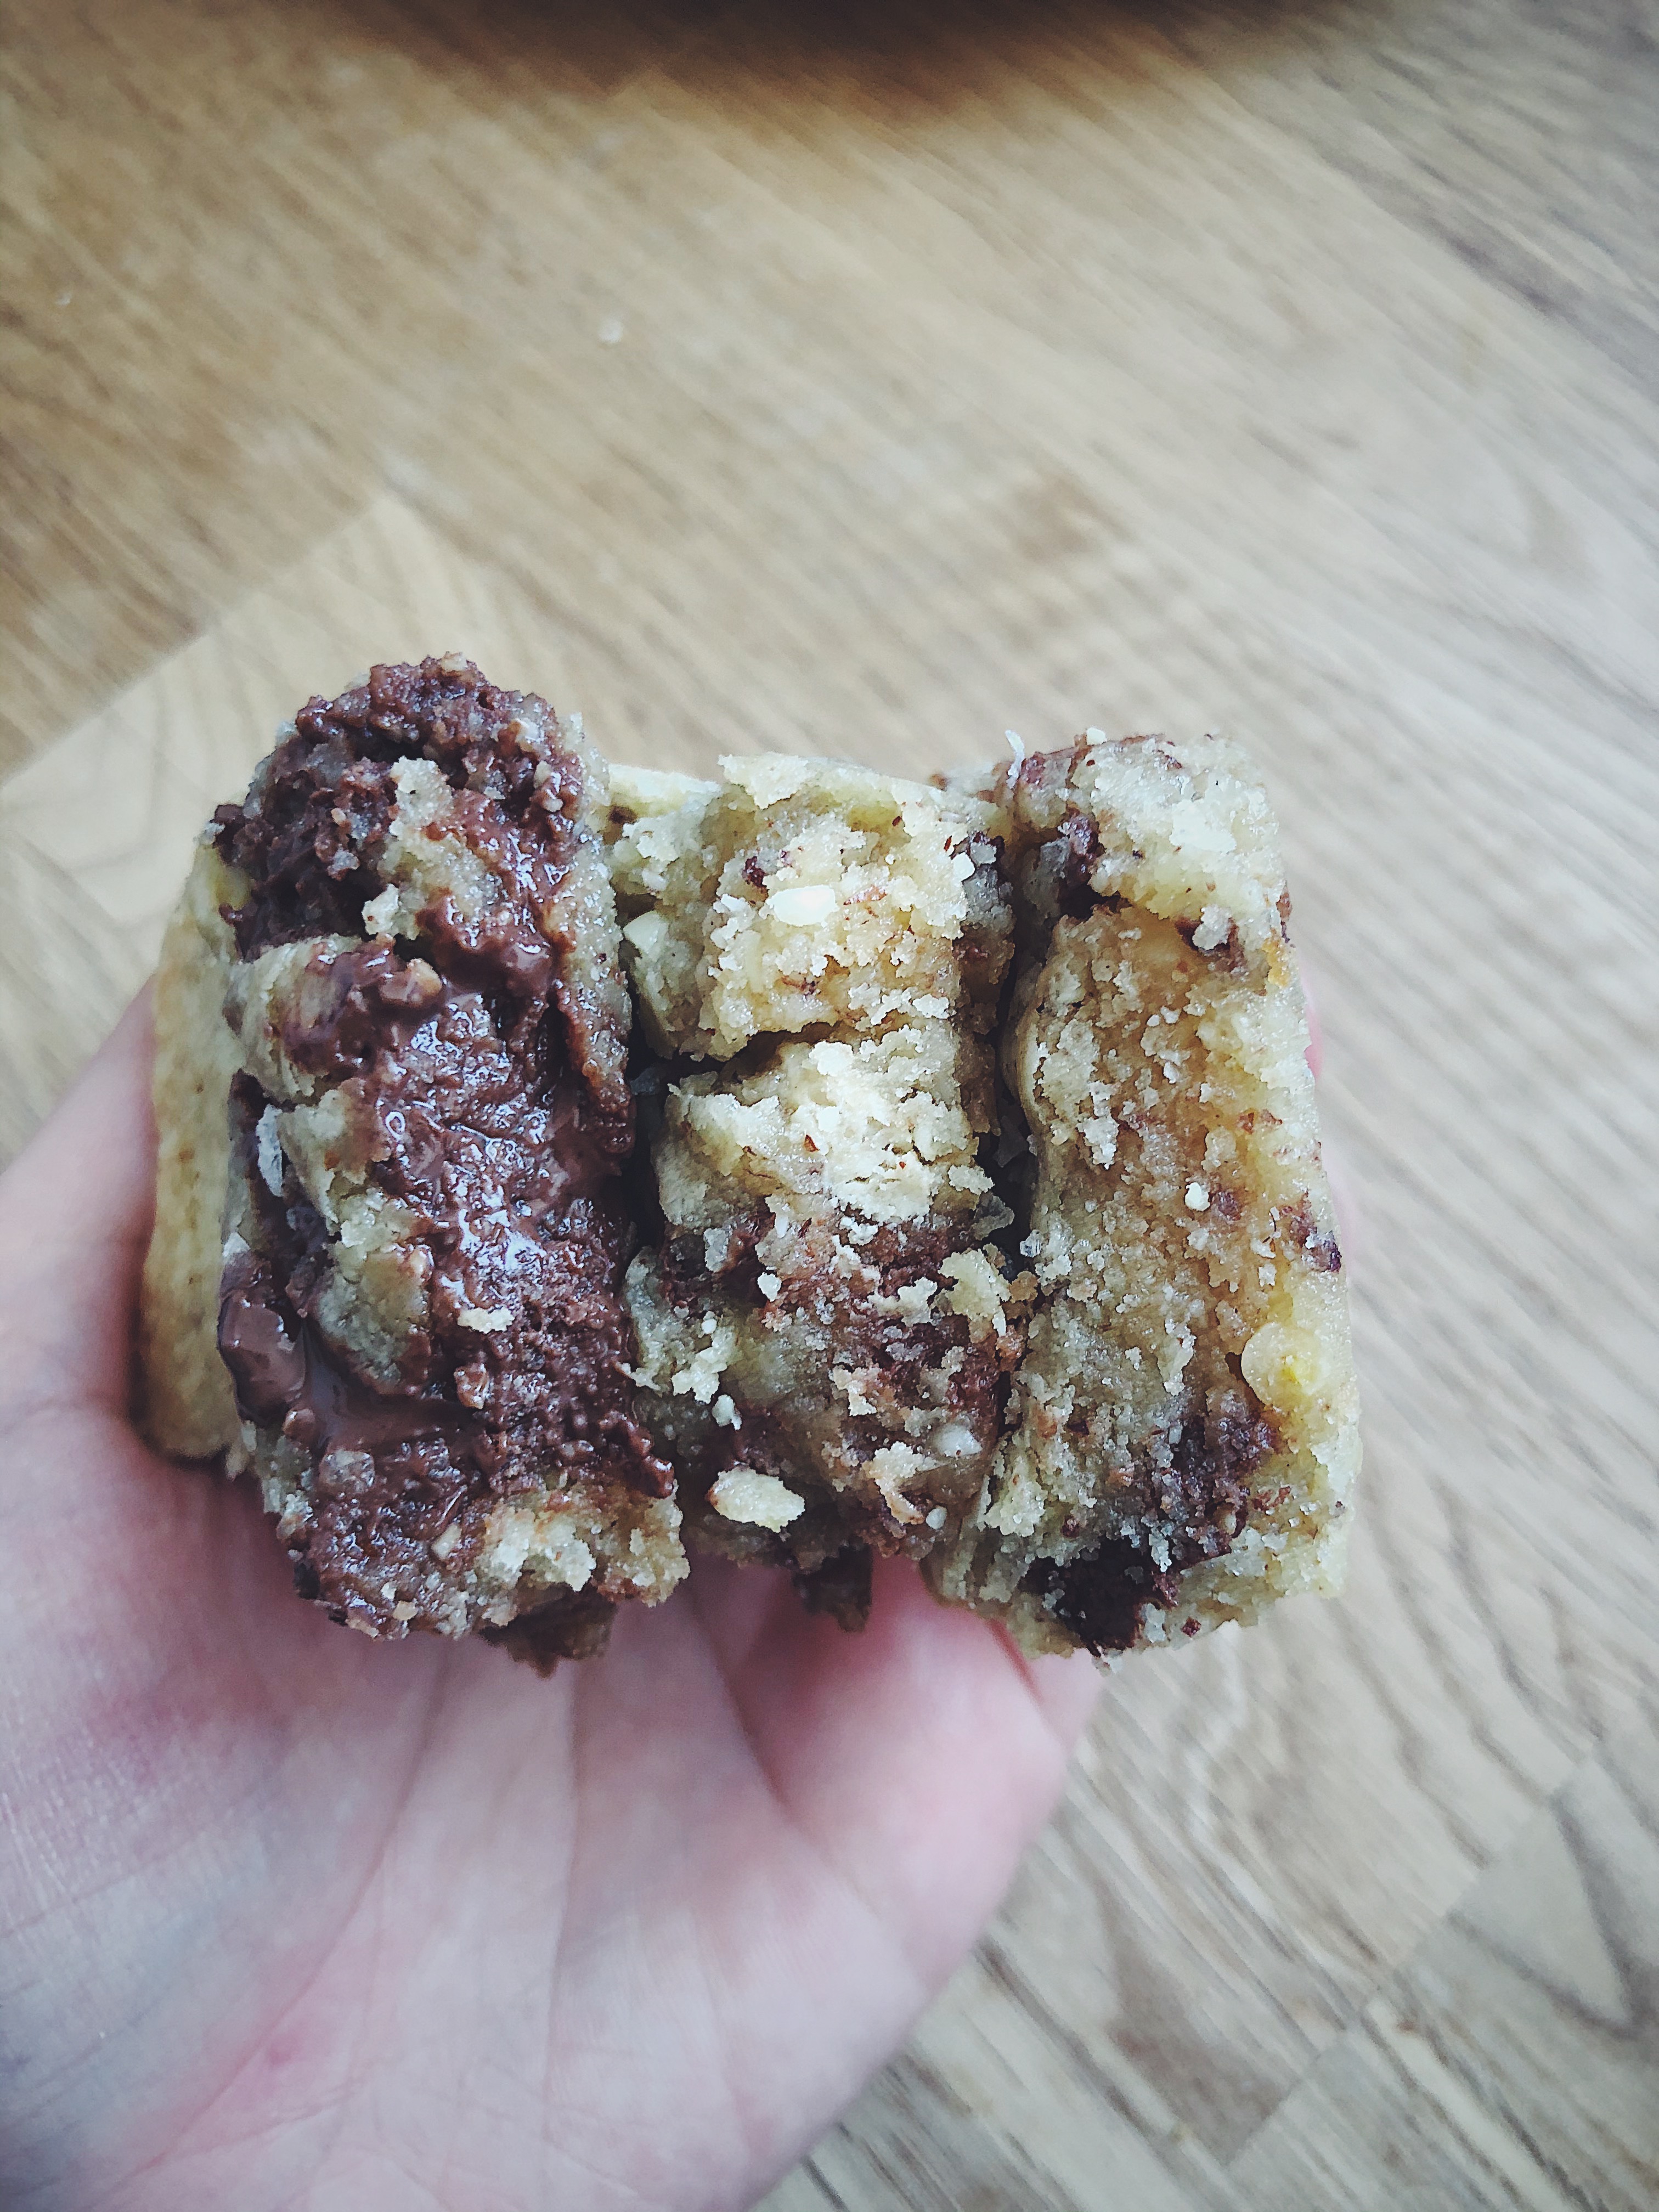
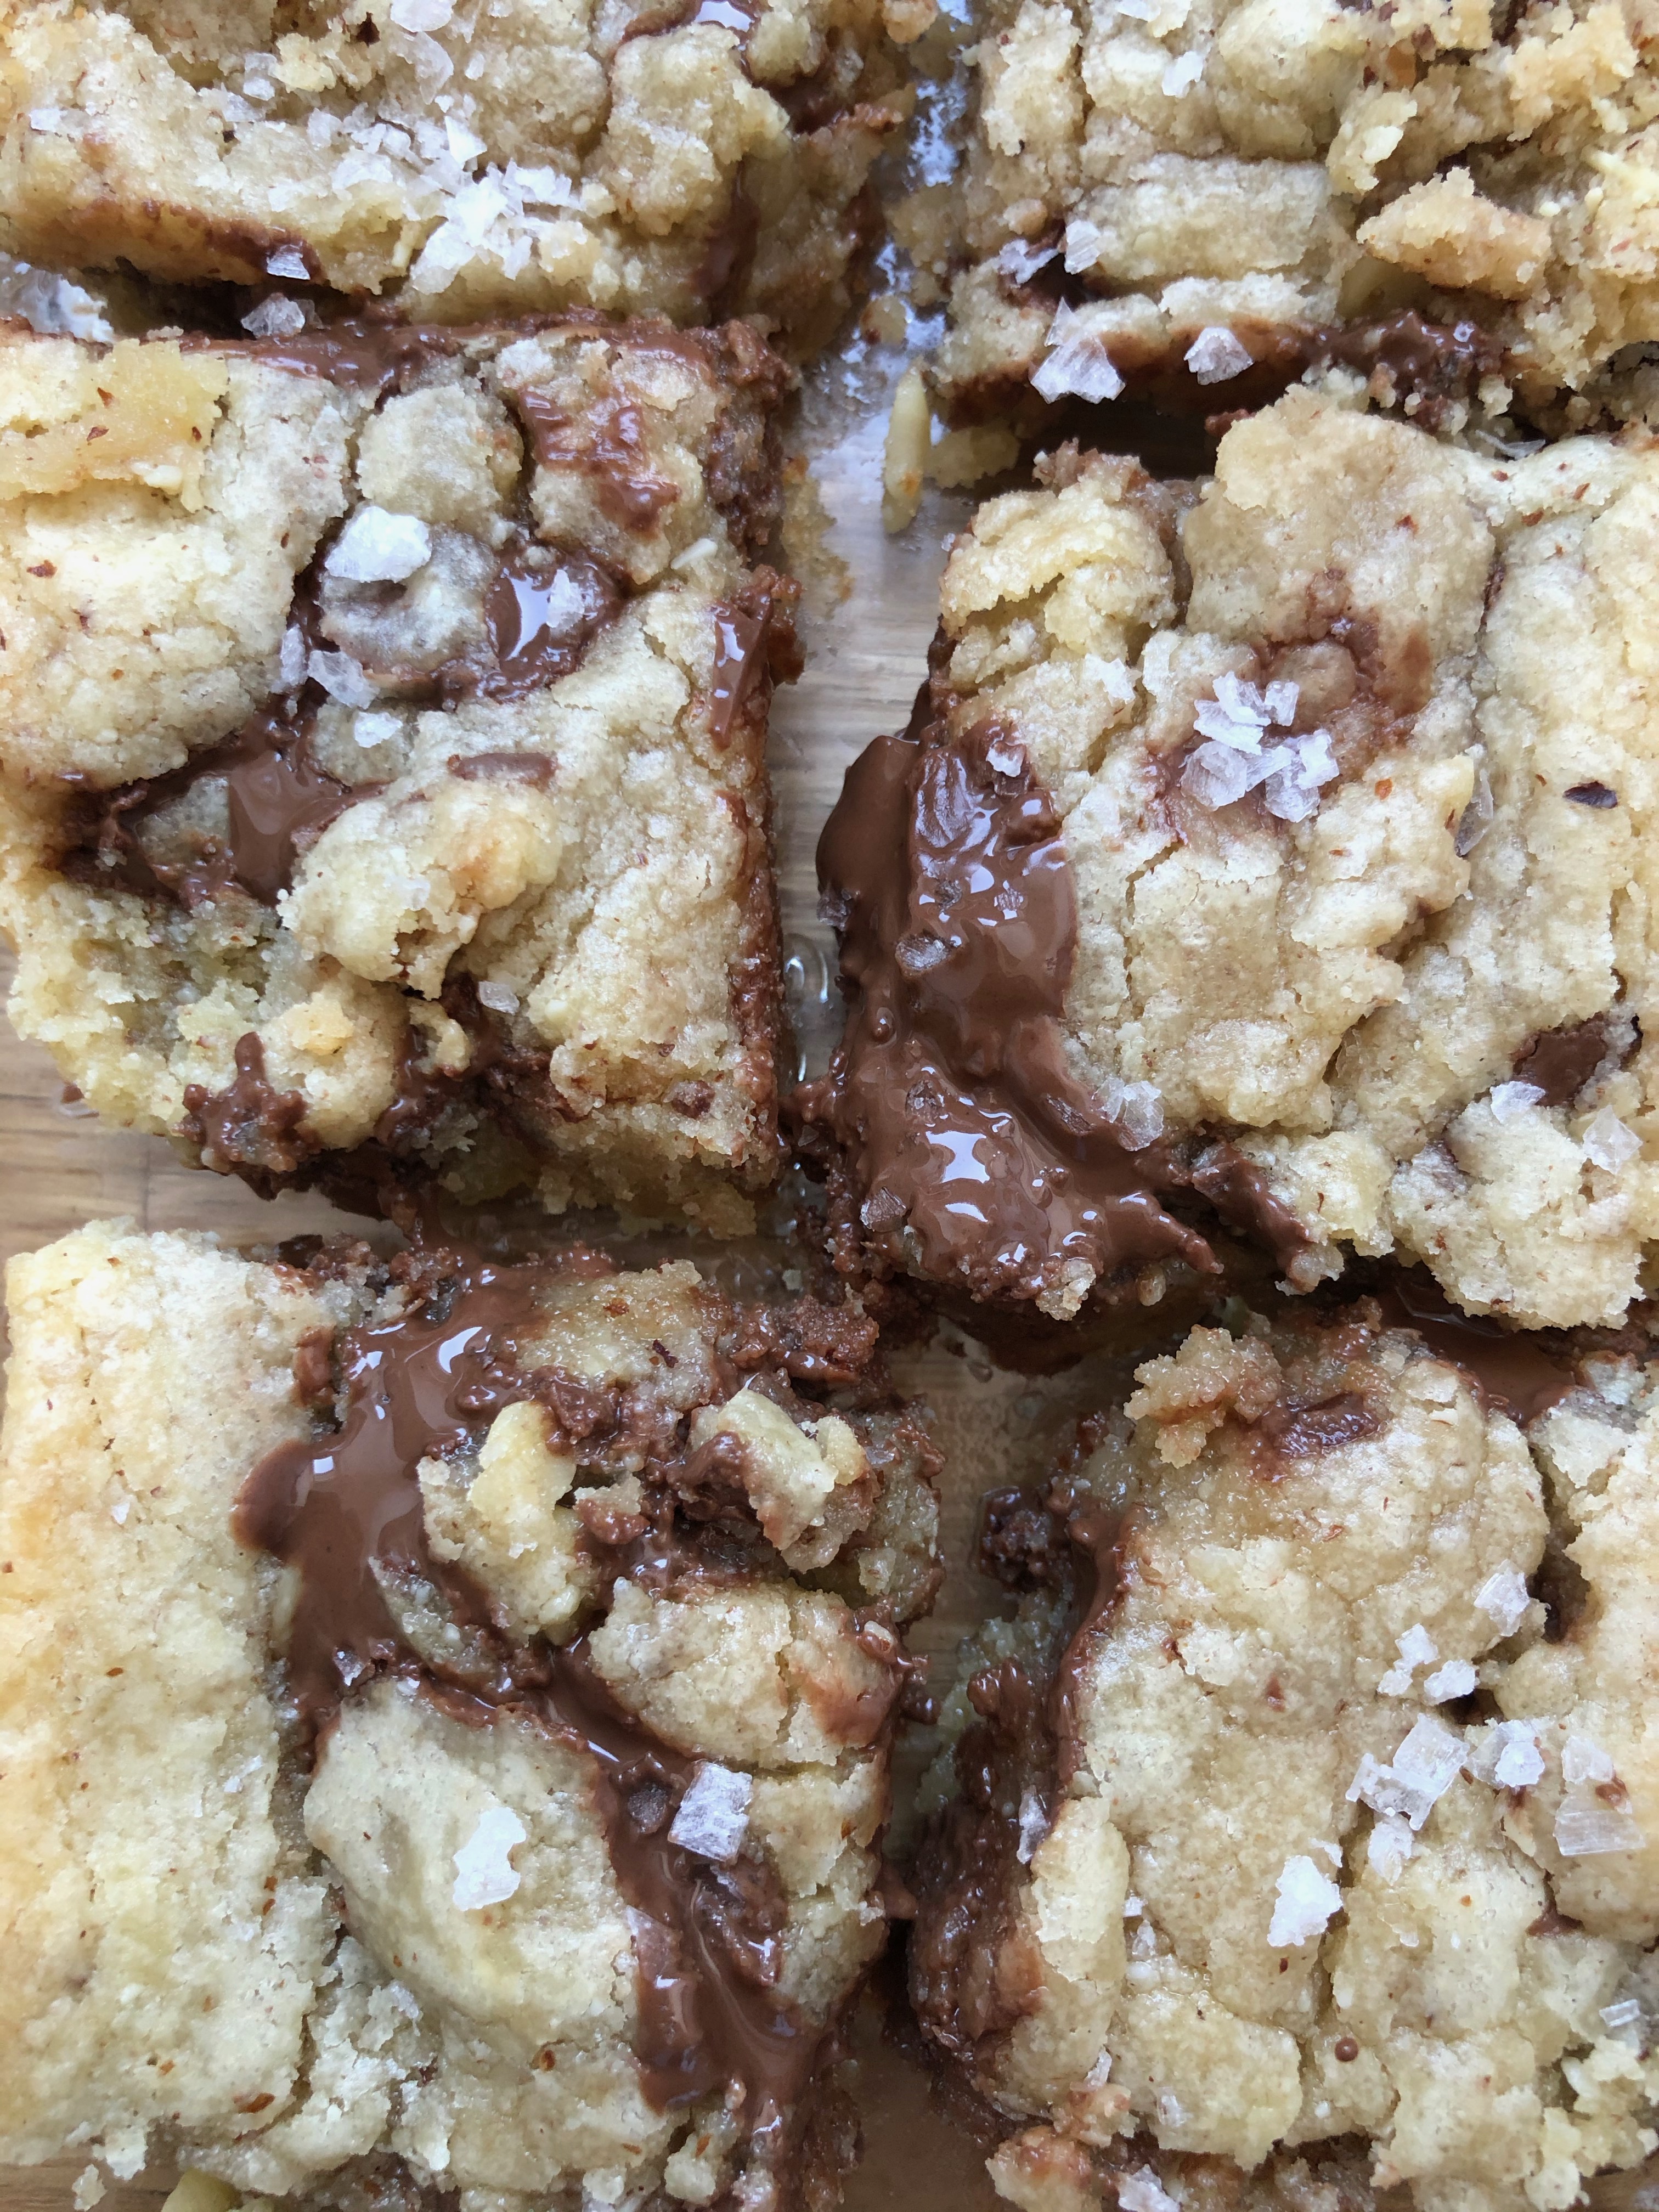
As of right now, these are the only cookies I (and you) need. Butter slowly browned on the stovetop, mixed with brown sugar, egg, and just enough dry ingredients to hold the flavour together. No exceptions for using light brown sugar; you need something dense enough for mild treacly essence but which won’t distract from the brown butter, and the soft sandiness of light brown sugar does the trick.

I made these at least 5 times already both here and in Singapore. Gone-in-the-hour type cookies. Brought them for a friend’s birthday and they were scoffed in no time, too. The secret really lies in the brown butter, so make sure to melt the butter low and slow for ultimate flavour and texture.

Behind the scenes of trial 1: squish
Slight inspiration for the cookies: Gail’s ginormous chocolate chip cookies

(And yes, I prefer these cookies to Gail’s ones). So incredibly soft, chewy and delicate on the inside, with a cracked top. Chocolate all the way through, too. 100g is enough but go for 150g if you’re the sort who needs plenty in every bite.

Brown butter chocolate chip cookies (makes 6-7 medium cookies)

Ingredients

150g butter

1/2 tsp fine salt

200g light brown sugar

1 egg

170g plain, all-purpose flour

1/2 tsp baking powder

100g dark chocolate, roughly chopped

extra coarse salt (for sprinkling at the end)

Directions

First, preheat your oven to 180C(350F) and line two medium baking pans with baking parchment. In a large saucepan, melt the butter on low-medium heat until the butter starts to pop and sizzle and you can see the light-coloured milk solids separate from the brown liquid. You know you are done browning the butter when you can smell something skin to mildly burnt toffee. Turn off the heat and let the butter cool for 5 minutes in the pan before pouring it into a large bowl together with the light brown sugar. Whisk the brown butter and sugar together well, you should have something that looks like wet sand. Add the egg and whisk it in too, with the half teaspoon of fine salt, until everything is well homogenised and smooth.

Finally, tip in the flour, baking powder and chopped dark chocolate. Use a large spoon or rubber spatula to fold the dry into the wet ingredients and mix well until there are no dry floury spots left. You should have a relatively thick batter which still drops easily from the spoon with a strong flick of the wrist. Take heaped tablespoonfuls of the batter and put onto the prepared baking tray. No need to flatten the cookies, as they will flatten and spread quite a bit during the bake time. Space the cookies out so that there is at least 2 inches of space in between the cookies. Bake for 10 minutes and let them cool for at least 5 minutes on a wire rack before serving.

Once they are done baking, sprinkle on some coarse salt (I use Maldon) on each cookie. Finally, apply generously to face!

24

Living through the last week of being 23 feels like waiting for a chapter that’s meant to close. Those were the exact words I told a close friend recently. 

The past few months have seen the world turned upside down. The enforced solitude, which I have grown to mostly enjoy by implementing a good routine and rewards to look forward to, has forced myself to uncover the roots of some of the biggest problems we face as a global community now, as well as some problems within myself that I have neglected. A few old demons, namely shades of anxiety and depression, may have arisen during the past month, but I’ve grown a lot by attempting to process emotions, past events, my relationships and academic endeavours. Bushy-tailed as I was when I matriculated at Oxford last year to start my PhD, I couldn’t help but feel rather lost and aimless when the virus abruptly took hold of the world, and I hazard a jab at saying that it has impacted most others in the world, too.

I could say I have learnt a few things this year:

  1. Learning a new language is hard, but fun. The more effort I put into it, the more enjoyable the process becomes. Having a strong reason as to why you want to learn makes it all the more worthwhile. 
  2. My relationship with social media has changed, and probably for the better. I find myself easily bored with many platforms now, such as Instagram, Facebook and Twitter, mainly because its constant stimulation has finally dwindled the dopamine rush I get from it. I will take another long break from Instagram soon, I think, because this period of abstinence is akin to a rebirth, while birthing more time into my day, to invest in other priorities such as learning, reading, and actually writing more lengthy posts on this blog. I personally still read blogs, but I feel less inclined to properly read lengthy articles after long bouts of social media usage- it’s just not as fun or stimulating. Yet I know that such an attitude is harmful in the long-term due to the way in which social media rewires the brain, as Cal Newport will also readily say. As much as I love the ability to share my life and engage in things my friends are doing, real life has so much to offer outside of my various blue screens. And real relationships, for me at least, lie in long conversations, over video chat or real life, hearing someone’s voice, so much more profound than the pings of hearts and emojis. Reduced social media usage has allowed me to shape my own opinion on things without forcing Facebook or Insta ads down my throat first, and I can walk around without a phone and just think, and enjoy plain, clean air. I also want to be able to read books in the evenings again, with candles and wine, instead of scrolling through various comments on what other people think about someone else’s boyfriend etc. I could go on and on about the hazards of shamelessly, constantly putting out a highlight reel for the world, but I think my point has been made. 
  3. Relationships have clarified and I am really grateful to those close to me, who constantly inspire, motivate and challenge me. 
  4. Oh my goodness, cooking is really fun. It’s become something I look forward to most nights. I typically have gotten into the routine of cooking a small batch of something 2-3 times a week, because cooking something fresh for one person every night is a little more than necessary, and I find this amount is just right. Very grateful for a freezer, I must say. Lately I’ve been making a lot of this and malai kofta from my friend’s new food blog– she does lots of vegan Indian recipes so do check it out!!

November’s orders for London are still up and running as usual, and you can email me at alimyun@protonmail.com for more details and questions. The stars are nut butter-stuffed brownie cupcakes and PB&J blondies (pictured just above here), and a box contains 4 cupcakes and 2 large blondies. Have received good feedback for both and it truly means a lot to me, even if it’s just coming from one person!

Tahini Chocolate Chip Nut Bars

Processed with VSCO with f2 preset

A few things I want to say after the past few weeks. Just as a side note, I’ve actually been meaning to put this up for quite a while but as usual, a lot of things regarding work and travel got in the way, and I also did not want to put something of a sensitive topic up too soon.

  • Constantly reposting images and Instagram stories makes good for collective awareness but is not as important as action and effort.
  • In the past I never had the courage to challenge racism if and where I identify it, and I’d like to think I am getting better at it. This will probably involve more difficult conversations with loved ones and friends. Not necessarily in a defensive way, but rather constructive. I usually struggle with challenging friends more so than just family (with whom we usually have no filter) in this manner sometimes, but it’s about trying.
  • Racism is like a defence mechanism against insecurity and anxiety. If someone is secure in his or her own identity then there’s no need to put others down, but the truth is that the person experiencing this suffers chronically and deeply, and may have to feel like he or she always has to prove oneself, or that he’s never good enough to do anything, acting like a self-fulfilling prophecy. Maslow’s hierarchy of needs place physiological needs (food, water, shelter) as the most basic needs we must have established before the needs of, in this order specifically: safety, feeling loved, having good self-esteem, and finally that of self-actualisation, which would propel us towards our highest goals and help us achieve them. Without the basic need of love and support fulfilled, and with many black people already suffering a lack of the most basic needs on a global basis, I think it’s fair to say that it is insensitive and ignorant if we dismiss their plight.
  • And finally, on a slightly unrelated but also very important note, although this oil is everywhere, any small step to try and reduce its usage would benefit our planet and its inhabitants many years into the future.

I was actually thinking about these points while baking the bars (don’t worry there’s a recipe at the end of all this), and now that I’m reflecting upon them I’m once again reminded of how good of a meditation baking is. I’d love to know if anyone else experiences this sort of calm and peace while kneading dough or simply mixing things together in a bowl.

Processed with VSCO with f2 presetProcessed with VSCO with f2 preset

I haven’t been baking all that much lately because of stress and bouts of anxiety that crop up every now and then, which tend to prevent me from being at my productive best, but these tahini chocolate chip nut bars were some sort of magic the last weekend. I noticed my boyfriend’s pantry had a bounty of unused nuts so I thought it would be fun to play around with my usual tahini chocolate combination but this time with a sprinkling of various nuts. Now that I’m living in a house with him and many more people, it feels more justified to bake and share the goods and of course get feedback!

The sesame in tahini itself already screams wonderful earthy, nutty tones so I thought pairing it couldn’t turn out all that bad. After the first test I knew I hit a jackpot. The combination of everything together made for this chewy bar with a classically fudgy, chocolatey middle. The best part was receiving the positive reviews from three flatmates, which were thankfully in line with my own expectations. It’s been a while since I could bake and share what I made with people– I still get nervous letting my own family try my experiments let alone folk I only just met! So that of all things really warmed my heart. I had to try again the second time, and second time was the charm. Not the prettiest of desserts but simple and easy to eat. Nothing could be better.

IMG_4110Processed with VSCO with f2 preset

One last note: you can opt to swap the milk chocolate for dark if you want, I just personally prefer a sweeter chocolate for a more delicate opposition to all the earthiness and nuttiness going on.

Tahini chocolate chip nut bars

Ingredients

170g flour (gf sub: use 160g of gluten-free flour mix, or more ground almonds)

½ tsp baking powder

50g ground almonds

3 tbsp chopped pine nuts

150g milk chocolate (vegan sub: vegan milk or dark chocolate)

80g butter, melted (vegan sub: vegan butter or margarine)

½ tsp salt

100g white sugar

75g brown sugar

1 egg (vegan sub: use a flax egg- mix 1 heaped tbsp of ground flaxseed with 2 tbsp water in a small bowl and let that gel to thicken up for a couple of minutes before using)

85g tahini

1 tbsp course salt (e.g. Maldon) for sprinkling


Directions

Preheat your oven to 180C (350F) and line a square 9×9-inch baking pan with parchment paper or aluminium foil. Alternatively, you can also use a loaf tin and bake just half the batter first if you want to test a smaller batch.

Melt the butter in a microwave-safe bowl in a microwave on a high power for 30 seconds, and set that aside to cool for a few minutes before using. In a medium bowl, whisk together the flour, baking powder, ground almonds, chopped pine nuts and milk chocolate. In a separate and slightly larger bowl, mix together the melted butter, ½ tsp salt, sugars, egg and tahini. Add the dry mix to the wet one and mix until everything comes together- the mix should look pretty thick and rather doughy. Scrape the mix into the prepared tin, use your hands to press the batter into an even layer in the tin, and bake in the preheated oven for 12-14 minutes. When 12 minutes is up, use a wooden skewer to poke the middle of the pan. If it comes out with moist crumbs, take it out and leave to cool on a cooling rack for 10 minutes or so. If it comes out clearly wet with batter, leave it in the oven to bake a little longer for a couple of minutes. Once the bars are done baking, leave to cool completely on a wire rack or heatproof surface, sprinkle with coarse salt and cut into bars however big you want after at least 10 minutes of cooling. Enjoy with ice cream or simply on their own.

Classic Cinnamon Rolls


Processed with VSCO with f2 preset
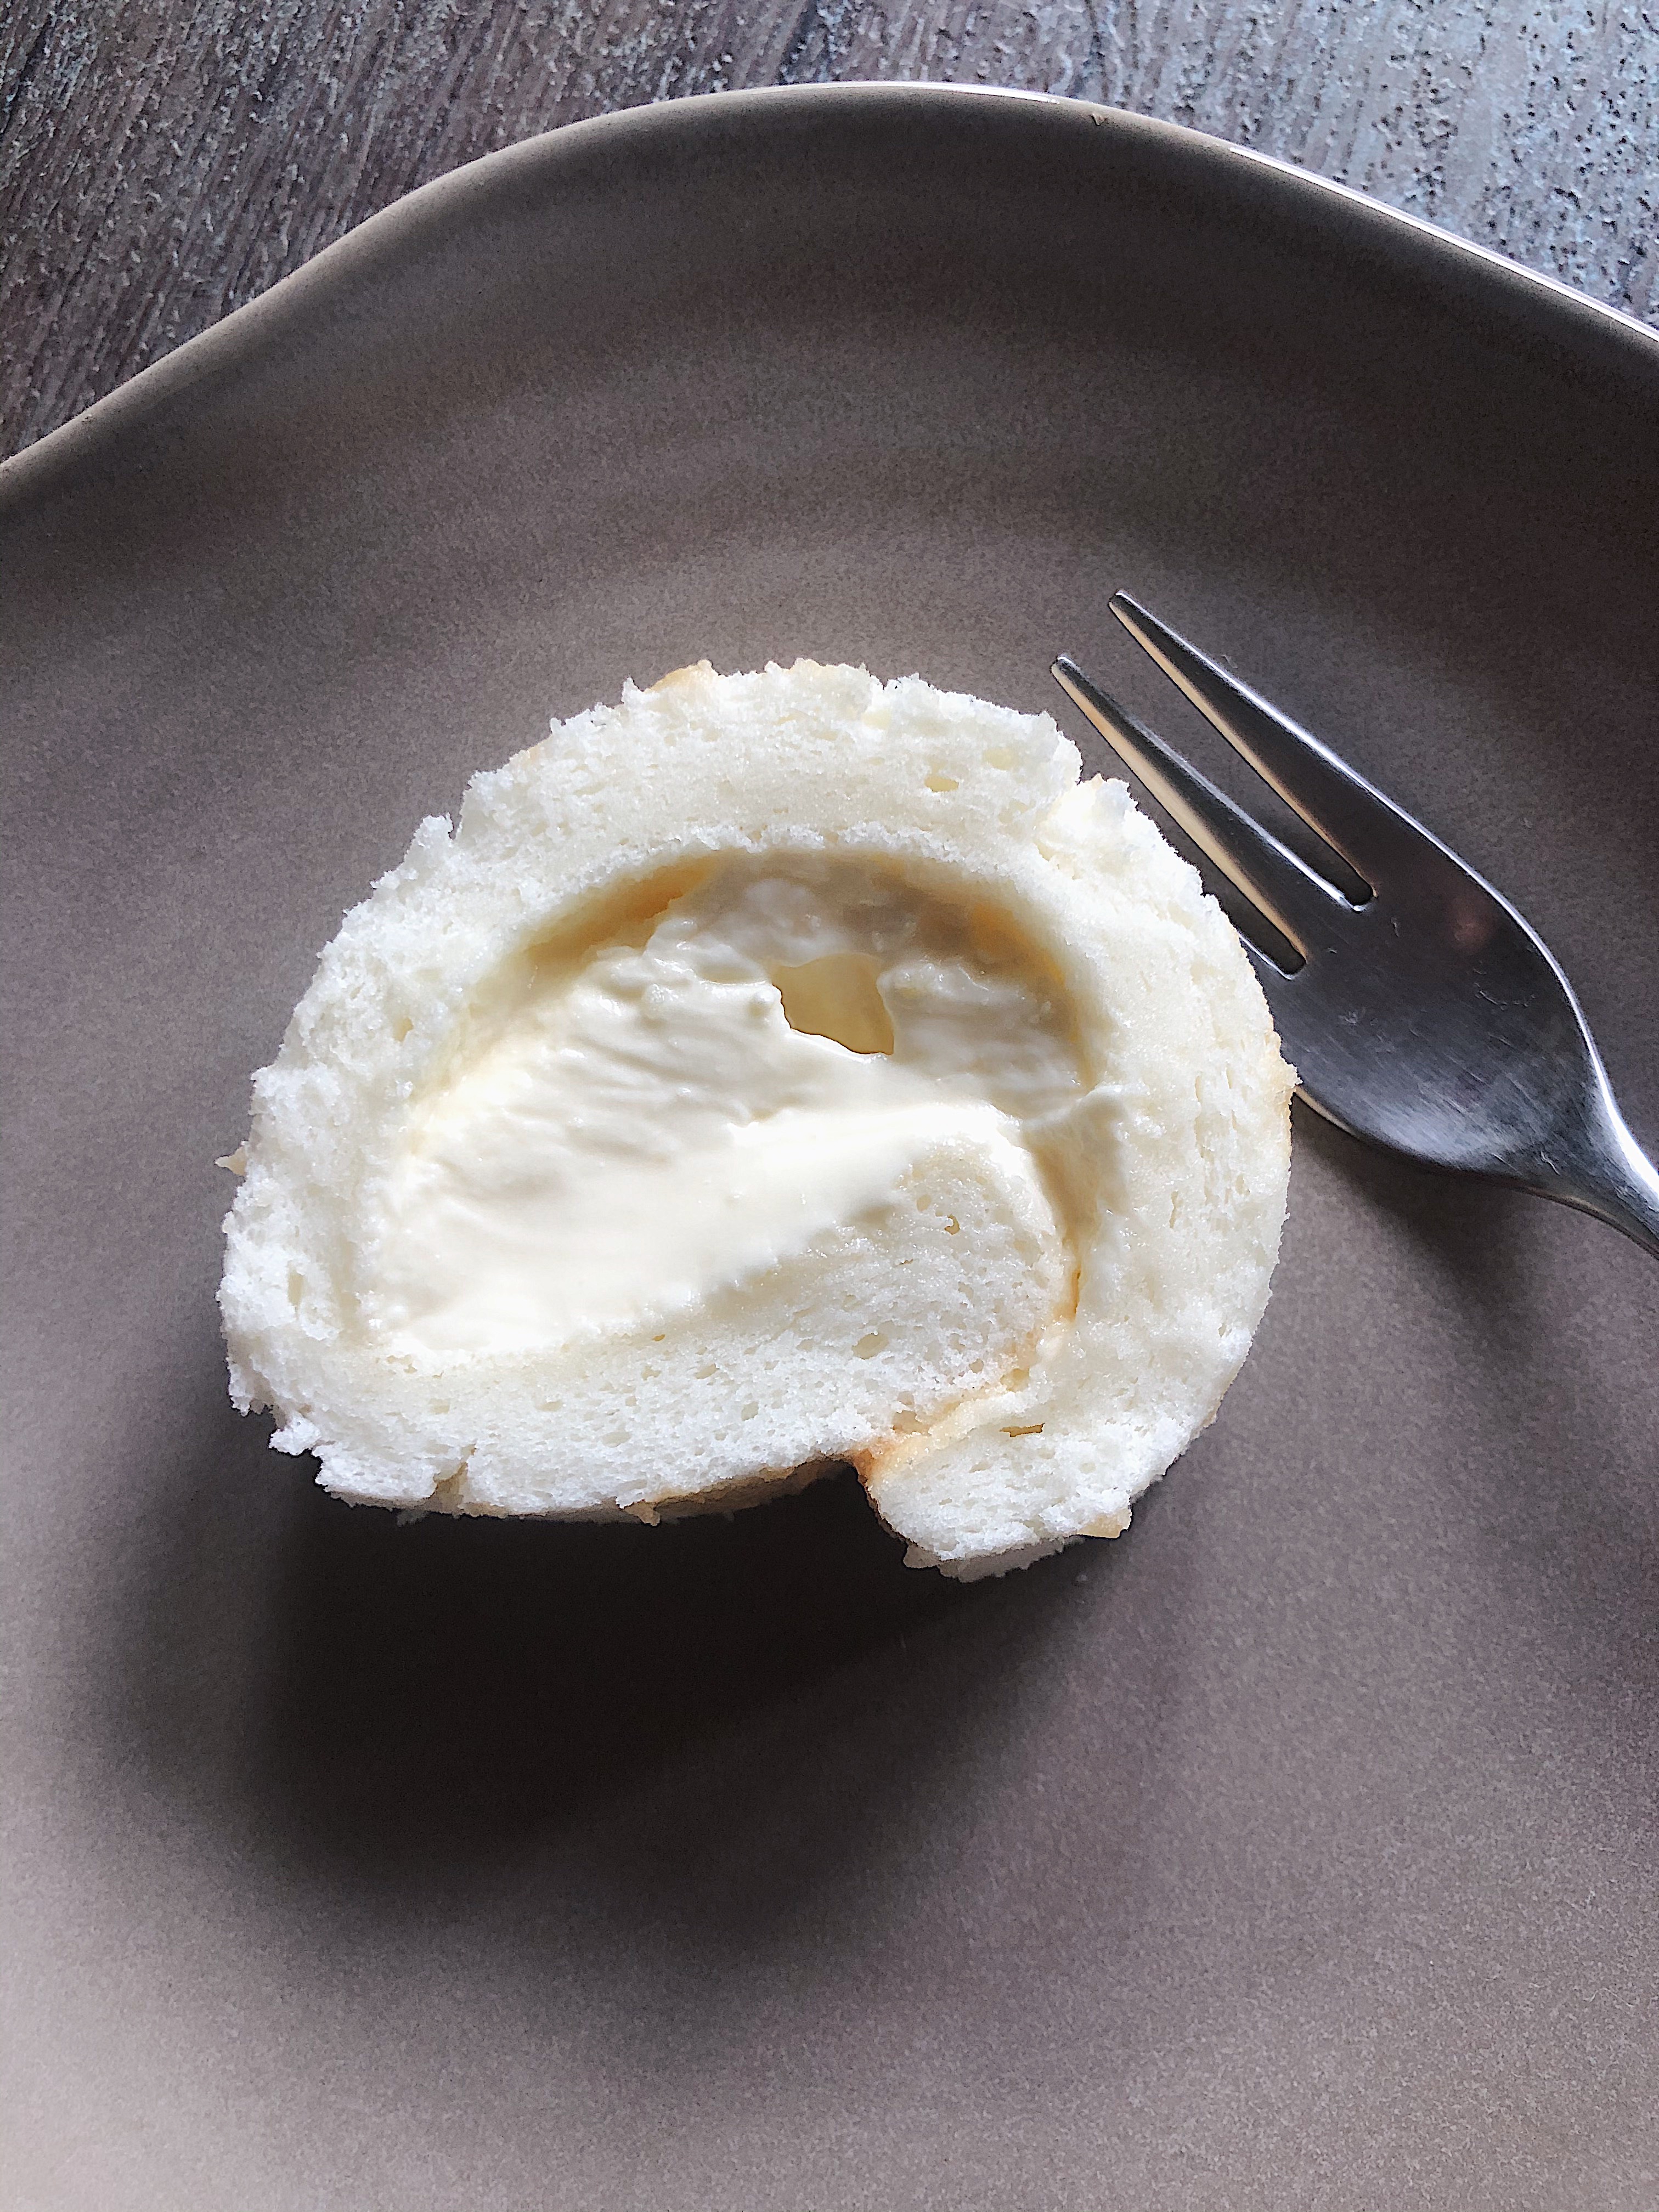
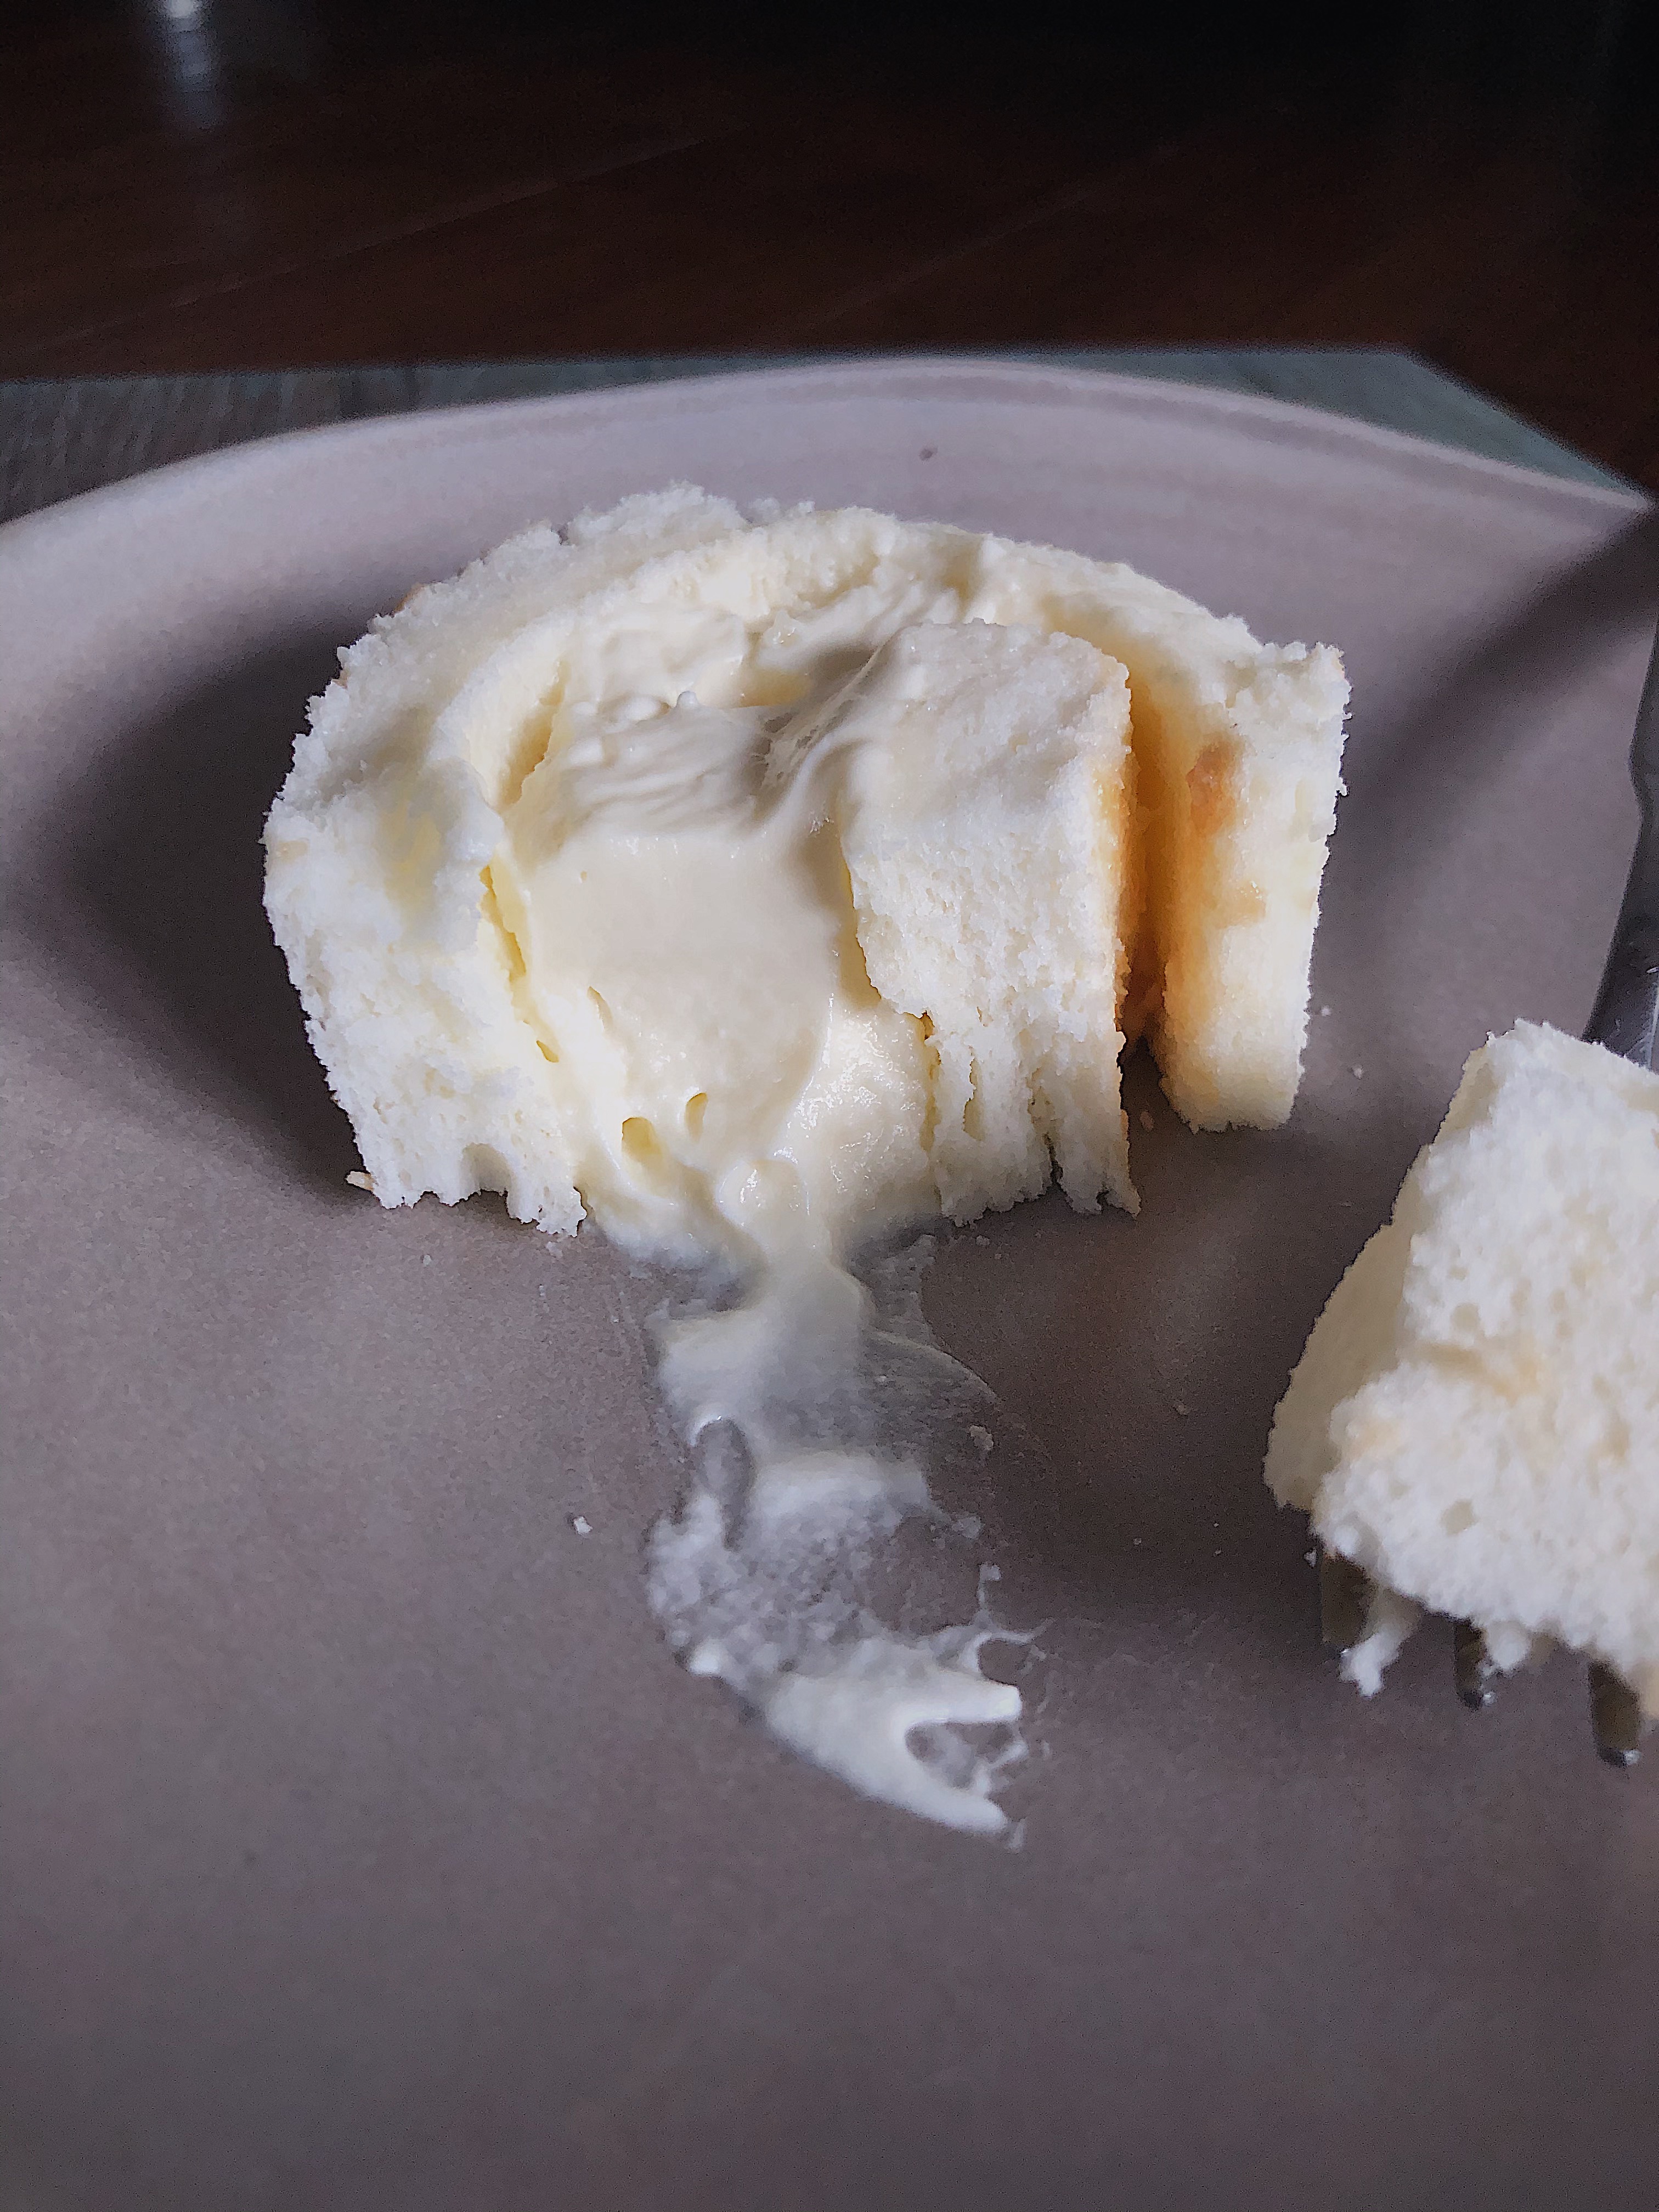
Lately I’ve found it hard to wrap my head around the concept of balance and moderation, realising that I’m pretty wired to think about everything in black and white. I either have a totally intellectually fulfilling day or I don’t. I either eat extremely healthy one day or I don’t. Clearly balance is something I’m still trying to conquer as a habit, as elementary as that may sound. Translating this lack of moderation to my creative endeavours, sometimes I’m so focussed on creating something new and exciting that I forget the roots of my baking pleasure– classic favourites. I get a high from riding on this streak of new things that I forget the magic of a simple classic. I’ve been putting this particular recipe off for a while. Cinnamon rolls are a tried and true classic and I don’t know anyone who doesn’t enjoy a bite of these gooey, cinnamony treats. I made these the first time almost 5 years ago using a random online recipe and loved them best with a cream cheese frosting. Aside from cinnamon rolls, I’ve enjoyed and made a few things that I’ve really enjoyed the past few weeks:

Processed with VSCO with f2 preset
Rye strawberry balsamic brownies from Woodlands Sourdough

Processed with VSCO with f2 preset Processed with VSCO with f2 preset
Smoky cruffin from Maxi bakery by Bearded Bella

Processed with VSCO with f2 preset Processed with VSCO with f2 preset
A naked salted caramel cake for my mum’s 50th! 

Processed with VSCO with f2 preset

Back to rolls. I know the classic version doesn’t have the (Americanised) cream cheese frosting, but I must say that this is the version I prefer. The tangy cream cheese pairs perfectly with the sweet bun, which can get too cloying if not cut through with something a little sharper. I recently tried making them again. Although the buns themselves were heavenly- all airy and light, it was missing the element of moist tenderness which I believe a good cinnamon bun should have. So I modified it to have a shorter baking time and, as most good baking recipes have it, more butter. Quite a bit more. It’s also a good idea to cover the rolls before baking with a layer of aluminium foil so that the tops of the rolls do not burn from the direct oven heat. You get these golden-brown, soft, delicious cinnamon rolls with very little effort. You don’t need a standing mixer to make them but it made my life a hell of a lot easier (and cleaner)! You can also just use some elbow grease and knead these for a little longer, just 10 minutes. It’s a good workout, at least.

IMG_2739Processed with VSCO with f2 preset

Classic Cinnamon Rolls (makes 8-9 rolls)

Ingredients

For the dough:

240ml (1 cup) milk

2 tsp active dry yeast

4 tbsp white sugar

1 egg

60g (0.25 cup) salted butter, melted

0.5 tsp salt

250g (2 cups) cake flour

200g (1.5 cups + 3 tbsp) all-purpose flour


For the filling:

2 tbsp ground cinnamon

150g (0.75 cup) dark brown sugar

60g (1/4 cup) unsalted butter, at room temperature


For the cream cheese frosting:

150g cream cheese

0.5 tsp vanilla extract (or vanilla bean paste for a richer vanilla flavour)

150g white sugar


Directions

Pour the milk into a microwave-safe bowl and microwave on high for 2 mins. It should feel warm but not scalding to the touch. If it’s very hot then wait a minute for it to cool down a little. Add the yeast and wait for it to activate, or around 3 minutes. It should have a light brown froth on top. It is ready when there’s a light brown froth on top. Pour this yeast-milk mixture into the bowl of your standing mixer (or just a large bowl if you’re doing this by hand) and add the sugar, egg, salt and melted butter. Whisk together. Then add the two flours and on medium speed, let the standing mixer knead the mixture well for 6-7 minutes. If doing this by hand, knead the mixture a little bit in the bowl first to let all the ingredients come together, before tipping it onto a well-floured surface and knead for 10 minutes. If the dough is too sticky or is sticking to the bottom of the mixing bowl, add more flour. Add enough flour so that you have a pliable and slightly sticky but not too sticky consistency. Shape the dough into a rough ball, place it back into the bowl and let it rise for at least an hour with a damp cloth, to keep the dough moist while the yeast does its work to expand it.

Right before this hour is up, mix together the room temperature butter, brown sugar and ground cinnamon in a small bowl. Once the dough has risen (an hour later), tip the dough out onto a floured surface and use a rolling pin to gently roll it out into a 9×14-inch (22x35cm) rectangular piece of dough. Use a spatula to smear the brown sugar-cinnamon mixture onto the flattened dough, leaving a half inch border around the edges. It may initially seem like a lot but it really is just enough!

Tightly roll the rectangle lengthwise and place the log so that the edge is at the bottom. Use a serrated knife or piece of floss to cut the rolls into 1-inch pieces. You may have to cut off the two edges first as they don’t have much filling. Place the rolls in a greased 9-inch round or square baking pan, cover these and leave them to rise for half an hour. Preheat your oven to 180C (350F) in the meantime. Once the half hour is up, cover the rolls with a piece of aluminium foil and place them in the oven to bake for 16 minutes. While they are baking, make the frosting by mixing the cream cheese with sugar.

Once the rolls are finished, leave them to cool for 10 minutes before smearing a generous amount of cream cheese frosting onto each roll. These are best served the same day they are made, warm and fresh. They can also be kept in an airtight container for up to 3 days, but microwave before serving to make sure they are warm and the insides stay gooey.

Milk and Cream Cheese Roll

Processed with VSCO with f2 presetAnother week coming to a close, another surreal reality coming into focus, continuously playing.

Random things/journal excerpts:

07/05: This has been a foundation of salve and is keeping me sane throughout all the hours of each day and each night. Grateful.

08/05: Stop half-assing things. Full-ass everything. And remember there’s a whole world out there for me (and you) to discover.  Also, drew up a relatively simple Mother’s Day menu of tomato bruschetta, mini avocado toasts, banana-egg pancakes, vegetarian frittata…!

11/05: I have a Pinterest board now for French fashion and pretty interiors and it is making me so very calm and happy. For many years I’ve forgotten how much I love old, moody things. When I was a teen my own Instagram account started out as a more aesthetic page; the food existed as an aesthetic branch too but the reining theme was still wispy, old, pretty things. The delicate heel of a suede ankle boot, my favourite red lipstick smeared on a tissue paper, an elegant striped tee, an unusual floor tile, a messy strand of pasta on the edge of my plate. Coming back to that is very nostalgic in the best possible way.

And now for this sublime thing!

Processed with VSCO with m3 presetProcessed with VSCO with b5 presetProcessed with VSCO with f2 preset

Words can’t express how stunned I was by how light and fluffy this roll turned out. I got inspiration from a Youtube video and ended up changing most of its recipe so I thought I could make a blogpost out of this little experiment. A weightless sponge just about holding onto a whipped cream cheese filling. I have not played with a gluten-free version of this but that would be fun to experiment with, if you have a gluten-free flour blend or something like almond flour on hand.

It was so satisfying to make the sponge, like handling a bouncy cloud from a faraway dream. I can’t believe this is a sponge, I kept saying to myself as I spread the air-light batter onto the baking tin. The first time I made this there was too much cream cheese, which ended up weighing down the sponge and cracking it far too early. Tasted delicious but wasn’t as pretty. So if you’re not too bothered by that then feel free to add a little more cream cheese to the filling mixture.

Processed with VSCO with f2 presetProcessed with VSCO with f2 presetProcessed with VSCO with f2 preset

Milk and Cream Cheese Roll (makes one roll, serves 6-7)

Ingredients

For the sponge:

30g (2 tbsp) room temperature butter/melted butter (or flavourless oil)

1 tbsp condensed milk (tried this with ‘sweetened creamer’ too and it worked fine, so use that if you have that instead)

60ml (1/4 cup) milk of your choice

0.5 tsp salt

5 egg whites (vegan sub: use the equivalent in aquafaba, or the liquid from 1 can of chickpease. If using normal eggs, save the yolks for a soufflé pancake, devilled eggs or mayonnaise)

1/2 tsp cream of tartar

75g (3/4 cup) white sugar

60g (1/2 cup) cake flour

2 tsp milk powder (sub: vegan milk powder)

2 tsp cornstarch


For the filling:

100g (half a standard package) cream cheese (vegan sub: vegan cream cheese)

150ml whipping cream/double cream (vegan whipped or whipping cream)

2 tbsp sugar


Directions

Preheat your oven to 160C (320F). Line a standard baking tin/cookie tray with parchment paper. With a small whisk, whisk together the condensed milk, milk and butter in a microwave-safe bowl and microwave this for 30 seconds. In a separate bowl, briefly whisk together the cake flour, milk powder and cornstarch. Tip this into the wet mix and whisk well. Whisk in the salt. You should have a thick, beige batter that drops off relatively easily off the whisk. In a large, clean bowl, tip in your egg whites and cream of tartar. If using the aquafaba, it will take longer to whip up, around 5 minutes.

Whip the egg whites using an electrical whisk for a minute until frothy. Add half of the sugar and continue whipping until you get soft peaks that easily drop off the whisk. Add the rest of the sugar and continue whipping until you get relatively stiff peaks. Take 2 tbsp of this whipped egg white and add it to your first mixture of milk, condensed milk and butter. Mix this together well with a whisk or spatula until smooth and homogenous. Add this to the rest of the whipped egg whites/ aquafaba and fold until everything is just incorporated. Tip this glorious, whipped mixture onto the baking tin, spread into an even layer and bake in the preheated oven for 12 minutes.

While that’s baking, make the filling by whipping the whipping cream and 2 tbsp sugar  in a separate clean bowl until stiff. Tip in the cream cheese and fold it in well. Leave the mixture in the fridge until ready to use. Once the sponge is done, it will look slightly brown on top. Take it out and leave it to cool for 5 minutes on a cooling tray or heatproof mat, but not too long otherwise the sponge will crack when you roll it. Cut a piece of parchment paper that’s slighter larger than your cake and put it on top of the sponge. After 5 minutes, flip the sponge using the tray as a support. Remove the tray and peel off the layer of parchment that was originally underneath. Add the whipped cream cheese filling to the centre of the sponge and gently spread it evenly over the sponge. Using the parchment as a support, gently and slowly roll the sponge onto the filling. It should be a single, neat roll. Leave to cool in the fridge before cutting into 6-7 rolls with a serrated knife. Best enjoyed with coffee and a dainty fork because you need dainty cutlery for soft, fairylike, dainty desserts like this.