Kaya Mochi

A few of you have asked me previously about my diet, and why I blog about breakfast and dessert specifically. I must say, I have recently made a minor, albeit profound change. To sum it up, I adopt a mostly plant-based, whole foods diet. The main reasons for this are:

Eating Animals

Forks over Knives

The China Study

Why the deprivation? Meat tastes the best!! I modified my About and FAQ’ page to cover a few points, but the above links are what induced a fixated curiosity on our warped nutritional conventions in the 21st century. So go ahead, click click click. On all the links.

Despite everything I say on adopting this diet, part of me feels a little sad because I do still eat a little meat, rendering my conviction less extreme, less concrete. It’s cultural convention to eat meat prepared for you, say, by your genius cook of a grandmother. This is why I still eat meat, albeit much less, replacing most of it with more starch and vegetables. And you know what? I haven’t felt better. Since the difficulty is justified, for reasons both ethical and environmental, ‘plant-based’ no longer carries the weight of ‘deprivation’ anymore. It really doesn’t. And I’ve finally come to realise that this is the right thing to do. If any of you have a similar experience with this, I’d love for you to share.

The second bit on why I choose to blog about breakfast and dessert specifically is also in the FAQ. I mean, my sweet tooth obviously deserves a bit of criticism. So check out the page for all that jazz as well.

Ok. Let’s talk about mochi!

Actually, I don’t know why that elicited an exclamation, because truth be told, I never was the biggest fan of mochi. I honestly just felt like trying something a little different. Increased exposure and this experiment indeed reversed my dislike.

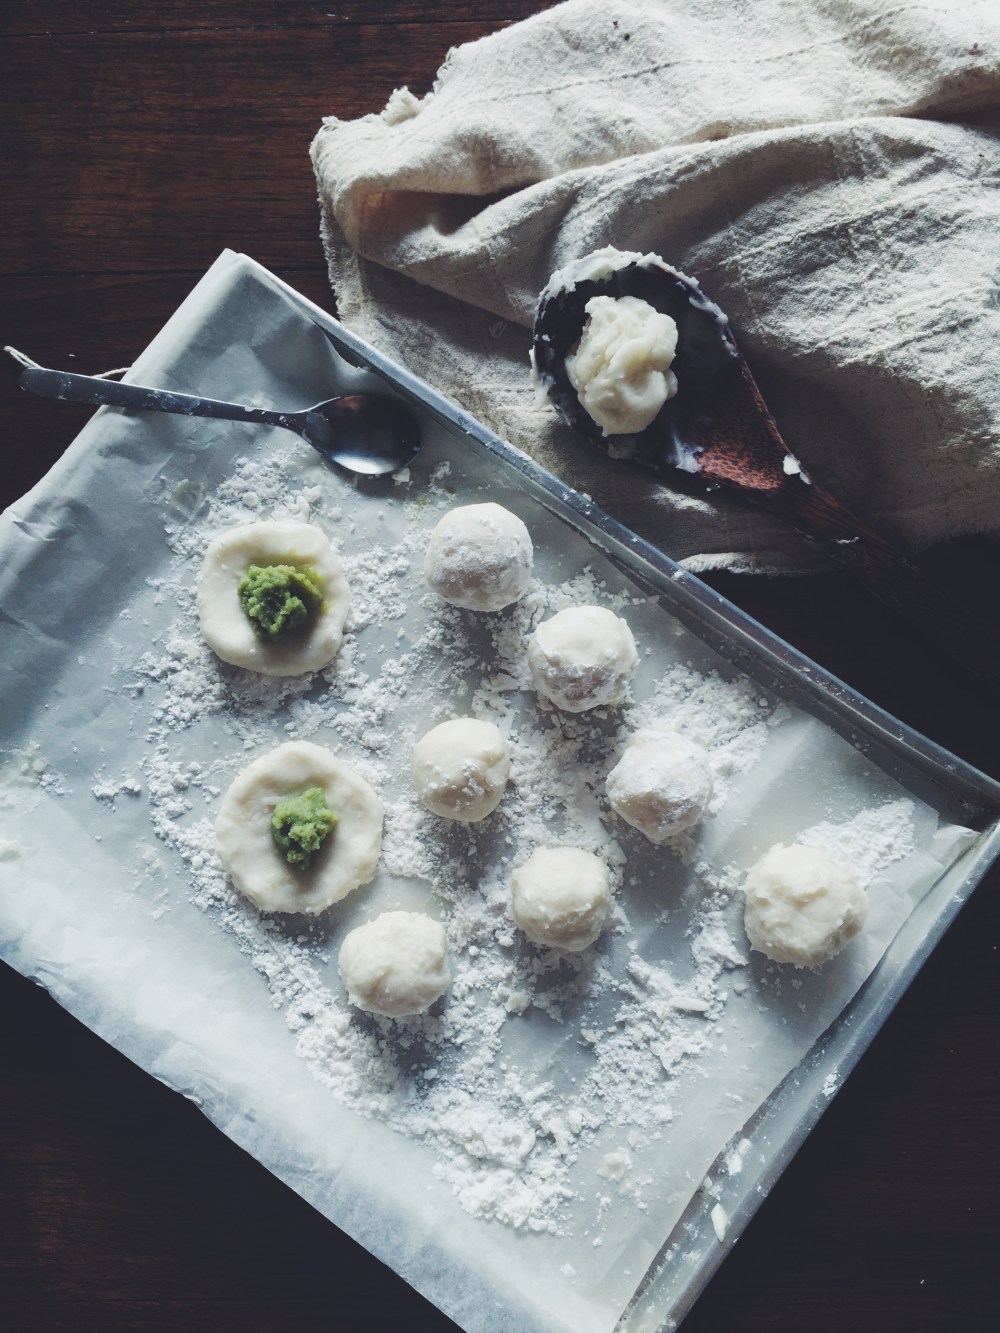
Mochi is a delicate Japanese dessert, its name being derived from the type of flour used to make it– mochiko (rice) flour. Plus points for anyone who would potentially benefit: rice flour is gluten-free, with a substantial amount of niacin and B6. Amazing how it still yields such a chewy texture after being combined with the other ingredients. Typically stuffed with this divine, sticky red bean paste, but I changed it up just a little, deciding instead to fill it with homemade kaya (pandan spread). Weaved nostalgic taste into a minor innovative tweak. Each bite was sticky, slightly chewy, and bursting with the earthy, coconutty goodness of kaya.

Processed with VSCO with f2 presetProcessed with VSCO with f2 presetProcessed with VSCO with f2 preset

Kaya Mochi (makes around 10 depending on how big you like them, mochi dough recipe)

Ingredients

160g mochiko (rice) flour

180g icing sugar

300ml (1.25 cups) water

cornstarch for dusting

8-12 tsp kaya

Directions

Ready a large bowl full of cornstarch for dusting your hands and the mochi.

In a saucepan, whisk together the flour and water. Turn the stove heat to medium, add the sugar, and use a wooden spoon to continue stirring. Cook the mixture until it starts to look almost gelatinous, around 7-10 minutes. You will see the mixture thicken, and look slightly glassy on top. Leave to cool for another 10 minutes before touching and fiddling. Dust your hands with cornstarch, then scoop a bit of the mixture with a teaspoon. This bit onwards is a slightly sticky ride, but it’ll be worth it! Roll between your palms until you get a smooth, white ball. Use your fingers to flatten it a little, and place a tiny dollop of kaya in the middle. Gently pull the sides over the ball, and gently roll the mochi again to get an even sphere.

Dust with a mix of cornstarch and icing sugar before eating. Store in the refrigerator for up to a couple of days.

Date Custard Tart with a Pistachio Crust

Processed with VSCO with f2 preset

In spite of all the pre-planning in the world, my usual baking endeavours still entail some degree of dilly-dallying beforehand. Well, not this time. I was standing in the kitchen, and knew I wanted a tart. A good tart with a finely baked crisp crust, and some sort of fudgy, gooey middle. Something with depth and exuberance and sin all round.

Put simply: I’ve been sooo into dates recently. Nothing really beats a huge, gooey medjool date. Peel one open and you get an untidy split down the middle, unveiling a thin seed and bountiful, sweet, sticky flesh. Yum. So… Date, custard, pistachios? A combination you would perhaps find in a specialty baking store, and a combination I almost haphazardly threw together. A combination that works.

Processed with VSCO with f2 presetProcessed with VSCO with f2 presetProcessed with VSCO with f2 preset

Little Maddie was all too keen on having her nose pressed up against the side of the tart shell. I look at her differently now, especially after finishing Eating Animals by Foer. I personally hold many strong views on meat-eating now, but that’s a whole other story that deserves its own section or post.

The crust itself is made of just a few things, and is completely eggless– roasted pistachios, flour, butter, sugar and salt. Et Voila. All you really need is a food processor, otherwise you could really just buy ground pistachios and mix the rest in by hand. And the custard? Another story of ease.

Processed with VSCO with f2 presetProcessed with VSCO with f2 presetProcessed with VSCO with f2 presetProcessed with VSCO with f2 preset

Dates smushed in the middle of a dense custard, offering perfect contrast to the hard exterior. The crust is buttery and flaky, holding little resistance to any give, thanks to the lack of eggs. What I like is that you can eat this tart alone hot or cold, or with ice cream/ cold whipped cream. I had a thin slice straight out the oven with a scoop of plain vanilla ice cream, which was absolute heaven. The next day, I tried it cold as I put the remains in the fridge, and that was equally sublime. The custard was more set, but if you prefer it a little more warm and watery, all you have to do is microwave it for a couple of minutes.

Processed with VSCO with f2 presetProcessed with VSCO with f2 presetProcessed with VSCO with f2 presetProcessed with VSCO with f2 preset

Date Custard Tart with a Pistachio Crust (makes 2 9-inch round tarts, or one 9-inch round and one 4×11-inch rectangular, adapted from here)


Ingredients:

For the crust:

290g (around 10oz or 2 cups) roasted, de-shelled pistachios (salted/unsalted)

260g (2 cups) plain flour

225g (1 cup) white sugar

pinch salt (not needed if you’re using salted pistachios)

250g (2 sticks+13g) unsalted butter, at room temperature


For the filling:

9 medjool dates

300ml heavy cream

1 tbsp vanilla bean paste, or 2 tsp vanilla extract

2 heaping tbsp greek yoghurt (can substitute with more heavy cream or sour cream)

4 egg yolks

3 tbsp sugar


Directions:

In a food processor, grind your pistachios until you get a coarse meal. Chuck in the flour, sugar and salt, and pulse until everything is well incorporated. Tip the mixture into a large bowl and whisk (or mix with a wooden spoon) everything, making sure the pistachio meal is evenly distributed in the dry mix. Add the softened butter, get your hands in and mix everything together. This shouldn’t take too long. The dough will be easy to break apart, yet dense and moist. Put the bowl containing the dough into the fridge for 20 minutes. Preheat your oven to 180C (350F).

After 20 minutes, take the dough out and ready your tart tins. Greasing isn’t necessary because all the butter in the dough does just the job, but if your tart molds are old and not very trustworthy, then go ahead and give them a light greasing. Break your dough in half (or store half in the freezer if you’re just making one tart) and press into your tart mold, making sure to have a thick enough layer on the bottom and sides. Bake the tart for 15 minutes.

While the crust is baking, make the filling. Whisk together the egg yolks and sugar for 5 minutes straight, or until visibly light, runny and fluffy. Whisk in the cream, yoghurt and vanilla. Once the tart crust is half-baked, remove from the oven and press in you (de-seeded) dates as shown in the picture above. The heat of the oven will soften them even more, making the insides even gooier, if such a word could exist. Pour the custard on your tart(s), then put back carefully in the oven and bake for another 10-12 minutes. Check the tart at 10 minutes– the top might have some soft brown, caramelised patches. The tart should still hold a little wobble when nudged at the side.

Remove from the oven and set on a heatproof mat or stand to let cool for a while before cutting. Eat hot with ice cream, or store in the fridge for a while, before tucking into it cold.

Oatmeal Date Pancakes

Processed with VSCO with f2 preset

Straight up, no fuss.

Post-flight mornings warrant simplicity. Being back in Singapore is still very surreal– everything still feels the same, yet somehow different. Anyways. 13-hour flights typically leave me feeling a little bloated, distended, out of sorts. So all I want to come home to is my morning ritual comprising the papers, iced coffee, and a standard bowl of my favourite banana-based oatmeal. Yet somehow this morning I opted out of this bowl ritual in favour of something more texturally interesting. I craved that same fluffy texture, but it needed a robust edge. Heck, just something with edges. It needed fork and knife action.

Processed with VSCO with f2 presetProcessed with VSCO with f2 preset

Was intrigued by why I favour oatmeal over other breakfast foods some days, or just when I’m especially hungry in the morning. It’s well known that the stuff keeps you feeling fuller for longer, but it’s only recently that I discovered that it has to do with a particular fluid property: viscosity. It’s the viscosity of oatmeal, that sticky, runny texture it has like glycocalyx on epithelial cells, that provides the feeling of satiety. Specifically, it’s the degree of initial viscosity in the mouth and subsequent viscosity in the GI tract that influences the release of appetite hormones. A high initial and subsequent viscosity, apparently best provided with instant oatmeal, will prolong fullness. My current favourite oatmeal is this one. It’s incredibly voluminous, nutritious and chock full of texture.

It’s all almost a bit silly. A good silly. Why would you straight up fry a perfectly good bowl of oatmeal? Oh, the wonders of a little pan action. The frying provides a crisp outside, while the inside remains fluffy and a little chewy, depending on how you cook the oats in the first place. The torn up bits of dates provide a good deal of goo and sweetness in each little pancake. These oatmeal pancakes are the halfway mark for proper versions of either oatmeal or pancakes, and I’m ok with that sometimes.

Processed with VSCO with f2 preset Processed with VSCO with f2 preset

Oatmeal Date pancakes (serves 1; makes 4-5 mini pancakes)

Directions

Make one serving of your favourite porridge or old-fashioned oatmeal: In a bowl, mash up half a banana, then add 45-50g (around a half cup) of porridge or old-fashioned oats, half a cup of milk of choice (I adore almond), and half a cup of water. Alternatively, you could use either just milk or water for the liquid bit. Preheat a pan on medium heat and ready some butter. Cook the mixture over the stove or in a microwave until you get the consistency you like. I like to microwave mine for 2 minutes, let stand for 30 seconds, then microwave again for another minute to achieve the perfect, just-under-thick consistency. Take out your oatmeal and stir in a pinch of cinnamon, salt, and brown sugar.

Once cooked, add a knob of butter to the hot pan and let sizzle. The butter should not brown or burn, indicating the right temperature. Ladle spoonfuls of oatmeal onto the pan and use the back of the spoon to flatten into a circle if it’s on the thicker side (as I like mine). Add the bits of date (optional) to the surface of the batter. Let cook for 2 minutes, then slide a spatula underneath to see if it’s done. Flip and let the second side cook for 1 1/2 minutes. Remove using the spatula and let cool on a paper towel while you cook the rest.

Serve as a stack, topped with peanut butter, more date bits, and maple syrup. I added some homemade raspberry chia jam for some tangy oomph.


Salted Honey Espresso Baked Doughnuts

Processed with VSCO with f2 preset

A doughnut embodies whimsicality, but sometimes it just seems like all the dovetailing attempts have been done through and through. As I type, my mind is bathed in a blur of facts and complicated scientific concepts in preparation for the upcoming finals, like little entangled confused tendrils. However, this idea of whimsicality pulled me through a short while, sparked by an unanticipated café encounter. Being in the kitchen getting my hands dirty is more therapeutic than anything; I never saw it as something I feel obliged to do for the sake of this blog’s up keeping. Such breaks seem to serve as mind-remodelling moments, themselves acting as platforms upon which motivation is furthered and concentration enhanced. That being said, it will probably be a while before my next post, because the library beckons far too often nowadays.

Ah right, that unanticipated encounter. The other day I was at one of the most popular coffee hits around Covent Garden with a good friend, and was particularly inspired by a bucket of Joe and Seph’s posh caramel and espresso popcorn. Enamoured me so much so that I just had to buy a bucket of the stuff.

Processed with VSCO with f2 preset

Well the whole baking attempt ended with me sprinkling chopped up bits of popcorn on top (alongside whole ones right into my mouth, of course), which is an optional addition. I simply did so whilst reminiscing the root of this flavour combination. The sugary hit of caramel and espresso reeled me in, and I wanted to recreate that sweet-bitter juxtaposition in this doughnut recipe.

It’s simple and takes just 15 minutes to bake, and who doesn’t adore that? I’ll never get tired of these simple and crazy quick recipes. I’ll just let the pictures do most of the talking.

Soft and fluffy, espresso and honey-infused baked doughnuts, topped with a honey glaze and coarse salt

Processed with VSCO with f2 presetProcessed with VSCO with f2 presetProcessed with VSCO with f2 presetProcessed with VSCO with f2 presetProcessed with VSCO with f2 preset

Coarse salt doesn’t adulterate the final texture, serving only to enhance the sweetness and soft bite of just-baked dough. The idea of the cake doughnut doesn’t get old to me, because ease of make aside, there are just too many possibilities, and you can top them with anything, and can’t go wrong.

Processed with VSCO with f2 presetProcessed with VSCO with f2 preset

Salted honey espresso baked doughnuts with a salted honey glaze (makes 6 mini doughnuts)

Ingredients

For the doughnuts:

145g (1 cup + 3-4 tbsp) self-raising flour, or use all-purpose flour and add 1/2 tsp of baking powder and 1/4 tsp baking soda

pinch salt

2 tbsp cocoa powder

1/2 tsp cinnamon

50g (1/4 cup) white sugar

30g (2 heaped tbsp) melted butter

60ml espresso (1/4 cup) –instant powder permitted, but straight from the bean is your best shot

1 egg

60ml (1/4 cup) milk

2 tbsp runny honey


For the glaze:

1 tbsp honey

1 tsp cocoa powder

85g icing sugar

pinch salt

coarse salt for sprinkling

3-5 tbsp milk


Directions

Preheat your oven to 177C (350F) and butter a 6-doughnut pan. In a large bowl, sift together all the dry ingredients– flour and necessary leavening agents, sugar, cinnamon, cocoa powder and salt.

In a separate, smaller bowl, whisk together the melted butter (that’s been left to cool a while, so you don’t end up cooking the egg!), egg, espresso, milk and honey, until everything is nicely incorporated. Pour the wet mix into the dry and mix until everything is just combined.

Bake the doughnuts for 12-15 minutes; test with a wooden skewer at 12 minutes. If it comes out clean, you’re good to go. While they’re baking, whisk together the icing ingredients with a fork. You should have a thick and runny, light brown-pink glaze.

Once the doughnuts are done, leave to cool in the pan for a while before removing. Dip the top in the glaze, then sprinkle with coarse salt. YUM GUYS.

Check out my other baked doughnut recipes!

Brown butter maple bacon doughnuts

Strawberry chocolate vanilla bean doughnuts

Maple syrup doughnuts (with glaze variations)

Hot cross cookie butter doughnuts

Spiced nutella-stuffed doughnuts


Double Banana Pillow Pancakes

Processed with VSCO with f2 preset Processed with VSCO with f2 preset

Pancakes are easy science. There’s really nothing more to them than mixing your wet with your dry, then plopping spoonfuls into a hot pan. You’re done in a few minutes, happier than the heavens with a drizzle of good maple and all the toppings your heart desires.

Fluffy pillow pancakes made with mashed banana, studded with soft banana coins. 

Your usual dose of weekend fluff, heavily inspired by these babes. I remember really enjoying the addition of mashed banana to the actual batter in this particular recipe, and it’s hard to imagine I made them that long ago. I wanted to recreate that pleasurable experience in a different light– something more straightforward but still just as moreish.

There’s a lot of fun in making a ‘double’ anything. Because that means 2 dimensions. It means depth, intensity. No space or time for something normal. I mean normal can be good, and tradition is bliss sometimes, but a little extra oomph is love and light, too. Adding the banana coins before flipping the pancakes cooks and softens them a little, remodelling your little stack into something with additional texture, a little hint of caramelisation perfusing each bite . Soft banana bits all cosied up in fluff.

Processed with VSCO with f2 presetProcessed with VSCO with f2 preset Processed with VSCO with f2 preset

Double Banana Pillow Pancakes (makes 12 medium pancakes)

Follow the recipe for my double chocolate banana pillow pancakes, but leave out the cocoa powder, and have a couple additional bananas on hand to slice into coins. Place 2-3 banana coins onto the batter after ladling the pancake batter into your pan, before flipping to cook the second side.

Highly recommended to eat this with greek yoghurt, chocolate shards, peanut butter, and plenty of maple syrup. This is your morning.