Orange Miso Buttermilk Bundt Cake

Processed with VSCO with f2 preset Processed with VSCO with f2 preset

A little twist never hurt anyone.

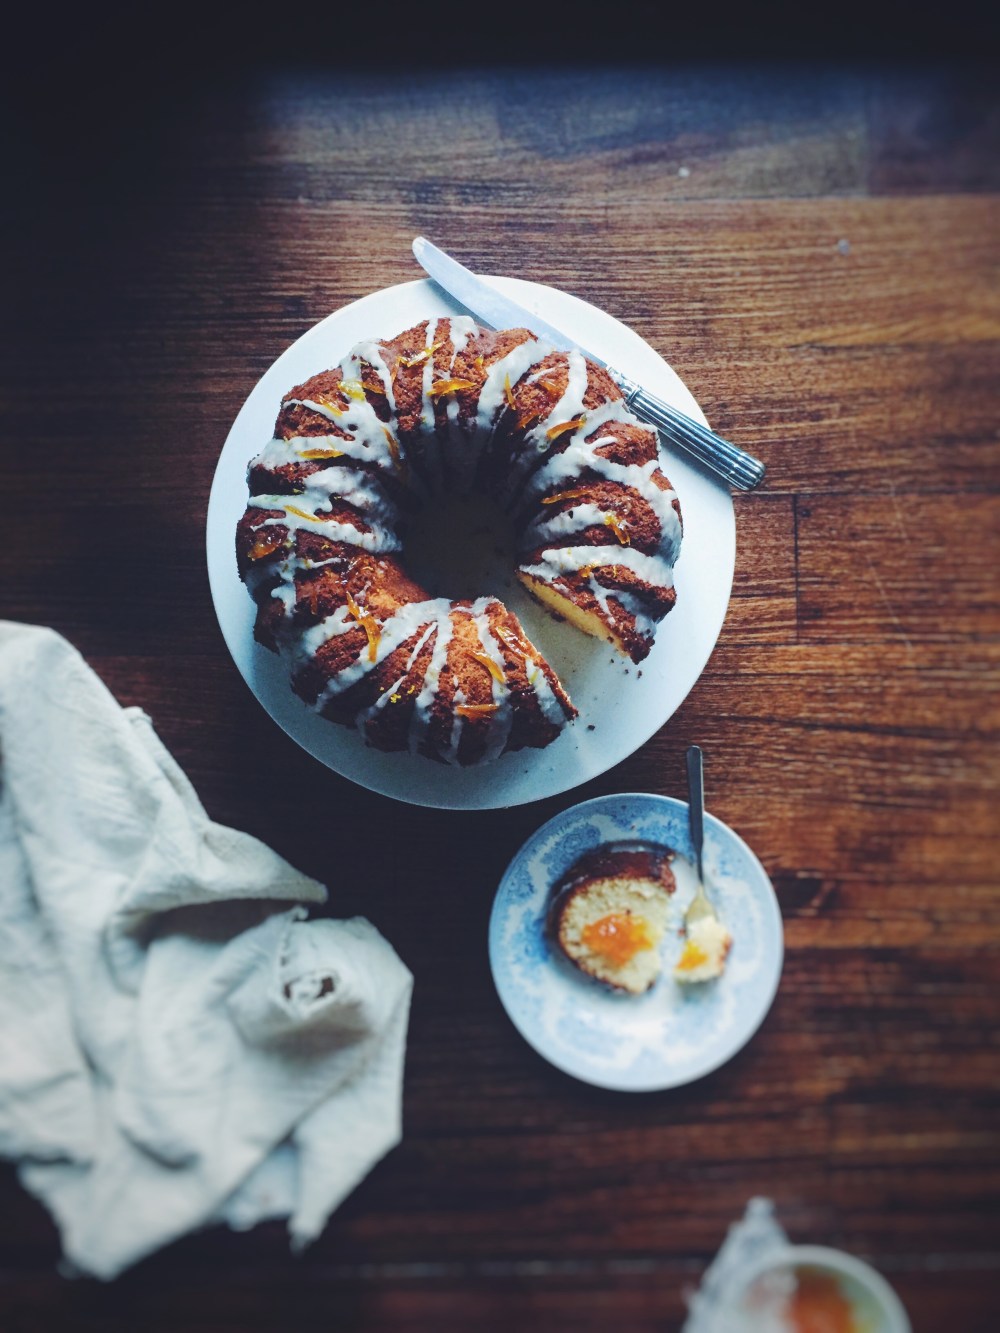
Here we have an orange miso buttermilk bundt cake, brushed with warm marmalade, tiger-striped with an orange miso buttermilk icing. Sunday respite indeed, friends. 

Processed with VSCO with f2 presetProcessed with VSCO with f2 preset

‘Miso? That’s weird. But cool.’

My hesitant sister picked at the top of the cake (which is actually the bottom) in wonder. I pinched a bit off myself and heaved a sigh of relief. At both the final crumb, and the flavours present. One would think pairing two tangy ingredients wouldn’t do much for either of the two star flavours here, but this couldn’t be further from the truth. . In each bite, you get the fragrant tang of orange, and the more sharply, savoury-dish-salty punch of miso. The ultimate hit of umami, only partially disguised by the sweet, light background of fluff. On a side note, I only recently discovered that miso is made by fermenting soybeans with salt and a peculiar-sounding fungus (Aspergillus oryzae). Soy has taken a backseat in my experimental repertoire, but it’s making a furious comeback, and one that I welcome, at that.

Processed with VSCO with f2 presetProcessed with VSCO with f2 preset

It’s more of a pound cake than anything. Dense yet fluffy, which I attribute to the cake flour used. I did debate using normal all-purpose flour, and you can go ahead and try substituting that for the cake flour here, but it does make all the difference in producing a fairytale crumb. The best bit, in my humble opinion, is the outer crust, which is both robust and partially caramelised. The crust sings strength, so much so that I needn’t have to bother with cutting the top, for the firm bottom meant it could rest flat on the cake stand without unduly collapsing. The rise from the oven did produce some cracks, air pushing through a firm golden canvas, but these only helped the penetration of marmalade when it was warmed through and brushed on post-bake. What I was most happy with was that glaze– of stronger miso flavour than the cake itself, adding a bite that would otherwise be too pronounced in just the cake. The marmalade glaze is optional, but it added to the citrus theme, and the slivers of rind looked a picture on top of the crumbs and brown.

Just now I sat down to a thin sliver of the stuff, and discovered the burst of savoury flavour enveloped in a smooth, sweet body of cake goes perfectly with a simple scoop of plain vanilla ice cream. Family helped mop it all up. Yesterday I made a cake, and it was simple, and so so good. Not much else (aside from a very well-written paper or book or walk) makes me just as happy and satisfied.

Processed with VSCO with f2 preset Processed with VSCO with f2 preset

Orange Miso Buttermilk Bundt Cake (makes one standard bundt cake)

Ingredients

For the cake:

226g (2 sticks) butter, at room temperature

330g (3 cups) cake flour

1 tbsp baking powder

1 tsp salt

2 heaping tbsp white miso

560g (2 1/2 cups) white caster sugar

4 eggs

zest+ juice of 1 orange, reserve 1 tsp orange juice for the icing later

1/4 cup marmalade (optional)

120ml buttermilk, homemade or store-bought (to make: add a tbsp of white vinegar to your measuring cup or beaker, then fill to the 120ml mark with milk, and let sit for 5 minutes to let the acidity work its magic)


For the icing:

135g icing sugar, sifted

1 tsp buttermilk

1 tsp orange juice (from the one orange you juiced earlier for the cake)

1 tsp white miso


Directions:

Preheat your oven to 350F (177C) and grease a bundt pan. In a medium bowl, whisk together the flour, baking powder and salt. In a large bowl, rub the zest into the sugar. Add the softened butter, and use an electrical whisk to cream the butter and sugar mixture until light, white and fluffy, about a minute. Beat in the eggs. Add the flour, buttermilk and orange juice, and beat until you get a uniform, pale mixture. It should have a thick, dropping consistency. Finally, beat in the miso. Pour into the greased bundt pan and bake for 60-65 minutes. Mine was done at the hour-mark.

While it is baking, whisk together the ingredients for the icing and set aside. Once the cake is done, poke a few holes in the top, then brush the surface with marmalade that’s been warmed in the microwave. Leave the cake to cool for half an hour, before turning it over onto a cake stand, and drizzling (however you like) with the glaze.

Chocolate Orange Pillow Pancakes

A little twist goes a long way in adding nuanced distinctions to established flavour profiles. I’ve always loved the classic combination of chocolate and orange, so I thought, why not try it in my all-time favourite fluffy pillow pancake recipe?

I remember finalising the recipe for this more than a year ago, and it still hits all heart strings every time I make them. No longer am I caught in the ugly morning mire of doubt and indecision. I love making new things and experimenting with different simple techniques, but what’s the use of a whole stack of badly-risen or bland pancakes when you know there’s one that’s always got your back?

Processed with VSCO with f2 preset Processed with VSCO with f2 preset

Made with real, fresh orange juice, speckled with chopped up bits of dark chocolate. Saturday respite never did look or taste so good. The tang is subtle and almost sophisticated when paired with more grown-up type chocolate.

Processed with VSCO with f2 presetProcessed with VSCO with f2 presetProcessed with VSCO with f2 preset Processed with VSCO with f2 preset

Chocolate Orange Pillow Pancakes (makes around 10, adapted from my classic pillow pancake recipe)

Ingredients

190g all-purpose flour

3 tbsp white sugar

generous pinch of salt

1 tsp baking powder

1 tsp baking soda

1 egg

50g unsalted butter (slightly less than 4 tbsp)

1 tsp vanilla extract or the insides of half a plump vanilla bean (or a skinny meek one)

120ml (1/2 cup) whole milk/ buttermilk; use store-bought or make your own by mixing 230ml whole milk with 1 tbsp white vinegar, and let the mixture sit for 5 minutes before using).

30g chopped dark chocolate (I used a bar of 70% cocoa content)

120ml (1/2 cup) freshly-squeezed orange juice; about one medium orange

Directions

In a large bowl, whisk together the dry ingredients (flour, sugar, salt and leavening agents). In a small microwave-safe bowl, melt the butter in a microwave and set it aside, letting it cool. In another medium bowl, whisk together the egg, buttermilk, orange juice, vanilla and melted butter. Pour the wet mix into the dry mix and mix briefly with a wooden spoon or a normal dinner spoon. Continue to mix until everything is justt combined, which means there will still be a few lumps, but no more streaks of flour. The batter will be thick and somewhat lumpy.

Preheat your pan on medium heat and ready some butter. You know the pan is hot enough when you flick a little water onto its surface and there’s a clear sizzle. At that point, generously butter the pan and ladle tablespoonfuls of batter. I didn’t have to wait for bubbles to pop before flipping; the batter is thicker than usual and there’s no need to wait. Flip the pancakes when you notice the edges stiffening a little, or when you can slide your spatula whole underneath the bottom of the pancake. It will rise a little upon flipping, as if that action gives it life, and hence, breath. The surface should have a brown mosaic thanks to the hot butter. Once the second side is done (will take no more than 20 seconds), let cool on a paper towel. As mentioned above, these freeze wonderfully, so you can make a whole batch, have a small stack and stash the rest in a ziploc bag in the freezer. Easy!


Pandan Waffles

Processed with VSCO with f2 preset Processed with VSCO with f2 preset

Really a pretty great thing.

After a long day at the lab (currently participating in a long but fascinating internship involving incredibly novel anticancer research, and I couldn’t be more grateful at this point in time), I relished a wholesome family dinner, then tried to resist a nighttime urge to bake, or do anything at all in the kitchen. As usual, I failed miserably.

I don’t like to stick to a certain theme more than once or twice at a go, but after making kaya mochi just a few days ago, there lingered the odd inclination to play around with one of my favourite childhood spreads once again. Kaya, if you don’t know already, is the most delicious South East Asian coconut pandan spread, which to me is right on par with drippy, sweet, delicious almond butter or a lovingly homemade marmalade– yes it’s that sublime. Pandan is the tropical leaf from which kaya is made from. Earthy, sticky, sweet. There are lots of made-for-toast spreads out there that I adore, but kaya is childhood, kaya is rich nonchalance. What I spread on my burnt toast with butter, each bite a sticky mess of equal parts green and white (from unmelted butter).

This recipe is based on one of my favourite personal recipes– soda water waffles! Clickidy click that link for a classic version, or if you don’t really have a thing for kaya/anything pandan-flavoured. It’s the soda water that breathes life into the batter, added just before the kiss of heat, making the final result as light and airy as ever. Another perk? Made using sweet potato flour as a rather haphazard and weird experiment, it’s entirely gluten-free. Haphazard because this is my first time experimenting with sweet potato flour, which is one of the finest, almost delicate flours I’ve come across. Everything made with it will be of a relatively thin consistency, permeated with an au natural chew. Definitely looking into using it more, for what I’m not sure just yet; I’m only excited to incorporate more gluten-free options to accommodate any of you coeliacs out there. Of course, you can substitute this with normal flour, and this will yield a slightly less chewy and probably more refined-looking waffle. Indeed, this isn’t the prettiest of waffles, but goodness the outside crisp is outrageous. The chew on this is also slightly ridiculous, and funnily enough reminds me of that kaya mochi I made not too long ago. An eerie similarity resulting from subconscious fashioning of the past. Processed with VSCO with f2 preset

Pandan waffles (makes 6-7 thin Swedish waffles, modified from here)

Ingredients

240g sweet potato flour (substitute with 200g all-purpose flour)

1 tbsp baking powder

1/2 tsp baking soda

pinch salt

2 tbsp coconut sugar (or brown sugar)

2 eggs

1/2 cup milk of choice (I used almond)

3 heaping tbsp store-bought or homemade kaya

1 drop pandan extract (bought at your local oriental store)

80g melted, unsalted butter

1 cup soda water


Directions

Preheat your waffle iron according to the manufacturer’s instructions. In a large bowl, whisk together the dry ingredients– flour, leavening agents, salt and sugar. Add the egg, milk, pandan extract, melted butter, kaya, and lastly, the soda water. Cook in the preheated iron according to the iron’s instructions. In my Sevren waffle maker, it took 4-5 minutes before the edges went crisp and golden.

These freeze wonderfully. Let the waffles cool on a cooling rack, before layering them with pieces of parchment between each waffle so they don’t stick together when you take them out the next morning. The next morning, take them out, microwave for 20 seconds, then stick in the toaster until golden and crisp again. Go wonderfully with banana, anything coconut-themed (I used coconut sugar), and peanut butter!

Kaya Mochi

A few of you have asked me previously about my diet, and why I blog about breakfast and dessert specifically. I must say, I have recently made a minor, albeit profound change. To sum it up, I adopt a mostly plant-based, whole foods diet. The main reasons for this are:

Eating Animals

Forks over Knives

The China Study

Why the deprivation? Meat tastes the best!! I modified my About and FAQ’ page to cover a few points, but the above links are what induced a fixated curiosity on our warped nutritional conventions in the 21st century. So go ahead, click click click. On all the links.

Despite everything I say on adopting this diet, part of me feels a little sad because I do still eat a little meat, rendering my conviction less extreme, less concrete. It’s cultural convention to eat meat prepared for you, say, by your genius cook of a grandmother. This is why I still eat meat, albeit much less, replacing most of it with more starch and vegetables. And you know what? I haven’t felt better. Since the difficulty is justified, for reasons both ethical and environmental, ‘plant-based’ no longer carries the weight of ‘deprivation’ anymore. It really doesn’t. And I’ve finally come to realise that this is the right thing to do. If any of you have a similar experience with this, I’d love for you to share.

The second bit on why I choose to blog about breakfast and dessert specifically is also in the FAQ. I mean, my sweet tooth obviously deserves a bit of criticism. So check out the page for all that jazz as well.

Ok. Let’s talk about mochi!

Actually, I don’t know why that elicited an exclamation, because truth be told, I never was the biggest fan of mochi. I honestly just felt like trying something a little different. Increased exposure and this experiment indeed reversed my dislike.

Mochi is a delicate Japanese dessert, its name being derived from the type of flour used to make it– mochiko (rice) flour. Plus points for anyone who would potentially benefit: rice flour is gluten-free, with a substantial amount of niacin and B6. Amazing how it still yields such a chewy texture after being combined with the other ingredients. Typically stuffed with this divine, sticky red bean paste, but I changed it up just a little, deciding instead to fill it with homemade kaya (pandan spread). Weaved nostalgic taste into a minor innovative tweak. Each bite was sticky, slightly chewy, and bursting with the earthy, coconutty goodness of kaya.

Processed with VSCO with f2 presetProcessed with VSCO with f2 presetProcessed with VSCO with f2 preset

Kaya Mochi (makes around 10 depending on how big you like them, mochi dough recipe)

Ingredients

160g mochiko (rice) flour

180g icing sugar

300ml (1.25 cups) water

cornstarch for dusting

8-12 tsp kaya

Directions

Ready a large bowl full of cornstarch for dusting your hands and the mochi.

In a saucepan, whisk together the flour and water. Turn the stove heat to medium, add the sugar, and use a wooden spoon to continue stirring. Cook the mixture until it starts to look almost gelatinous, around 7-10 minutes. You will see the mixture thicken, and look slightly glassy on top. Leave to cool for another 10 minutes before touching and fiddling. Dust your hands with cornstarch, then scoop a bit of the mixture with a teaspoon. This bit onwards is a slightly sticky ride, but it’ll be worth it! Roll between your palms until you get a smooth, white ball. Use your fingers to flatten it a little, and place a tiny dollop of kaya in the middle. Gently pull the sides over the ball, and gently roll the mochi again to get an even sphere.

Dust with a mix of cornstarch and icing sugar before eating. Store in the refrigerator for up to a couple of days.

Salted Honey Espresso Baked Doughnuts

Processed with VSCO with f2 preset

A doughnut embodies whimsicality, but sometimes it just seems like all the dovetailing attempts have been done through and through. As I type, my mind is bathed in a blur of facts and complicated scientific concepts in preparation for the upcoming finals, like little entangled confused tendrils. However, this idea of whimsicality pulled me through a short while, sparked by an unanticipated café encounter. Being in the kitchen getting my hands dirty is more therapeutic than anything; I never saw it as something I feel obliged to do for the sake of this blog’s up keeping. Such breaks seem to serve as mind-remodelling moments, themselves acting as platforms upon which motivation is furthered and concentration enhanced. That being said, it will probably be a while before my next post, because the library beckons far too often nowadays.

Ah right, that unanticipated encounter. The other day I was at one of the most popular coffee hits around Covent Garden with a good friend, and was particularly inspired by a bucket of Joe and Seph’s posh caramel and espresso popcorn. Enamoured me so much so that I just had to buy a bucket of the stuff.

Processed with VSCO with f2 preset

Well the whole baking attempt ended with me sprinkling chopped up bits of popcorn on top (alongside whole ones right into my mouth, of course), which is an optional addition. I simply did so whilst reminiscing the root of this flavour combination. The sugary hit of caramel and espresso reeled me in, and I wanted to recreate that sweet-bitter juxtaposition in this doughnut recipe.

It’s simple and takes just 15 minutes to bake, and who doesn’t adore that? I’ll never get tired of these simple and crazy quick recipes. I’ll just let the pictures do most of the talking.

Soft and fluffy, espresso and honey-infused baked doughnuts, topped with a honey glaze and coarse salt

Processed with VSCO with f2 presetProcessed with VSCO with f2 presetProcessed with VSCO with f2 presetProcessed with VSCO with f2 presetProcessed with VSCO with f2 preset

Coarse salt doesn’t adulterate the final texture, serving only to enhance the sweetness and soft bite of just-baked dough. The idea of the cake doughnut doesn’t get old to me, because ease of make aside, there are just too many possibilities, and you can top them with anything, and can’t go wrong.

Processed with VSCO with f2 presetProcessed with VSCO with f2 preset

Salted honey espresso baked doughnuts with a salted honey glaze (makes 6 mini doughnuts)

Ingredients

For the doughnuts:

145g (1 cup + 3-4 tbsp) self-raising flour, or use all-purpose flour and add 1/2 tsp of baking powder and 1/4 tsp baking soda

pinch salt

2 tbsp cocoa powder

1/2 tsp cinnamon

50g (1/4 cup) white sugar

30g (2 heaped tbsp) melted butter

60ml espresso (1/4 cup) –instant powder permitted, but straight from the bean is your best shot

1 egg

60ml (1/4 cup) milk

2 tbsp runny honey


For the glaze:

1 tbsp honey

1 tsp cocoa powder

85g icing sugar

pinch salt

coarse salt for sprinkling

3-5 tbsp milk


Directions

Preheat your oven to 177C (350F) and butter a 6-doughnut pan. In a large bowl, sift together all the dry ingredients– flour and necessary leavening agents, sugar, cinnamon, cocoa powder and salt.

In a separate, smaller bowl, whisk together the melted butter (that’s been left to cool a while, so you don’t end up cooking the egg!), egg, espresso, milk and honey, until everything is nicely incorporated. Pour the wet mix into the dry and mix until everything is just combined.

Bake the doughnuts for 12-15 minutes; test with a wooden skewer at 12 minutes. If it comes out clean, you’re good to go. While they’re baking, whisk together the icing ingredients with a fork. You should have a thick and runny, light brown-pink glaze.

Once the doughnuts are done, leave to cool in the pan for a while before removing. Dip the top in the glaze, then sprinkle with coarse salt. YUM GUYS.

Check out my other baked doughnut recipes!

Brown butter maple bacon doughnuts

Strawberry chocolate vanilla bean doughnuts

Maple syrup doughnuts (with glaze variations)

Hot cross cookie butter doughnuts

Spiced nutella-stuffed doughnuts