Blackberry Orange Sweet Rolls

2865310 Processed with VSCO with f2 preset

‘Too often, we do something for the sake of reward. But usually there is a delay between action and reward… If you can make the process of making an effort your primary source of happiness, then you have succeeded in the most important challenge of your life.”– Ken Mogi

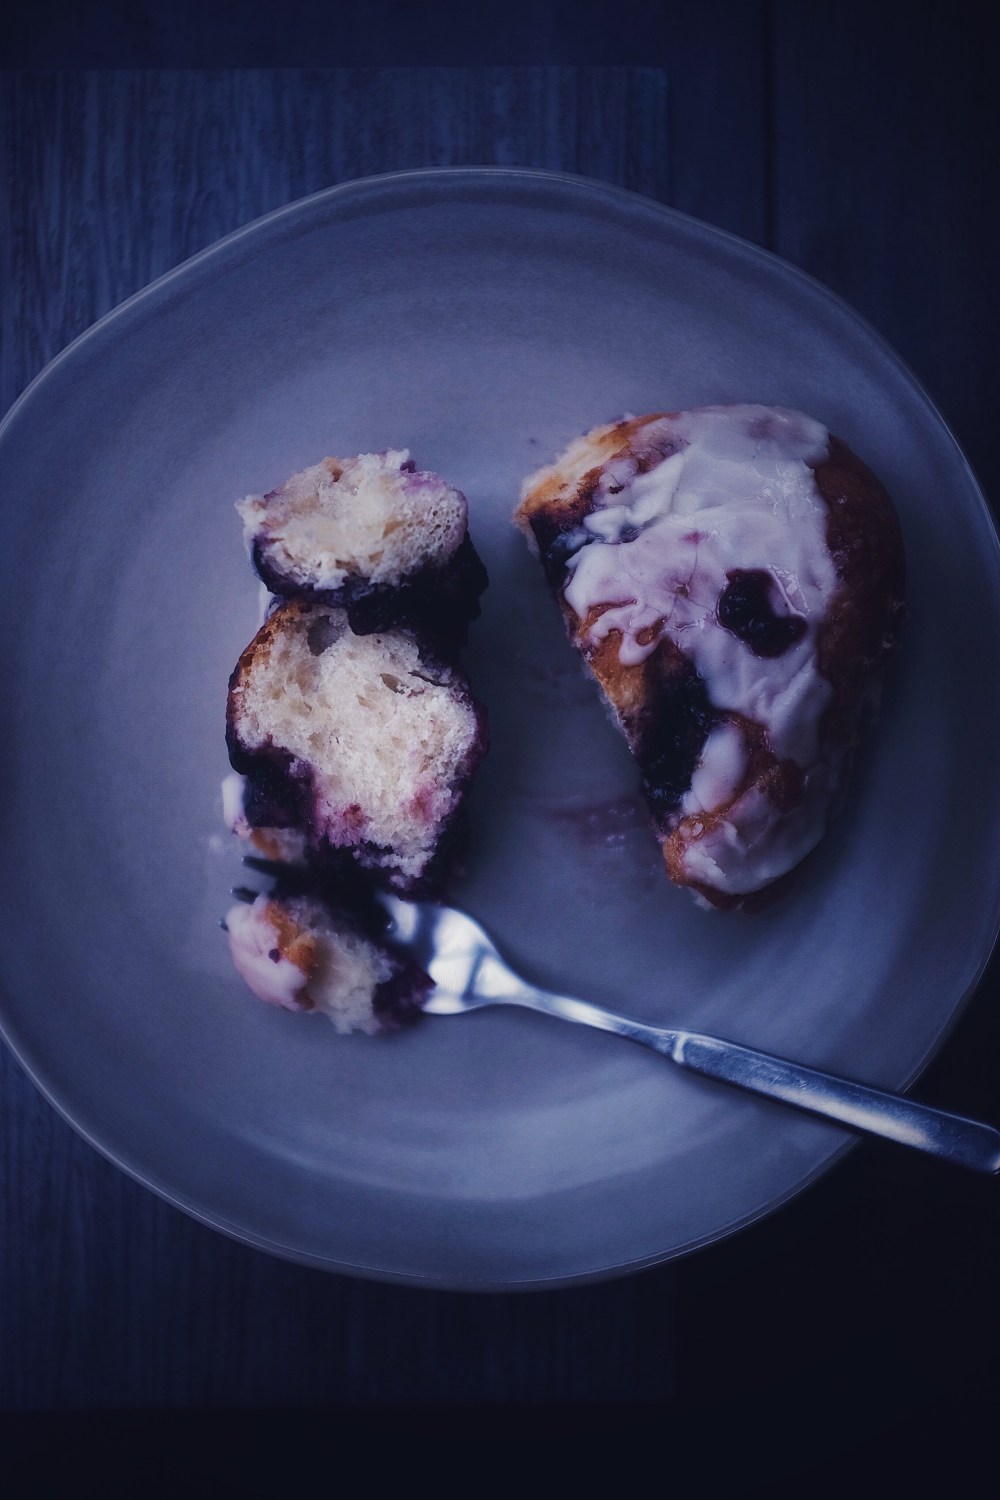
On that note, why not dance or sing with no one to hear you? Why not bake when there’s no one to bake for? Like this blackberry orange sweet cinnamon roll, ready for you like nothing else in the world, sometimes. There’s something pretty magical about the way two dimensions of tart marry perfectly with each other. Can we just talk about blackberries for a second?

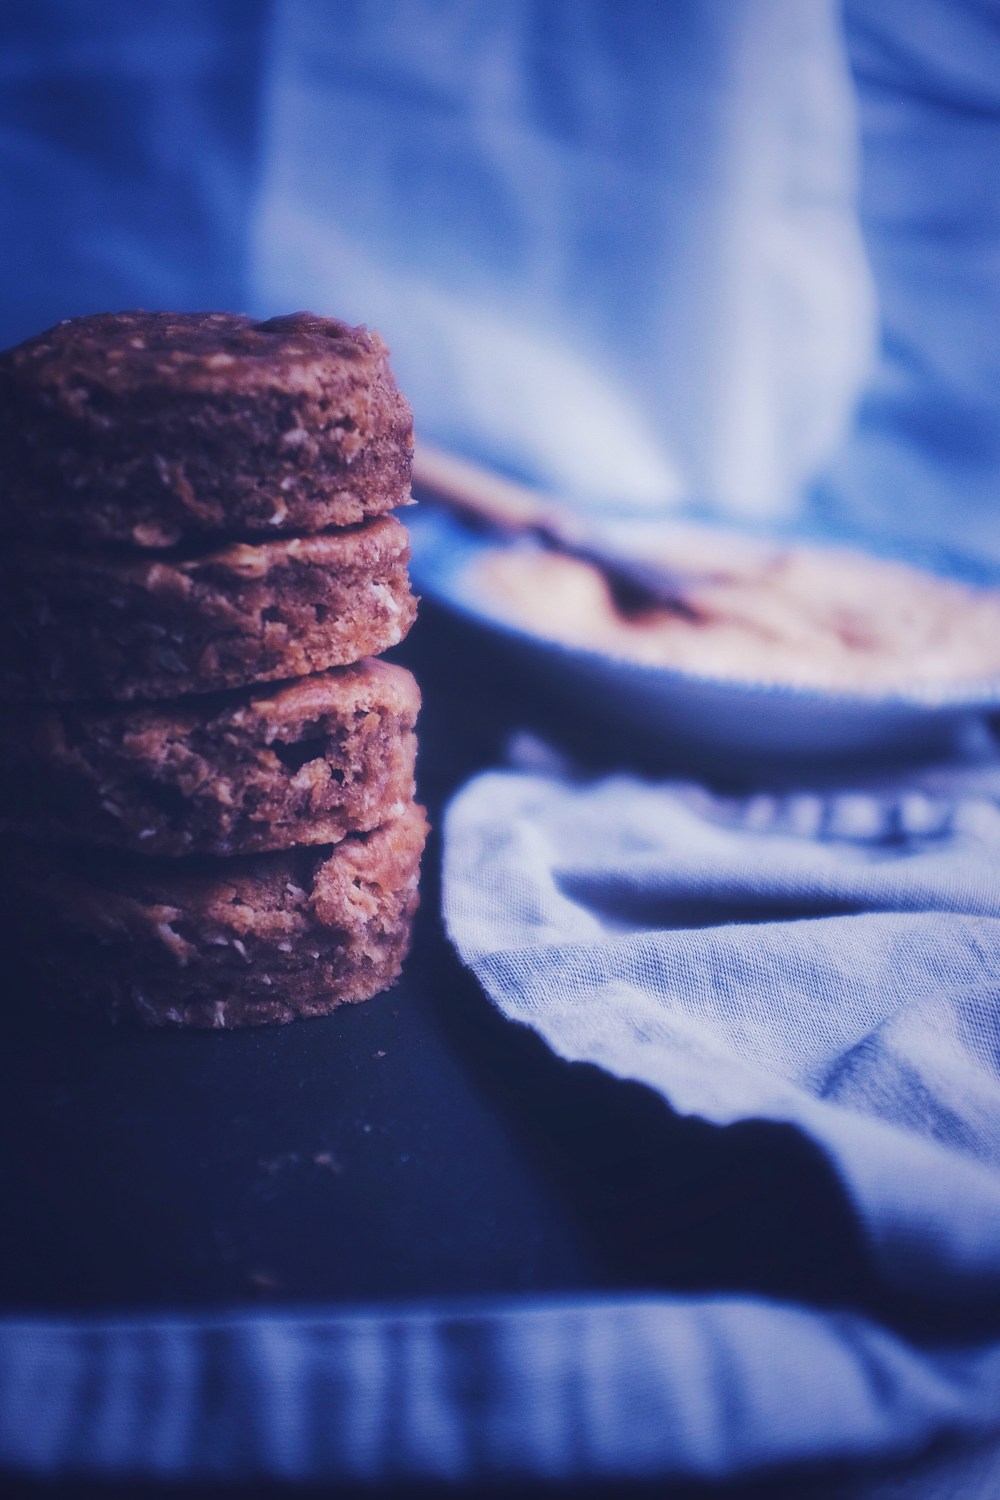
With summer comes berries. Let there be berries. Frozen berries are, and always will be, my kryptonite. I haven’t lived through a day without frozen berries for quite a few years now. Aside from their health benefits, they just taste amazing no matter what time of year. I’m also quite in love for how thawing frozen berries adds a sorbet-like quality to anything. So why not chuck this magic into a classic cinnamon roll recipe? Blackberries in particular are so underrated. Blueberries and raspberries seem to garner all the attention, all the time. You can go right ahead and use those as substitutes in this recipe, although I do think this power-packed berry is a special one, with a flavour all its own. Tucked in folds of brioche-like bread, this roll is simple goodness at its finest.

4606489 Processed with VSCO with f2 preset3801205 Processed with VSCO with f2 preset

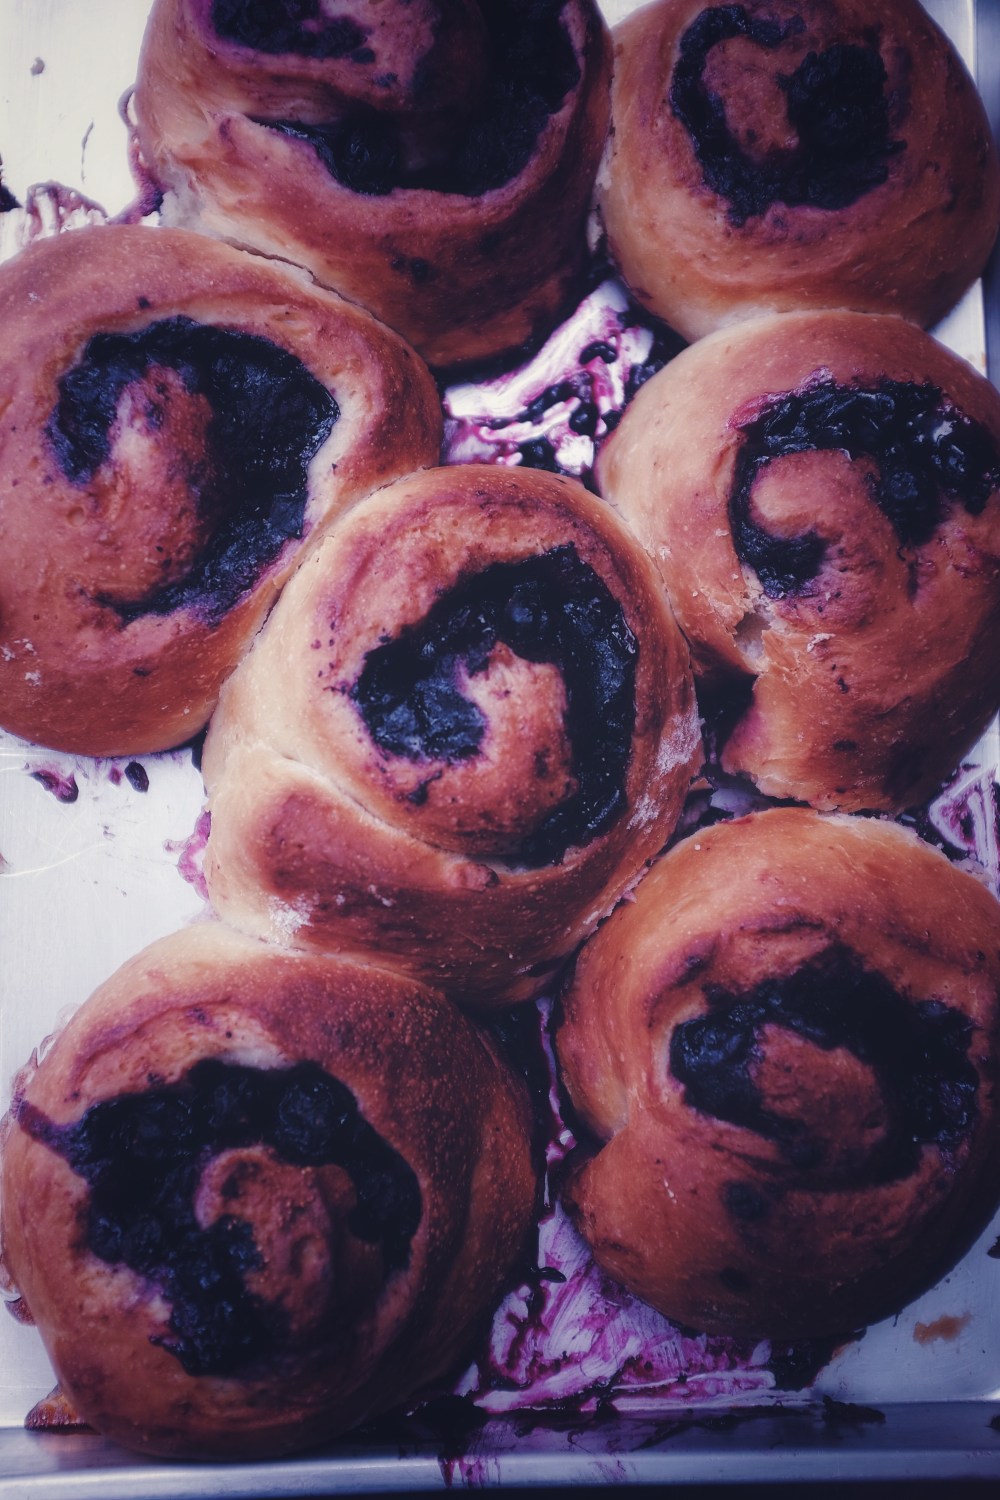
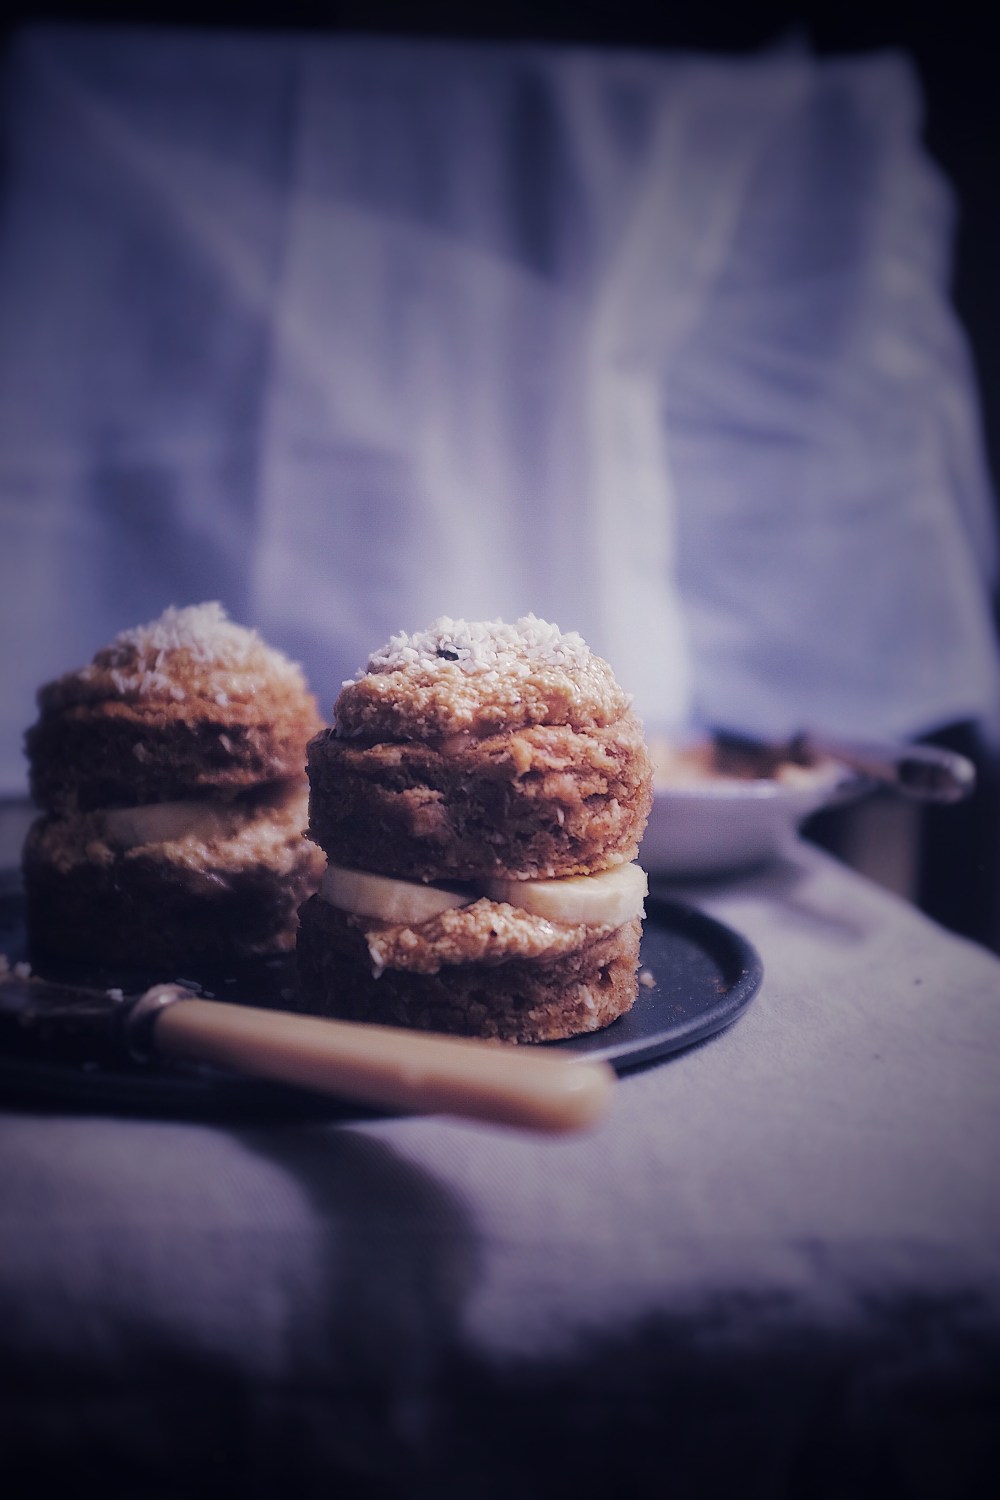
Think messy, sticky, sweet fingers. Bursting, warm sweet berries elevate your classic cinnamon roll, mushing into cinnamon-coated innards of each fluffy roll.

There’s no reason to shudder at the word ‘yeast’. I have a few no yeast recipes in the archives, but I tell you now, using yeast this time won’t do you any harm with luck or time, or both. It’s a simple matter of chucking instant yeast into the dry mix, mixing in the wet ingredients, kneading, and letting nature get to work on its own. Sometimes shortcuts make life less of a hassle, it’s true, but instant yeast does make this whole thing a breeze.

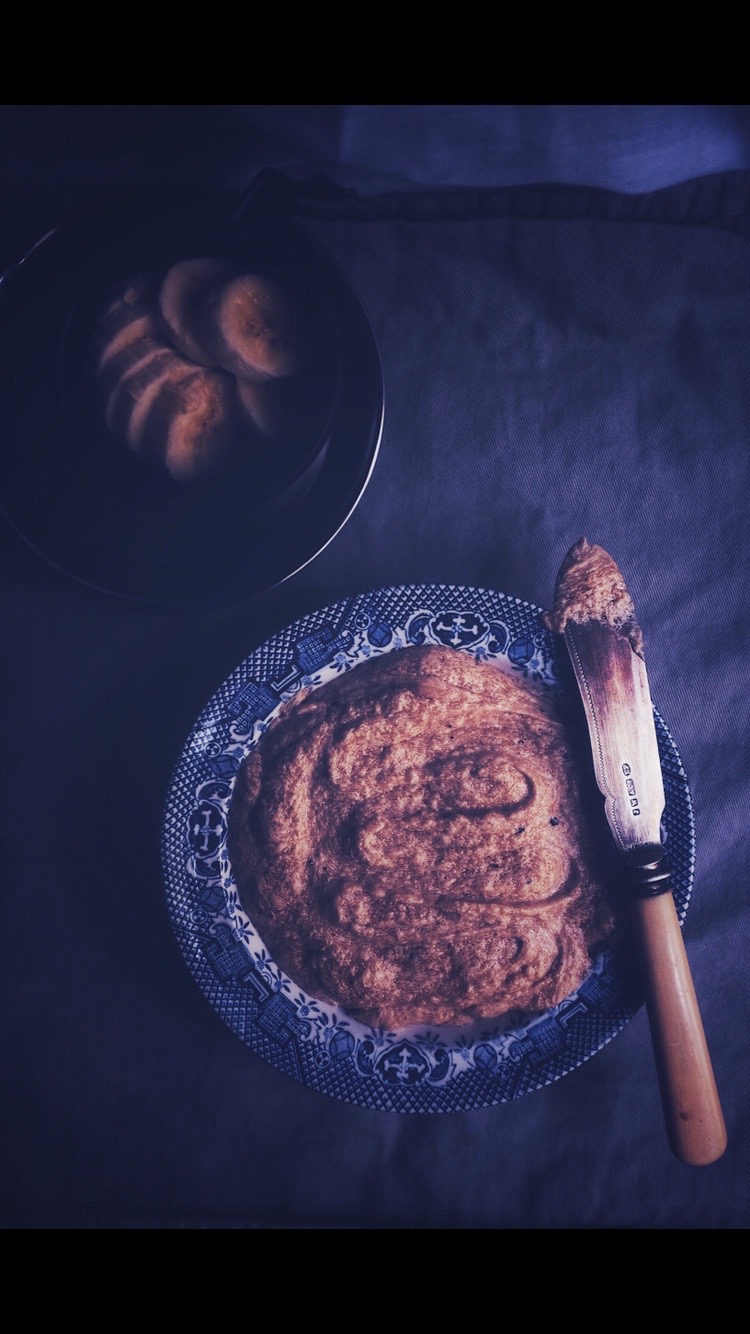
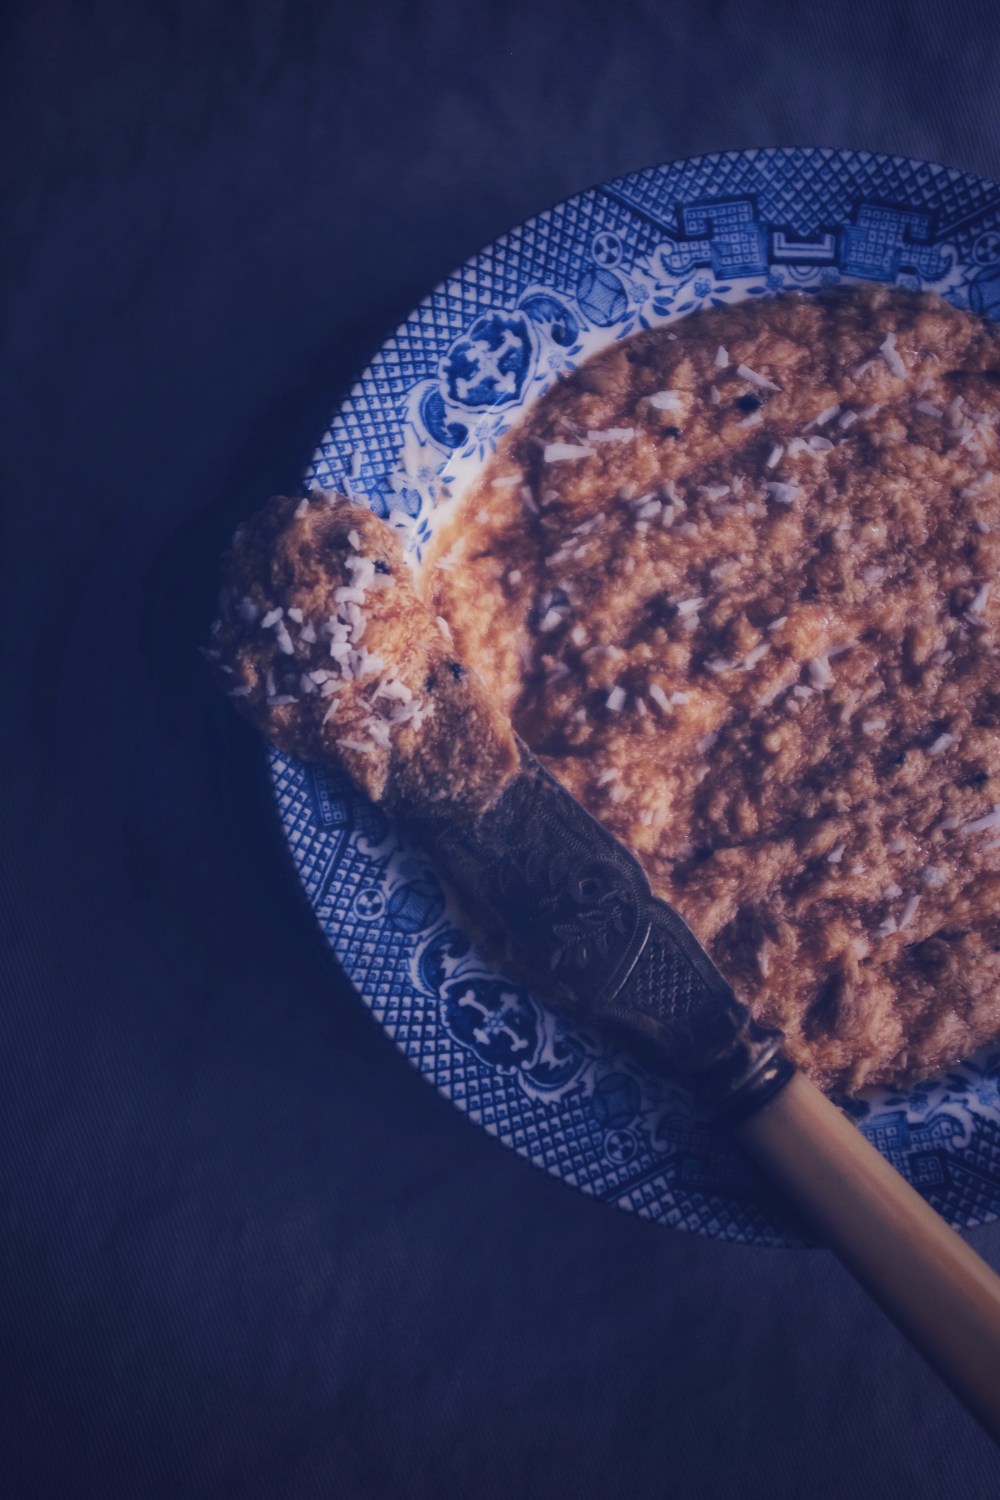
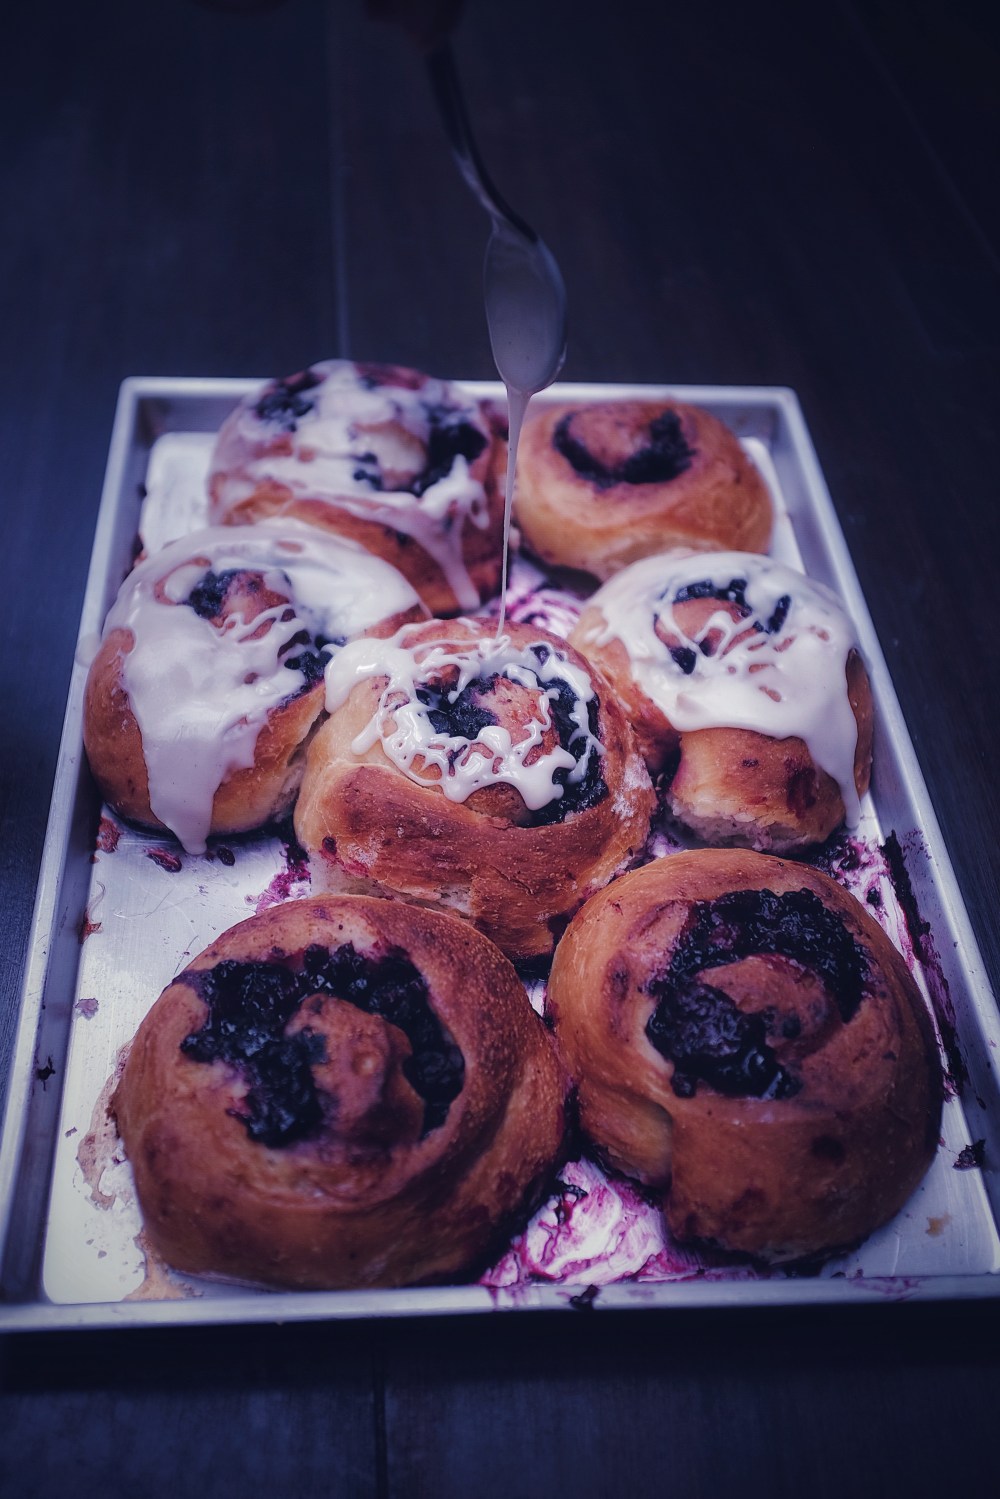
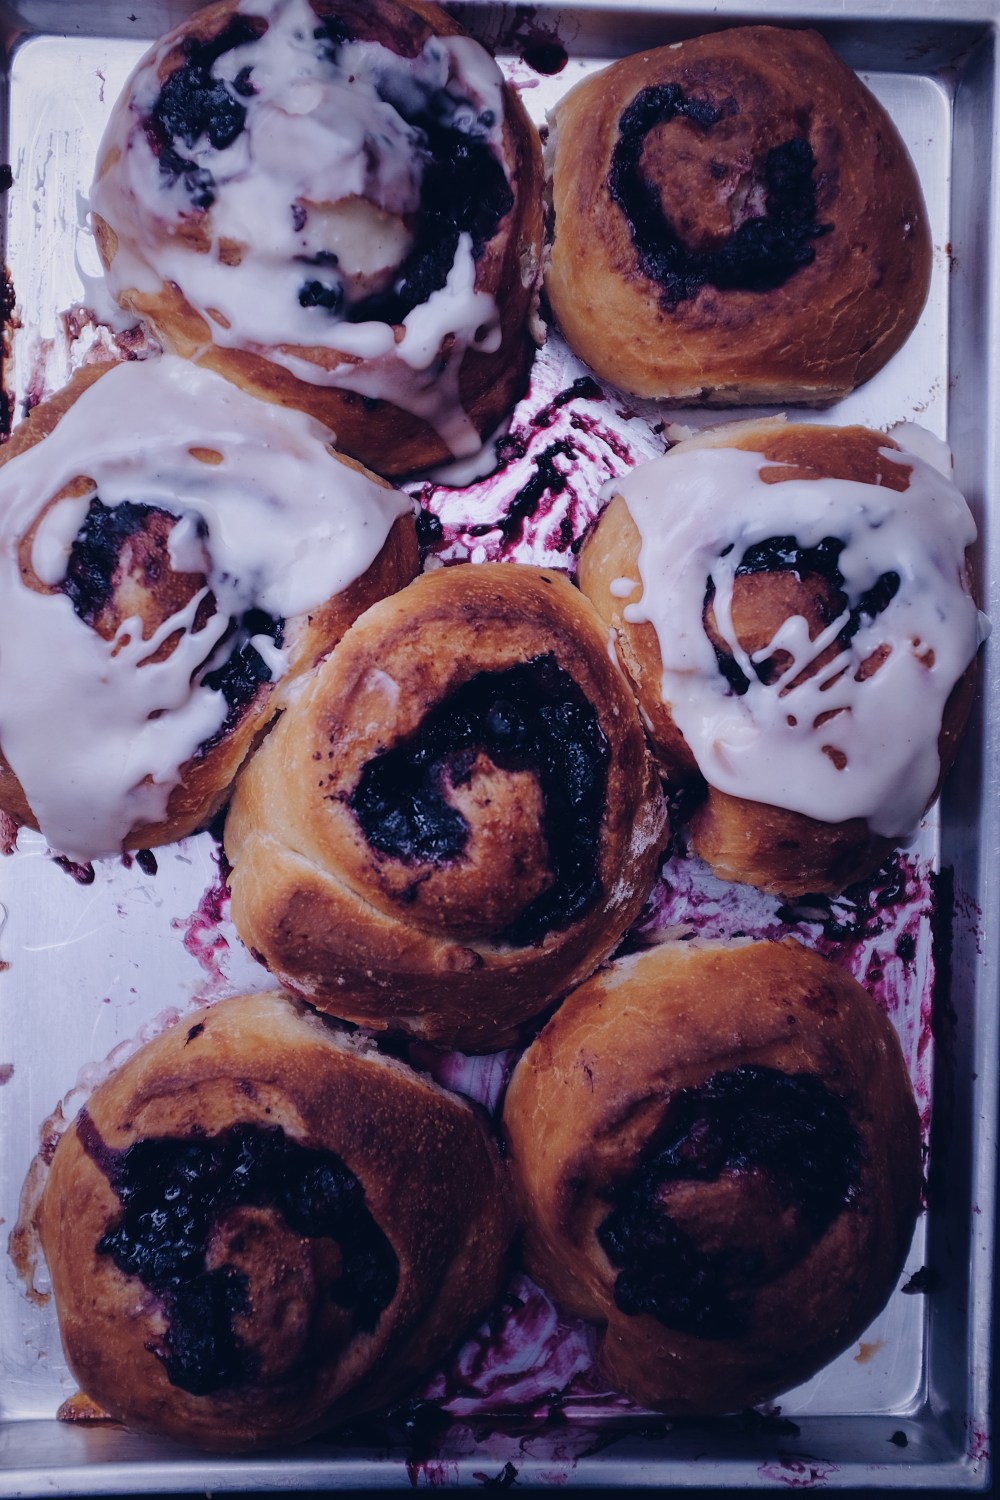
Just like how best part about eating granola is the sweet milk after letting the milk soak into every surface and crevice of the granola, the best part, to me at least, of eating a cinnamon roll is tearing apart a fresh and warm one, letting the tear end wherever the brioche fails to stop seizing under pressure, unveiling the speckles of cinnamon, filling spilling everywhere. Rich, superior filling with an interesting salty top. I like to have a part of this as a snack since it is quite rich, best enjoyed with a cup of hot black coffee.

621C2F08-A1CF-43AF-BA05-416E54CBE3A4.jpg

Ingredients

For the dough:

450g plain flour (sub: use half whole-wheat and half plain for something a little more wholesome, although the buns will not turn out as fluffy)

65g (around 1/4 cup) cane/coconut/white sugar

7g instant yeast

1 tsp fine salt

zest of one orange

240ml (1 cup) unsweetened almond milk

50g (1/4 cup) coconut oil (sub: the same weight of melted vegan butter)


For the filling: 

250-280g frozen blackberries

1 tsp ground cinnamon mixed with 2 tsp white/cane/coconut sugar


For the salted vanilla icing:

160g icing sugar, sifted

1 tsp fine salt

1/2 tsp vanilla bean paste

5 tbsp almond milk

1 tbsp orange juice


Directions

First, make the dough. In a large bowl, tip in the flour, then put the salt, yeast and sugar on opposite sides of the bowl. Mix briefly, then pour in the milk and coconut oil. Add the orange zest. Using a wooden spoon, mix everything together until you get a taut, firm dough. Flour your hands and work surface and knead the dough for around 5 minutes. Alternatively, you could actually leave the dough in the bowl and use the spoon to ‘knead’ (I like to call this spoon kneading, kill me if you wish) the dough by mimicking the same movement you would do with hands with the spoon. This technique means less dough on your hands and more left in the bowl for you to enjoy…. duh! You just have to make sure that you’re thorough and not complacent with the kneading. It gets tiring, but it’s worth it. Just 5 minutes, you know.

Cover the bowl with a towel and leave it in a warm place (skip this if you’re in Singapore currently, ha) for 1.5 hours. Leave for longer, or up to 2 hours, if your surrounding temperature is under 25C. During the time you have to wait, take your frozen blackberries out to thaw, and mix the ground cinnamon with the sugar in a small bowl. Line a baking tray with a piece of baking parchment and set this aside.

After 2 hours, tip the ball of dough out onto a lightly floured surface, and then roll this out into a relatively large rectangle of 20x30cm. Sprinkle on the cinnamon sugar, then put on as many berries as you can fit, leaving the juice behind. Alternatively, you can use fresh blackberries microwaved for a minute. Leave a border of about an inch on each side of the rectangle. Mash the berries a little using a fork. Roll the rectangle lengthwise (along its length, not the breadth), keeping each roll tight and rolling gently and carefully the whole way. Cut the roll using a serrated knife or piece of dental floss into 6-7 smaller rolls along its length, or 3-4 cm apart each time. As you cut, some of the filling will spill out, and that’s ok. The side at which you cut may have more berry stains– simply lay this side of the roll down on the parchment. Lay all the rolls out on the piece of parchment and leave them to rise and puff out a little more for an hour. Meanwhile, preheat your oven to 180C (350F).

An hour later, place your rolls in the oven for 25 minutes. As they bake, make the icing by mixing all the icing ingredients in a medium bowl. You should have a thick, runny and opaque white icing. Add the liquid ingredients little by little and stop once you reach the thick, runny consistency you need. Once the rolls are baked, leave to cool for 5-6 minutes before drizzling on the icing. These rolls are best eaten within 3 days of making them. Store them in an airtight container, or in the freezer, where they will last for months!

Chocolate-stuffed Pillow Pancakes for One

2810503 Processed with VSCO with f2 preset

And it’s back to the pancake grind. Does anyone else think pancakes are just beyond magical? I mean really, think back to when you had one really good pancake, and all the suffering it may have alleviated. I’m not saying one must be dependent on pancakes (or good food) alone to be relieved of anything depressing or sad, because that in itself isn’t a case for good health. Good health need not mean a good pancake, but good health certainly leaves room for a damn good pancake.

My signature pillow pancakes have been my (and your) long-standing favourite recipe since I started posting recipes on this blog. Though it seemed initially banal to re-write a recipe which I’ve done too many times to count, it behoves me to re-write it for your benefit, just this once, because chocolate-stuffed pancakes do take these to a whole new level, and because it’s ‘for one’, you need not share, or worry about tidying up and freezing leftovers. Further, it’s the perfect way to use up any leftover chocolate frosting you may have from a cake or tart experiment. This is no pabulum or stupidity (the latter you may witness, though, in the current issue surrounding the new American immigration policy; I am both heartbroken and angered by such hoo-ha).

2810503 Processed with VSCO with f2 preset3132461 Processed with VSCO with f2 preset

A firm warning from yours truly– these pancakes will make you productive the entire morning. I topped mine with a homemade pumpkin spread and some granola given to me by my dearest Charlie, although these toppings are optional (and honestly, gave the photography shoot bit a nice bit of pop and fun). You’re good with some maple and extra chopped dark chocolate, and I imagine some good, thick coconut yoghurt would work so well.

I’ll dial the excitement down a shade, and leave you to it. The past week has been rife with friendly gatherings and good food, and I hope this does not stop for a long, long while.

3254758 Processed with VSCO with f2 preset

Chocolate-Stuffed Pancakes for One

Ingredients

For the pancakes:

80g plain flour, or use half plain and half whole-wheat

1 tbsp ground flax (optional)

1 tbsp coconut/white/brown sugar

1/2 tsp each of baking powder and baking soda

pinch of salt

2 tsp melted butter (normal/vegan) or coconut oil

100ml milk or mylk (I like almond or soy)

For the chocolate middle:

10g cocoa powder

30g icing sugar

splash of milk or mylk almond/soy)


Directions

The night before you make the pancakes, whisk the cocoa powder and icing sugar together, Drizzle in the milk/mylk drop by drop until you get the consistency of a smooth and thick chocolate icing. Put the icing on a plate, spread it out and put it in the freezer to set. In a large bowl, whisk together the dry ingredients (flour(s), flax (if using), sugar, salt and leavening agents). Pour the rest of the ingredients into the dry mix and mix briefly with a wooden spoon or a normal dinner spoon. Continue to mix until everything is justt combined, which means there will still be a few lumps, but no more streaks of flour. The batter will be thick and somewhat lumpy.

Preheat your pan on medium-high heat and ready some butter. You know the pan is hot enough when you flick a little water onto its surface and there’s a clear sizzle. At that point, add a little pat of butter, let it melt, and add a heaping tablespoon of pancake batter for your first pancake. Then take your frozen chocolate disc and place it in the centre of your first pancake. Add a little more batter to cover the disc. Wait for the pancake to cook through, or once you notice one or two bubbles forming on its surface. Flip the pancake and let it cook for at least 30 more seconds. Let this cool on a paper towel while you do the same for the next pancake.

Serve with butter and maple syrup, or whatever you want. They’re wonderful with banana and more chopped chocolate, its moist sweetness adjoining arms with the maple. What a Sunday.


Banana Coconut Mini Cakes

B800FD1A-BAE0-4A7F-BCCB-B5CC5DC7A546The hardest part of self-actualisation is that of  discerning what to accept and what to reject– of the world and of  ourselves– as we build the architecture of our character and stake out our stance in relation to our aims and obstacles’– Camus

Recently I’ve been thinking about habits. Today’s mantra shall be this: kicking old habits is just as important as incorporating new, good ones. We all have our good and bad habits, but sometimes the balance just isn’t there. I, for one, may see a scatter of crumbs late at night on the kitchen floor but oh god, it’s late, and I can do it tomorrow morning. It’s not the most serious crime, but little things do add up to be a lot. Doing things like making my bed and preparing my clothes the night before does wonders for saving time, space and maintaining cleanliness throughout the week, day by day. That’s the miracle of habits. Little actions that change routine that change you for the better. Currently working on bettering myself, to be better around others, too. It’s hard, but worth it, I feel. We are capable. And keep being grateful.

So here’s what I wrote last week in my diary about this cake: “Banana coconut cake with miso frosting! So moist and cute and tender. Might have to change the frosting a tad but I’m happy-dappy for now. There’s a flow to it, it’s enticing and dreamy and moody. Happy-dappy”.

Well firstly, wow I sound quite silly whenever I write about how excited I am about some new experiment in my personal diary. Did I really write ‘happy-dappy’ twice? Secondly, wow this cake is good. Like, really darn good, and I can’t wait for you to experience this banana-ful love all over again, from my kitchen and oven to yours.

3144412 Processed with VSCO with a5 preset Processed with VSCO with f2 presetIMG_54643617481 Processed with VSCO with a5 preset

Simple, really. You start off traditionally, mixing the wet and dry ingredients separately. Once everything is incorporated, and you pop the thing in the oven and make the frosting. Everything is cooled, then the frosting begins.

I didn’t mean to put miso in there (as is the case for so many random ingredients in my other bakes), but this is what gives the lift, the interest. Banana and miso?? Yes, it works. Please try it. Ingredients of the earth. All from nature. What is so wonderful about baking from home is that you know exactly what you’re putting in it, be it a simple or more complex bake. No chemicals, pesticides or what have you. Flour, sugar, plants… plants! It’s so wonderful, don’t you think.

I was listening to the podcast ‘On Being’ the other night (highly recommend, by the way), and there’s one part which talks about how there’s a link between being in awe of nature and altruism. Just witnessing the greatness of this universe perhaps makes us feel more like we should help one another along in society, keep us afloat in the raging seas, the beautiful yet turbulent grandeur of Mother Earth.

3023814 Processed with VSCO with a5 preset Processed with VSCO with f2 preset3122144 Processed with VSCO with a5 preset

Banana Coconut Mini Cakes with Miso coconut frosting (makes 4 mini cakes or 1 large 8 or 9-inch cake)

Ingredients

1 and a half bananas, mashed

45g dark/light brown sugar

30g white/coconut sugar

30ml (25g) vegetable oil

1 tbsp vanilla bean paste, or sub with vanilla extract

60ml plant milk of choice (I like using oat or rice milk

145g (little more than a cup) plain flour, or use half spelt/whole wheat flour

1/2 tsp baking powder

1/2 tsp baking soda

pinch of salt

30g desiccated coconut


For the frosting:

130g butter

5g miso paste

150g icing sugar

handful of desiccated coconut


For the layering (optional):

a sliced banana

more desiccated coconut, the amount here is up to you


Directions

Grease an 8 or 9-inch springform pan and preheat your oven to 180C. In a large bowl, mix together the banana, sugars, milk, vegetable oil and vanilla paste/extract. In a separate, medium bowl, briefly whisk together the dry ingredients– flour, salt, coconut and leavening agents. Tip this into the wet mix and stir everything together until all is just about incorporated. Bake this in the oven for 25 minutes, or until a wooden skewer inserted comes out clean.

While the cake bakes, make the frosting by beating the butter and miso together with an electric whisk, then slowly add the icing sugar until you get a smooth and thick frosting with bits of miso strewn throughout. Add the coconut and mix briefly. Place the frosting in the fridge until ready to use.

Once the cake is totally cool, or about a half hour later, use the lip of a glass cup to stamp out circles in the cake. You will get about 4 circles, so two mini cakes. Once the cakes are stamped out, add a dollop of frosting onto one cake, then add a few banana coins and a sprinkling of desiccated coconut on top. Place the second layer on top, then frost the top and add more desiccated coconut to decorate. Alternatively, you can leave the cake as is and frost it right there and then, or just frost the 4 circles individually without layering them, to get 4 separate open-faced cakes. These cakes will last 3-4 days in an airtight container in the fridge. If you’re just making the cake by itself, you can store it at room temperature for the same amount of time and in the same way.

Apple Strudel

3023365 Processed with VSCO with a5 preset Processed with VSCO with f2 preset

Things to be grateful for the past week:

  • Billie Holiday. Happy belated, you star.
  • Extended periods of concentration
  • My mum’s lipstick (oops).
  • Discovering new, creative inspiration all around me, in the air, sights, people (Instagram aside, of course).
  • Daily yoga practice. Still trying to get better at certain inversions and balances. Nothing else truly grounds and invigorates me.
  • Love. Everywhere. Phone calls or video calls. Precious and genuine.
  • Making mistakes, and distinct feelings of unease. And then letting the right balance of stoicism and determination kick in. Feel, embrace, face obstacles, before trying to untangle and change them.
  • Coming across the cutest café (named Moreish) near the Wellcome Collection full of delicious vegan options, including vegan gelato!!
  • Coming up with more easy, AMAZING new recipes which I am so excited to release week after week! And just refining some sweet (literally) cult classics whenever I can. Snickerdoodles, red velvet cake, carrot cake, fudgy brownies galore. These things just can’t go wrong.My most recent experiment was particularly exciting and got me squealing on my knees at 10pm last night. Seriously.

Over the Easter weekend I was privileged enough to be hosted by my boyfriend’s family in Austria. On the plane ride back, my hands were itching to start playing with the Austrian cult classic– yes, the one and only apple strudel. I remember my first encounter with the traditional Austrian pastry before I went vegan so distinctly, The first bite was an explosion of thick-cut chunks of tender, stewed, cinnamony apple, enveloped in light-as-air, flaky pastry. Drenched in vanilla sauce (you usually douse your pastry in either this or vanilla ice cream if you have it), each vanilla speckle visible in pure, vivid ivory, if ivory could be so vivid. It’s the perfectly flaky pastry encasing soft apple, firm yet two steps away from being mush upon the pressure of your spoon, that I wished to replicate the past weekend.

And that I did.

3799083 Processed with VSCO with a5 preset Processed with VSCO with f2 preset

487AEAAF-EC54-4E1B-AFA1-C6B679EBA769.jpg

This easy vegan apple strudel is about an hour away from you if you feel like buying some filo tonight. Seriously, it’s so darn easy and delicious I can’t possibly think of what is stopping you. Since I was only making this for me and my uncle last weekend, the strudel I ended up with was a rather small thing of a sausage, but nevertheless satisfying in portion. Double the ingredients if you wish to make this for a larger party or, say, 5 or more friends who are more cautious than carefree when it comes to dessert after a hefty dinner of pot stickers and the likes on a Saturday night. I personally enjoy any dessert a la mode, as opposed to drenching it in custard or vanilla sauce. Ice cream any day for me, who’s with me?? I also drizzled over some of my homemade salted caramel sauce of extra pizzaz, though any sauce is of course optional, if you’re the sort who also hates stuff like sweet chilli sauce. Is that even possible?

Filo pastry actually comes in so handy for these types of dessert– I like to chuck mine in the freezer and let it thaw for at least 3 hours or overnight in the fridge to be used the next day.

3020716 Processed with VSCO with a5 preset Processed with VSCO with f2 preset

Apple Strudel (makes one 4×8-inch strudel. enough for 2-3 people)

Ingredients

2 large apples, diced

juice of half a lemon

1 tbsp ground cinnamon

2 and a half sheets of filo pastry, with the 2 larger ones cut in the middle along the longer edge, so you end up with 5 halves. If you’re using frozen filo pastry

A handful, or about 30g of chopped nuts (or buckwheat groats, as I used in my case since I didn’t have many nuts lying around– sacrilege!), and some extra for sprinkling later on

4 tbsp vegan butter, melted in the microwave

4 tbsp brown or coconut sugar

Directions

Preheat your oven to 180C (350C). In a bowl, mix together the chopped apple, cinnamon, lemon and nuts. If you don’t have any nuts or buckwheat groats, granola or any trailer mix sort of thing works well too. Set the bowl aside.

Place a piece of parchment paper that fits a standard baking tray, and place the paper on the tray. Flour the parchment and lay down one sheet of filo pastry. Carefully (filo pastry is quite delicate) brush on some vegan butter, then sprinkle on a tablespoon of brown or coconut sugar, then some of your finely chopped nuts/granola/something crunchy basically! Then lay down your second piece of pastry and repeat. Repeat until all five sheets are used up. Place the filling in the middle of the pastry, leaving a border of an inch from the shorter edge (breadth) and 2 inches from the longer edge (length). Refer to the pictures above for a clearer idea of what I’m saying. Using a sharp knife, roughly cut lines going from the edge of your filling to the length of the pastry, spaced 2 cm away from each other and parallel to each other. The lines should match up to each other on both sides of the filling.

Carefully fold the strips of pastry towards the middle, using the extra melted butter to stick any overlapping bits together. Continue doing this along the length of the strudel until you reach the bottom. Brush the top of the pastry with more melted butter, sprinkle on some brown sugar, and bake in the preheated oven for 25 minutes. The pastry should not be dark, but crispy all the same. Serve with a healthy dollop of vegan vanilla ice cream, and more nuts for crunch. This can be kept in the fridge for a few days


Double Chocolate Coffee Cookies (gluten-free)

3122966 Processed with VSCO with f2 preset

Bossa nova, and then Elvis in the background. At a new café in London (Abuelo) in the heart of Covent Garden, enjoying the serenity of solitude. Peaceitude. Hopefully there will be a vegan mud pie for me soon, to complement this matcha latte velvet. Despite my need for solitude, this heart is full with emptiness after a full 2 weeks of living and enjoying life to the fullest with my favourite human being over the Easter break. The past few weeks taught me that sometimes, all that’s needed is frugality and acceptance of what is. A fresh page in my diary for a fresh day. The simple, dense crumb of a freshly-baked loaf (missing the cheap and delicious bread from Germany so much!). The still invigoration of a short morning yoga flow, which pervades the air you breathe every second of every day with a keen alertness, curiosity and beauty. Nothing more sleek or necessary.

Success need not be about ticking off the 100 things on your to-do list, rather it could be absolute mindfulness. The absolute mindfulness of a cheeky bite of a chewy-edged, gluten-free chocolate chip cookie, which I made for my boyfriend’s dad who is extremely sensitive to gluten.

0F807E42-4901-46B3-AE4A-4D296DBD36ED3214697 Processed with VSCO with f2 preset

These cookies have double the chocolate than your average cookie. In other words, they’re double the fun and flavour. Each break and pull yields strands and streams of melting dark chocolate (or stuff in some vegan milk chocolate if you wish, go on). The best part is of course the coffee, which brings out the flavour of the chocolate while illuminating a hint of morning smokiness. Using just buckwheat flour will make the cookies sandier in texture, but this is somewhat offset but the chewy edges, gooey middles and countless pools of melted chocolate. YUM.

3122966 Processed with VSCO with f2 preset

Gluten-free Double Chocolate Coffee Cookies (makes 6-8 medium-large cookies)

Ingredients

180g (1.5 cups) buckwheat flour (or use half buckwheat and half whole wheat/ plain flour)

100g chopped dark chocolate, or use a mix of dark and milk vegan chocolate if you prefer slightly sweeter cookies

100g vegan butter, at room temperature. Alternatively, you can use coconut oil.

140g brown/coconut sugar

1/2 tsp each of baking powder and baking soda

1 tsp espresso powder

1 tbsp vanilla extract

120ml (a half cup) plant milk of choice


Directions

Preheat your oven to 180C and line two baking trays with baking parchment. In a bowl and with a fork or whisk, cream together the butter and sugar. Add the baking powder, baking soda, espresso powder, vanilla and plant milk. Mix everything together well. Add the buckwheat flour and chopped chocolate, and mix together until batter is well incorporated. It should look relatively thick and clumpy.

Dollop heaped tablespoons of batter onto your lined sheets, and press down on the cookies a little to flatten them. Bake in the preheated oven for 12 minutes exactly. They should be really soft, in fact a little too soft to fiddle with once right out of the oven. Wait 10 minutes for them to firm up a little, before taking them off the tray and eating them (ideally with a cold glass of almond milk!).