Biscoff Oreo Brownies

Processed with VSCO with f2 preset

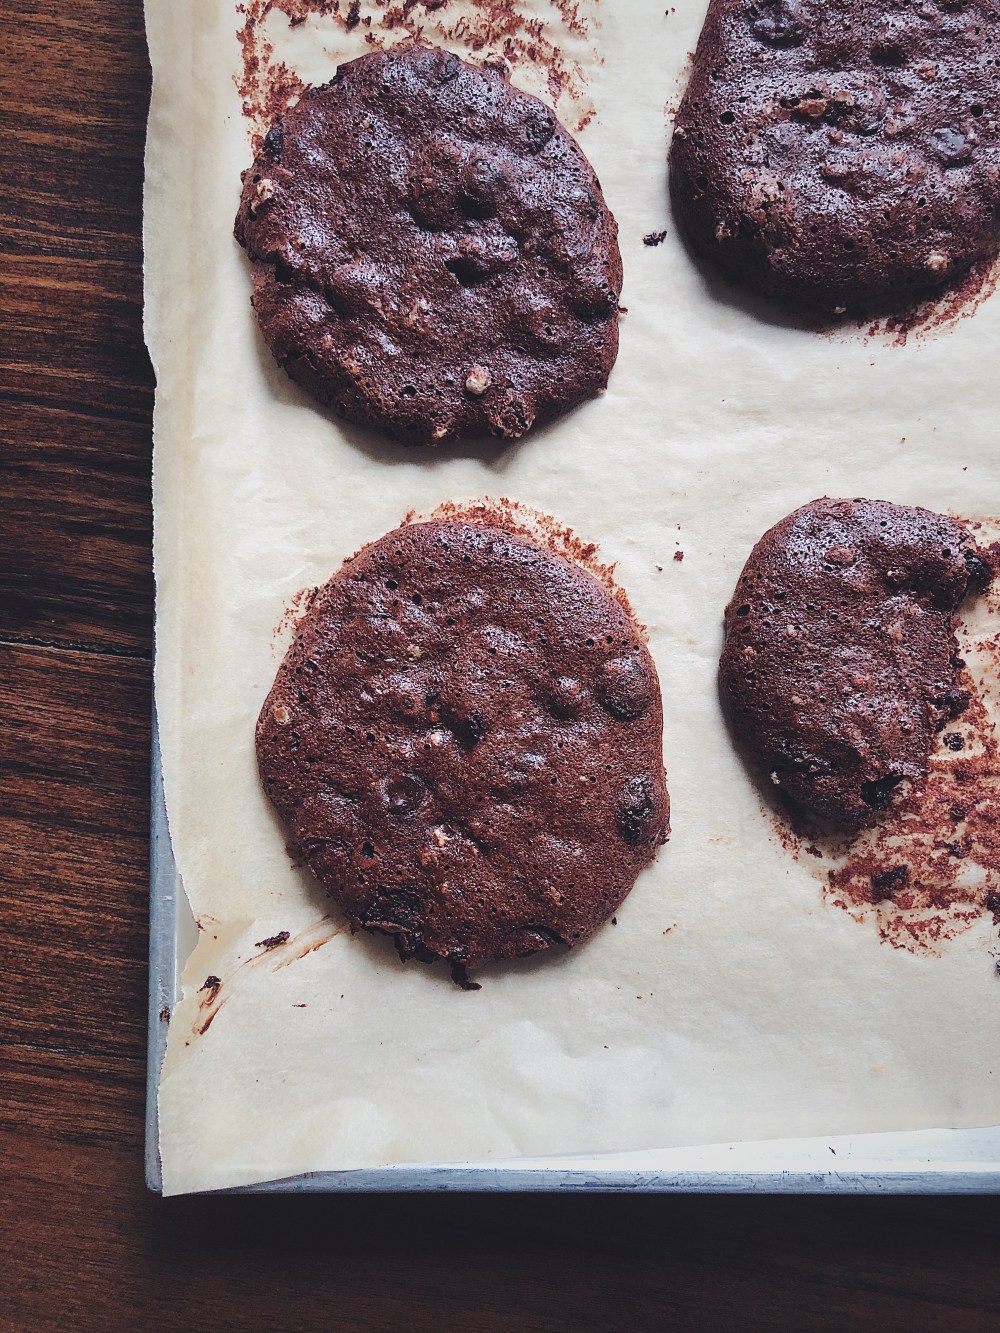
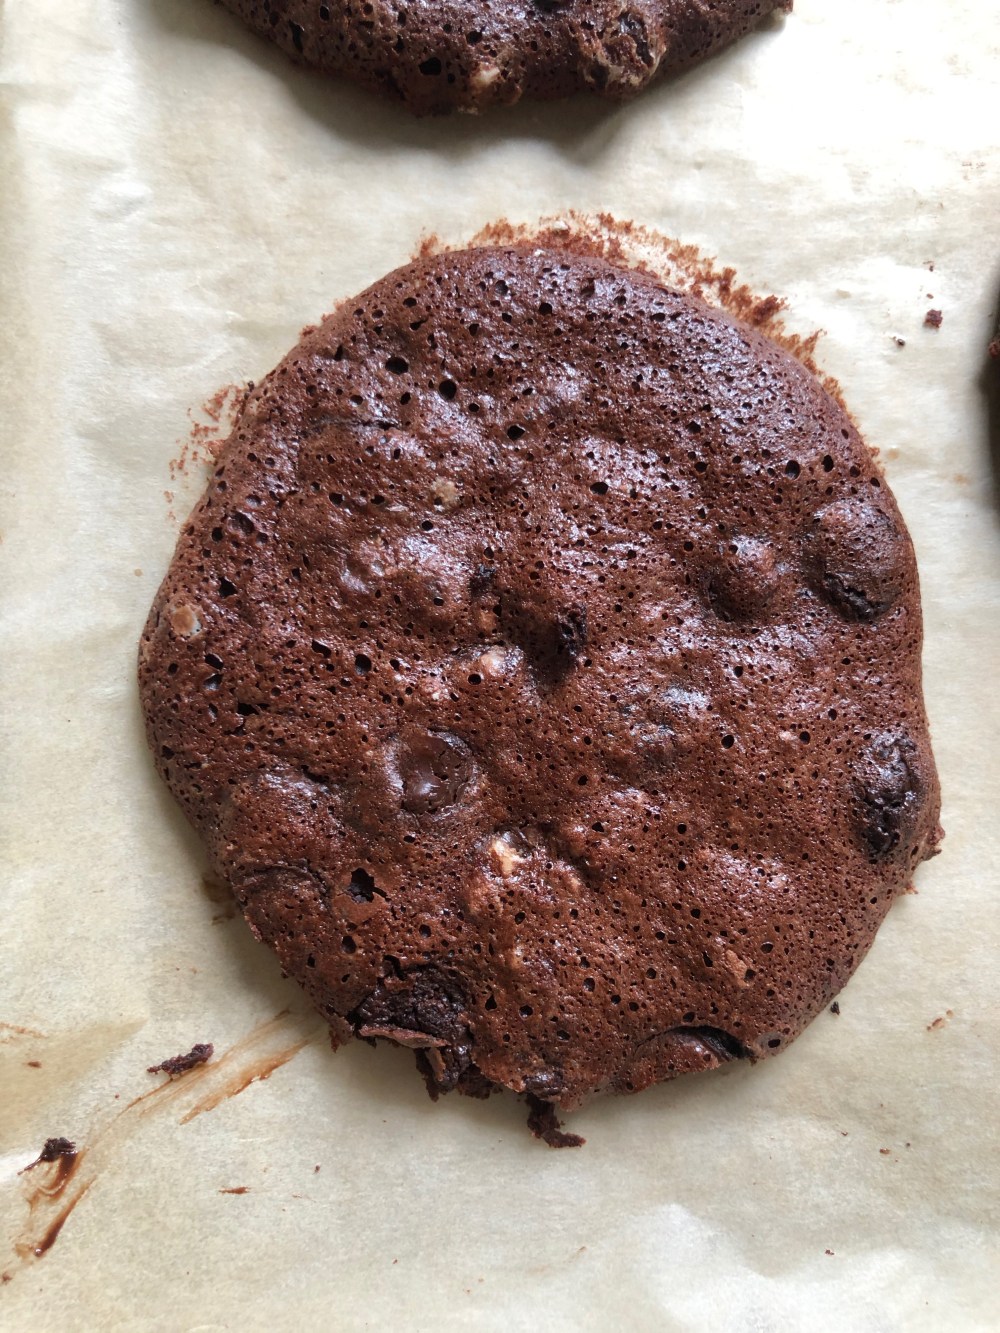
This deserves to be recipe of the year. For me, at least. I’ll keep it short and sweet for everyone’s convenience today. Brownies are overdone and the combinations one can experiment with seem to be endless. The brownie category in every baking blog is usually a saturated one– basic fudgy, basic chewy, Nutella, jam-bellied, the works. You would think I’d be tired of reading or trying out any new brownie recipe at this point. BUT NO. This particular recipe features angles of child’s play, a three-stranded braid of chocolate, biscoff and oreo. I usually do a ‘Notes’ section just above the recipe itself for clarity and guidance, but the ease of this recipe needs no additional guidance aside from the simple steps stated below. The whole process of putting the brownie together and baking it takes around half an hour. Anyone can do it, during any point of the week. I guess my one note would be that, for maturity’s sake, the addition of salt both in and top of the batter is quite necessary.

I like recipes that make me feel like a 5 year-old at a birthday party, and this is the epitome of that. These brownies makes me feel all kinds of things that I hope you feel too- sunshine, sticky fingers, making reckless decisions that make for the best memories.

Processed with VSCO with f2 preset

Processed with VSCO with f2 preset

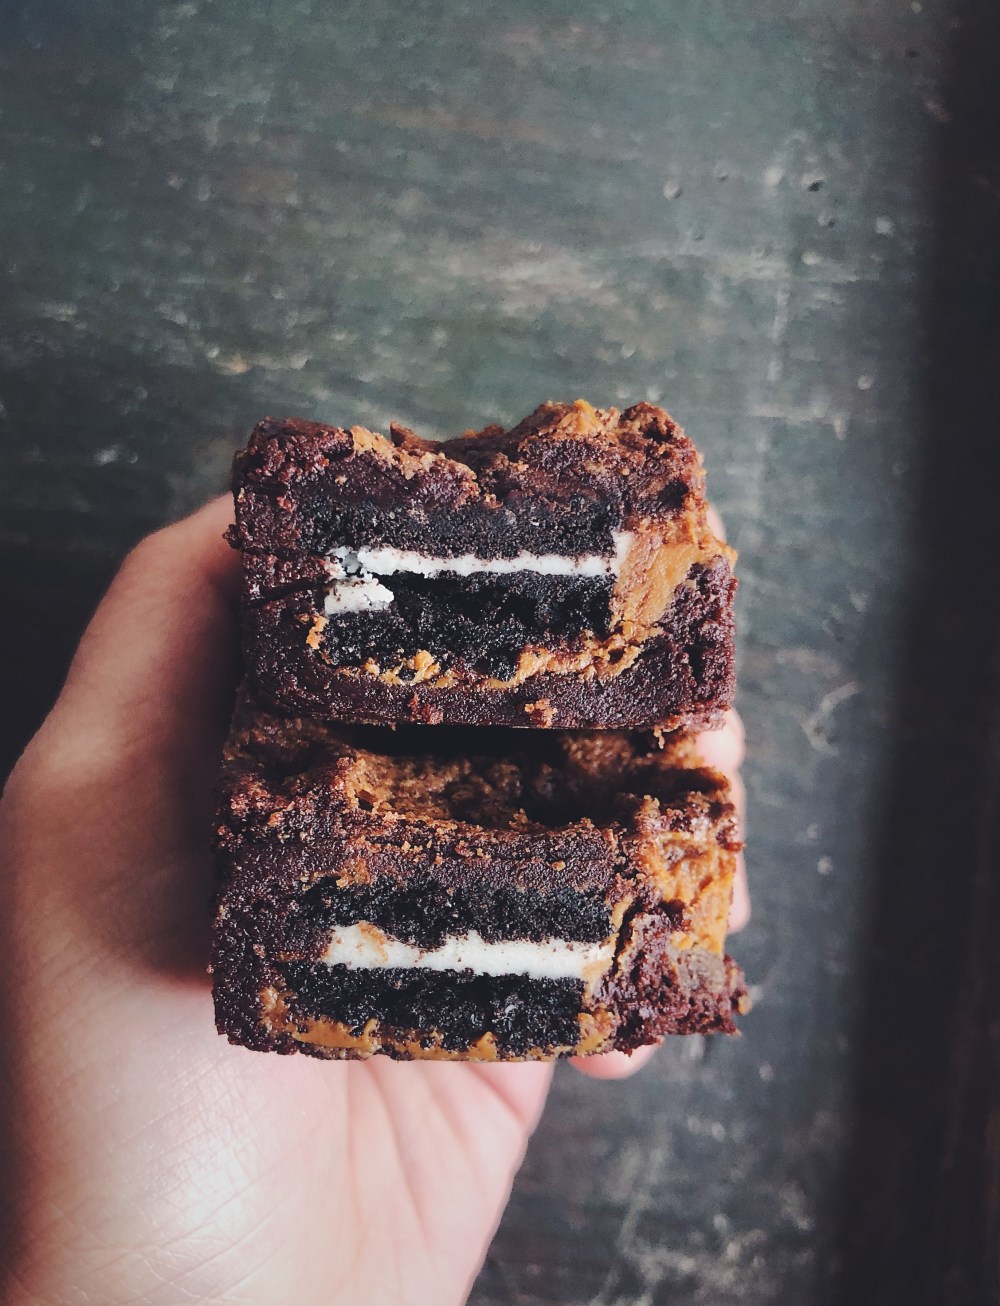
When I was vegan one of my more sinful home staples was Biscoff, or lotus biscuit spread. I think I put it on apples, in place of peanut butter, which I also love but didn’t quite hit the spot in that moment. As a child I never thought much of the cinnamon, crumbly biscuits themselves, almost always served alongside a piping-hot cup of green tea at the hairdresser’s, but I did enjoy the spread miles more. The crunchy one specifically made my heart sing. Came across the spread here in Germany and felt a wave of nostalgia flood through my system. These are by far one of the best brownies I have ever toyed with. They are:

  • extremely fudgy in the middle
  • quite chewy all around the edges
  • layered with oreo biscuits

The swirling of the biscoff spread into the batter ensures that the crunch and notes of cinnamon of the spread melts into the brownies themselves as they bake in the oven and doesn’t simply exist as an isolated layer in the brownies. I recommend the crunchy stuff because I simply prefer the added crunch, but do smooth if that’s what you prefer, or if you think the crunch of the oreo cookies will suffice.

Processed with VSCO with f2 preset

Biscoff Oreo Brownies (makes 8 brownies in a loaf tin)

*indicates a vegan or gluten-free substitution that will be mentioned below the recipe

Ingredients

90g butter*

100g dark chocolate, chopped

1 egg*

½ tsp salt

120g sugar

150g Biscoff spread (crunchy/smooth)

45g all-purpose flour

25g cocoa powder

5-6 oreo cookies

Coarse salt for sprinkling on top

*vegan sub: use the same amount of vegan butter or margarine in place of the butter. For the egg, use 2 flax eggs: make this by mixing 2 tbsp ground flaxseed with 5 tbsp water in a small bowl, and let that gel for a while before you use it

Directions

Preheat your oven to 180C (350F) and line a loaf tin with parchment paper. You can also do this in an 8×8-inch square tin. Put the chocolate and butter into a microwave-safe bowl and microwave in 30-second increments on high until everything has melted together well. Let this cool for about 3 minutes before using- dip your finger into the chocolate-butter mixture to make sure it’s more or less at room temperature. It’s fine if it is still a little bit warm.

In a separate bowl, whisk the egg (or vegan flax eggs) and sugar together well, until foamy. Then add the chocolate-butter mixture, salt, flour and cocoa powder. Whisk well until everything comes together and the batter seems to pull away from the edges. Pour the batter into the prepared tin. Put dollops of biscoff spread onto random parts of the brownie batter and use a knife to swirl it through the chocolatey batter. Then put 5-6 whole oreo cookies on top of the batter and press them down into the batter. The batter will be pushed up between the cookies; use the back of a spoon to spread these parts over the cookies. Sprinkle the top with coarse salt before putting the tin in the oven.

Bake for 25 minutes. Check at the 20-minute mark, if a wooden skewer inserted into the middle comes out with wet crumbs then you can take it out already. If it is still very gloopy and wet, leave it in for a few more minutes. If you’re baking this in a square pan, you will only need half the baking time. Leave the brownies to cool at room temperature on a cooling rack or heatproof surface for half an hour before cutting and serving. They are perfect on their own, but also good with ice cream or a scoop of crème fraiche on top.

Tahini Chocolate Chip Nut Bars

Processed with VSCO with f2 preset

A few things I want to say after the past few weeks. Just as a side note, I’ve actually been meaning to put this up for quite a while but as usual, a lot of things regarding work and travel got in the way, and I also did not want to put something of a sensitive topic up too soon.

  • Constantly reposting images and Instagram stories makes good for collective awareness but is not as important as action and effort.
  • In the past I never had the courage to challenge racism if and where I identify it, and I’d like to think I am getting better at it. This will probably involve more difficult conversations with loved ones and friends. Not necessarily in a defensive way, but rather constructive. I usually struggle with challenging friends more so than just family (with whom we usually have no filter) in this manner sometimes, but it’s about trying.
  • Racism is like a defence mechanism against insecurity and anxiety. If someone is secure in his or her own identity then there’s no need to put others down, but the truth is that the person experiencing this suffers chronically and deeply, and may have to feel like he or she always has to prove oneself, or that he’s never good enough to do anything, acting like a self-fulfilling prophecy. Maslow’s hierarchy of needs place physiological needs (food, water, shelter) as the most basic needs we must have established before the needs of, in this order specifically: safety, feeling loved, having good self-esteem, and finally that of self-actualisation, which would propel us towards our highest goals and help us achieve them. Without the basic need of love and support fulfilled, and with many black people already suffering a lack of the most basic needs on a global basis, I think it’s fair to say that it is insensitive and ignorant if we dismiss their plight.
  • And finally, on a slightly unrelated but also very important note, although this oil is everywhere, any small step to try and reduce its usage would benefit our planet and its inhabitants many years into the future.

I was actually thinking about these points while baking the bars (don’t worry there’s a recipe at the end of all this), and now that I’m reflecting upon them I’m once again reminded of how good of a meditation baking is. I’d love to know if anyone else experiences this sort of calm and peace while kneading dough or simply mixing things together in a bowl.

Processed with VSCO with f2 presetProcessed with VSCO with f2 preset

I haven’t been baking all that much lately because of stress and bouts of anxiety that crop up every now and then, which tend to prevent me from being at my productive best, but these tahini chocolate chip nut bars were some sort of magic the last weekend. I noticed my boyfriend’s pantry had a bounty of unused nuts so I thought it would be fun to play around with my usual tahini chocolate combination but this time with a sprinkling of various nuts. Now that I’m living in a house with him and many more people, it feels more justified to bake and share the goods and of course get feedback!

The sesame in tahini itself already screams wonderful earthy, nutty tones so I thought pairing it couldn’t turn out all that bad. After the first test I knew I hit a jackpot. The combination of everything together made for this chewy bar with a classically fudgy, chocolatey middle. The best part was receiving the positive reviews from three flatmates, which were thankfully in line with my own expectations. It’s been a while since I could bake and share what I made with people– I still get nervous letting my own family try my experiments let alone folk I only just met! So that of all things really warmed my heart. I had to try again the second time, and second time was the charm. Not the prettiest of desserts but simple and easy to eat. Nothing could be better.

IMG_4110Processed with VSCO with f2 preset

One last note: you can opt to swap the milk chocolate for dark if you want, I just personally prefer a sweeter chocolate for a more delicate opposition to all the earthiness and nuttiness going on.

Tahini chocolate chip nut bars

Ingredients

170g flour (gf sub: use 160g of gluten-free flour mix, or more ground almonds)

½ tsp baking powder

50g ground almonds

3 tbsp chopped pine nuts

150g milk chocolate (vegan sub: vegan milk or dark chocolate)

80g butter, melted (vegan sub: vegan butter or margarine)

½ tsp salt

100g white sugar

75g brown sugar

1 egg (vegan sub: use a flax egg- mix 1 heaped tbsp of ground flaxseed with 2 tbsp water in a small bowl and let that gel to thicken up for a couple of minutes before using)

85g tahini

1 tbsp course salt (e.g. Maldon) for sprinkling


Directions

Preheat your oven to 180C (350F) and line a square 9×9-inch baking pan with parchment paper or aluminium foil. Alternatively, you can also use a loaf tin and bake just half the batter first if you want to test a smaller batch.

Melt the butter in a microwave-safe bowl in a microwave on a high power for 30 seconds, and set that aside to cool for a few minutes before using. In a medium bowl, whisk together the flour, baking powder, ground almonds, chopped pine nuts and milk chocolate. In a separate and slightly larger bowl, mix together the melted butter, ½ tsp salt, sugars, egg and tahini. Add the dry mix to the wet one and mix until everything comes together- the mix should look pretty thick and rather doughy. Scrape the mix into the prepared tin, use your hands to press the batter into an even layer in the tin, and bake in the preheated oven for 12-14 minutes. When 12 minutes is up, use a wooden skewer to poke the middle of the pan. If it comes out with moist crumbs, take it out and leave to cool on a cooling rack for 10 minutes or so. If it comes out clearly wet with batter, leave it in the oven to bake a little longer for a couple of minutes. Once the bars are done baking, leave to cool completely on a wire rack or heatproof surface, sprinkle with coarse salt and cut into bars however big you want after at least 10 minutes of cooling. Enjoy with ice cream or simply on their own.

Classic Cinnamon Rolls


Processed with VSCO with f2 preset
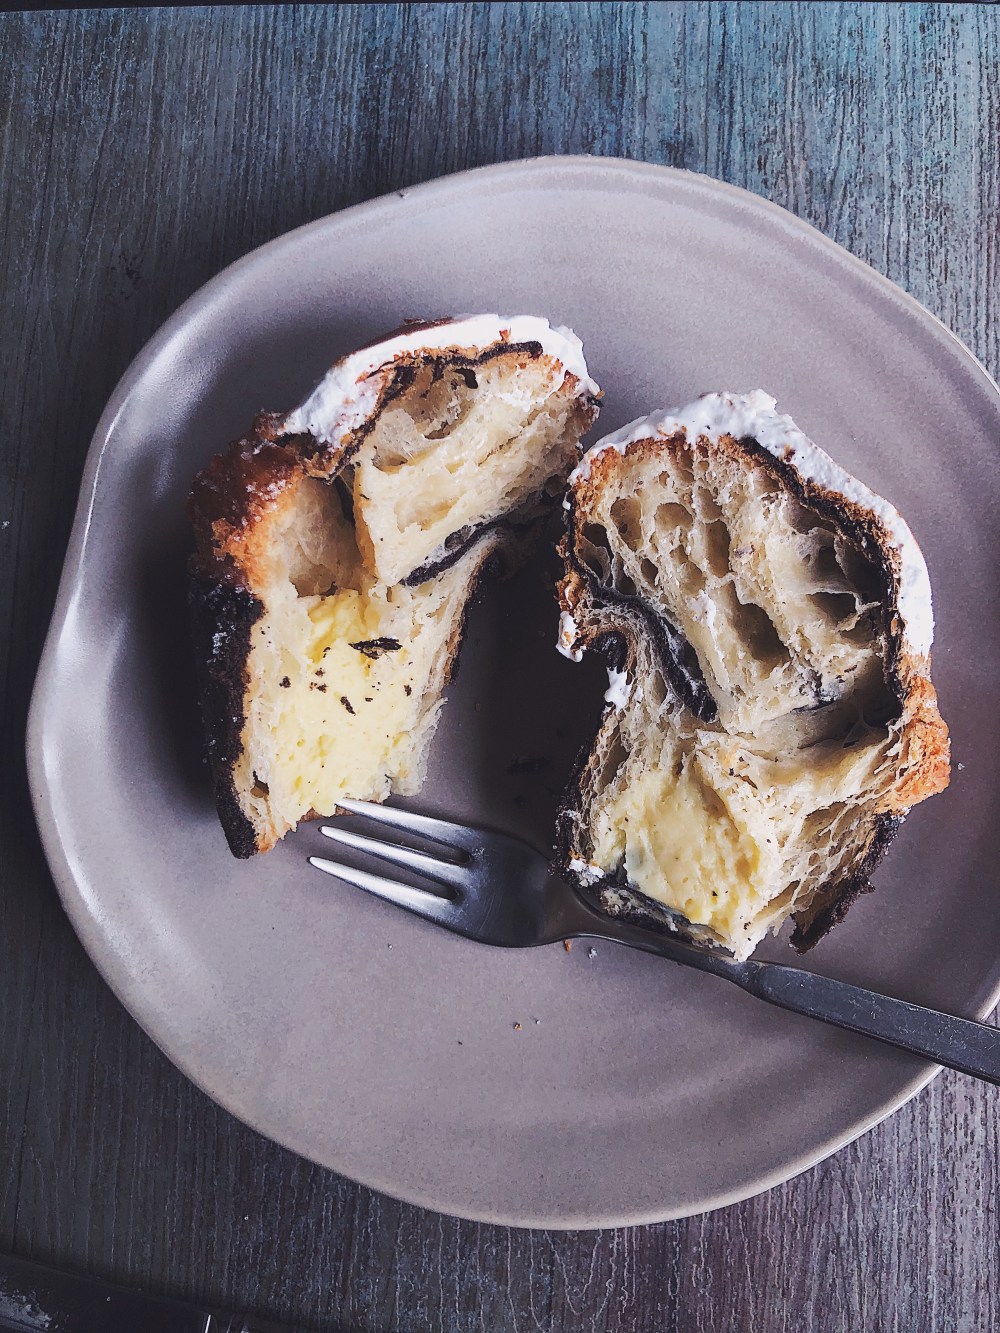
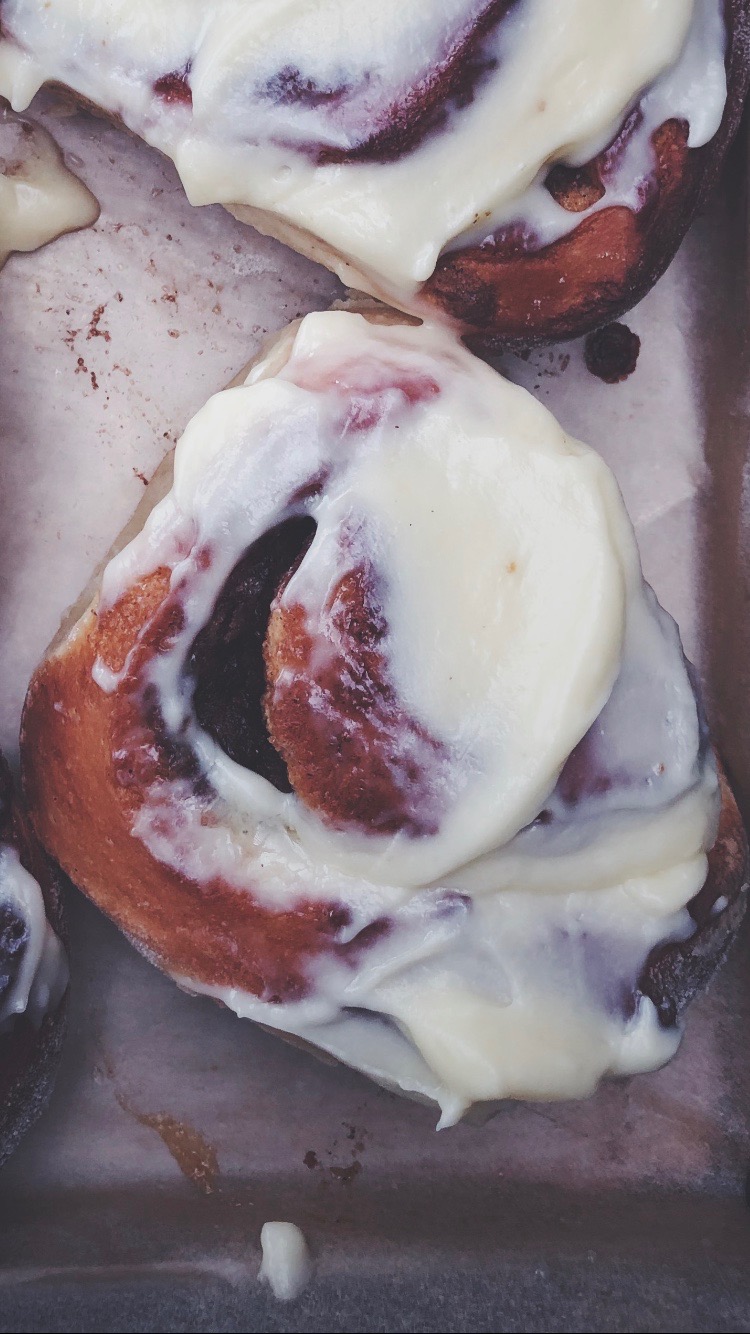
Lately I’ve found it hard to wrap my head around the concept of balance and moderation, realising that I’m pretty wired to think about everything in black and white. I either have a totally intellectually fulfilling day or I don’t. I either eat extremely healthy one day or I don’t. Clearly balance is something I’m still trying to conquer as a habit, as elementary as that may sound. Translating this lack of moderation to my creative endeavours, sometimes I’m so focussed on creating something new and exciting that I forget the roots of my baking pleasure– classic favourites. I get a high from riding on this streak of new things that I forget the magic of a simple classic. I’ve been putting this particular recipe off for a while. Cinnamon rolls are a tried and true classic and I don’t know anyone who doesn’t enjoy a bite of these gooey, cinnamony treats. I made these the first time almost 5 years ago using a random online recipe and loved them best with a cream cheese frosting. Aside from cinnamon rolls, I’ve enjoyed and made a few things that I’ve really enjoyed the past few weeks:

Processed with VSCO with f2 preset
Rye strawberry balsamic brownies from Woodlands Sourdough
Processed with VSCO with f2 preset Processed with VSCO with f2 preset
Smoky cruffin from Maxi bakery by Bearded Bella
Processed with VSCO with f2 preset Processed with VSCO with f2 preset
A naked salted caramel cake for my mum’s 50th! 

Processed with VSCO with f2 preset

Back to rolls. I know the classic version doesn’t have the (Americanised) cream cheese frosting, but I must say that this is the version I prefer. The tangy cream cheese pairs perfectly with the sweet bun, which can get too cloying if not cut through with something a little sharper. I recently tried making them again. Although the buns themselves were heavenly- all airy and light, it was missing the element of moist tenderness which I believe a good cinnamon bun should have. So I modified it to have a shorter baking time and, as most good baking recipes have it, more butter. Quite a bit more. It’s also a good idea to cover the rolls before baking with a layer of aluminium foil so that the tops of the rolls do not burn from the direct oven heat. You get these golden-brown, soft, delicious cinnamon rolls with very little effort. You don’t need a standing mixer to make them but it made my life a hell of a lot easier (and cleaner)! You can also just use some elbow grease and knead these for a little longer, just 10 minutes. It’s a good workout, at least.

IMG_2739Processed with VSCO with f2 preset

Classic Cinnamon Rolls (makes 8-9 rolls)

Ingredients

For the dough:

240ml (1 cup) milk

2 tsp active dry yeast

4 tbsp white sugar

1 egg

60g (0.25 cup) salted butter, melted

0.5 tsp salt

250g (2 cups) cake flour

200g (1.5 cups + 3 tbsp) all-purpose flour


For the filling:

2 tbsp ground cinnamon

150g (0.75 cup) dark brown sugar

60g (1/4 cup) unsalted butter, at room temperature


For the cream cheese frosting:

150g cream cheese

0.5 tsp vanilla extract (or vanilla bean paste for a richer vanilla flavour)

150g white sugar


Directions

Pour the milk into a microwave-safe bowl and microwave on high for 2 mins. It should feel warm but not scalding to the touch. If it’s very hot then wait a minute for it to cool down a little. Add the yeast and wait for it to activate, or around 3 minutes. It should have a light brown froth on top. It is ready when there’s a light brown froth on top. Pour this yeast-milk mixture into the bowl of your standing mixer (or just a large bowl if you’re doing this by hand) and add the sugar, egg, salt and melted butter. Whisk together. Then add the two flours and on medium speed, let the standing mixer knead the mixture well for 6-7 minutes. If doing this by hand, knead the mixture a little bit in the bowl first to let all the ingredients come together, before tipping it onto a well-floured surface and knead for 10 minutes. If the dough is too sticky or is sticking to the bottom of the mixing bowl, add more flour. Add enough flour so that you have a pliable and slightly sticky but not too sticky consistency. Shape the dough into a rough ball, place it back into the bowl and let it rise for at least an hour with a damp cloth, to keep the dough moist while the yeast does its work to expand it.

Right before this hour is up, mix together the room temperature butter, brown sugar and ground cinnamon in a small bowl. Once the dough has risen (an hour later), tip the dough out onto a floured surface and use a rolling pin to gently roll it out into a 9×14-inch (22x35cm) rectangular piece of dough. Use a spatula to smear the brown sugar-cinnamon mixture onto the flattened dough, leaving a half inch border around the edges. It may initially seem like a lot but it really is just enough!

Tightly roll the rectangle lengthwise and place the log so that the edge is at the bottom. Use a serrated knife or piece of floss to cut the rolls into 1-inch pieces. You may have to cut off the two edges first as they don’t have much filling. Place the rolls in a greased 9-inch round or square baking pan, cover these and leave them to rise for half an hour. Preheat your oven to 180C (350F) in the meantime. Once the half hour is up, cover the rolls with a piece of aluminium foil and place them in the oven to bake for 16 minutes. While they are baking, make the frosting by mixing the cream cheese with sugar.

Once the rolls are finished, leave them to cool for 10 minutes before smearing a generous amount of cream cheese frosting onto each roll. These are best served the same day they are made, warm and fresh. They can also be kept in an airtight container for up to 3 days, but microwave before serving to make sure they are warm and the insides stay gooey.

5-Ingredient Chewy Gluten-free Chocolate cookies

IMG_1487

“Life as we know it is merely an afterthought in the global scheme of the cosmos”- Avi Loeb.

It’s May and most of us are still under lockdown. It’s real easy to get caught up in the weirdness and pain of today, so estranged from the social entanglement, that milieu we are so familiar with. But as Avi reminds us soberly, we are a very small part of the universe and it’s easy to lose sight of the big picture– that is, the constant movement of the sun, of nature in general, the people who don’t have a roof over their heads (ever), the constant love we can show those closest to us, the constancy of human creativity which can be cultivated by indulging in our favourite hobbies– cooking, talking to friends, movies, knitting, whatever. This in itself is solace, to me.

Random thoughts and journal excerpts:

04/05: On a brighter note, pandemic solutions are also solutions for the environment. Prior to this current commotion, land clearing reduces biodiversity, which means that the species that survive are more likely to host illnesses transferred to humans.

24/04: Open your windows!! Virus aside, it’s very easy to have difficulty breathing because of too-high carbon dioxide levels in our own homes. Especially now of all times, when we’re all stuck at home.

03/05: There’s a new doughnut and sandwich place called Korio and they sell the fluffiest doughnuts (and cinnamon-sugar doughnut holes, the only thing I could get a hold of one sad Tuesday afternoon).

06/05: This girl’s channel is whack and I’ve started watching one of her videos after journalling almost every morning. I’ve really been savouring mornings, which are like pages of empty magic because nothing really happens yet, but I can sit and daydream and drink coffee and journal a bit before getting on with other things (exercise, work, etc). Talking about exercise, light weights can really transform a workout.

Processed with VSCO with f2 presetIMG_1488IMG_1486

I know a few people have requested a gluten-free recipe, and since I know a couple of gluten-intolerant people myself, why not! It’s one of the easiest recipes I’ve played with and takes just 13 minutes in the oven. Like many of my other recipes, you simply have to chuck the ingredients in one bowl, whisk them together and be done with it.

These cookies have an incredibly chewy exterior and moist, air-light interior richly studded with dark chocolate. They’re rich with gooey chocolate, yet light and melt-in-the-mouth. I originally just used the vegan egg for this, then experimented with actual egg, then just egg white which yields the chewiest texture out of all three options. It also makes the cookies shiny and glossy, while letting the chocolate stand out as the main ingredient, both in the form of the cocoa powder and chocolate chips. The chocolate added at the very end is optional (but not really).

Processed with VSCO with f2 preset

Chewy Gluten-free Chocolate cookies (makes 6 medium cookies)

Ingredients

150g (around 1.25 cups) icing sugar

60g (0.5 cups) cocoa powder

0.5 tsp salt

60-70g (large handful) chopped dark chocolate or chocolate chips

2 egg whites (vegan sub: use 2 flax eggs instead by mixing 2 tbsp ground flaxseed with 4 tbsp water and letting that gel in a small bowl for a few minutes before using)

Directions

Preheat your oven to 177C (350C). Line 2 large baking trays with parchment paper. If using vegan eggs, make that now with the ground flaxseed and water before using later. Whisk together the icing sugar, salt and cocoa powder in a bowl. If your icing sugar and cocoa have been sitting in your pantry for a while, then you’re better off sifting them together instead of just whisking. Add the egg whites/vegan egg and whisk together until smooth and glossy. Add the chocolate chips and use a spoon to fold those in until incorporated. Put heaped tablespoonfuls of wet batter onto the baking trays, leaving 2 inches of space between them because they will spread. Bake for 12-13 minutes, or until there’s a clear hard and glossy crust on the cookies. Enjoy alone or with a nice scoop of vanilla bean ice cream/yoghurt. Can be kept at room temperature for up to 3 days.

Peanut Butter Olive Oil Cookies

Processed with VSCO with f2 preset

A new year, another classic with a twist. I thought this post would come online much earlier to be honest, but with everything that’s been happening here, and with the past year’s late festivities and jolly holiday obligations, it well and truly has slipped my mind. I actually thought I already uploaded this one, really. Clearly I need help. But HERE’S to a symmetrical-sounding 2020.

I’m all for resolutions and change, but only if there’s a feasible plan involved. Some of mine include:

  • to stretch daily. I used to do this religiously everyday for 10-15 minutes, but lately I’ve gotten more into the habit of just cracking my back (and ew, my neck).
  • to do one thing at a time. It does feel good to multitask (read: supertask), but being at work and at home has made me realise how much more deep, focussed and creative work and creative thinking can be accomplished when doing one thing at a time. Slowly but properly.
  • to do a weekly review on Sundays. Sundays still remain days of reflection for me. Starting off with pancakes, proceeding to movies, then reflecting on what good and bad has happened throughout the week. It’s good to generally not take everything too seriously, so I won’t bash myself for foregoing all the apples I bought for my chocolate brownies, but it’s better at least to be aware of certain bad habits that may be unhealthy.
  • work on my personal/passion project at least twice a week.
  • eat out a maximum of twice a week!! And indulge in a drink once a week (been pretty bad health-wise recently so these will hopefully bring me to my senses again).

Processed with VSCO with f2 preset

Processed with VSCO with f2 preset

If you read my previous post, perhaps you can tell I’m on a cookie roll at the moment. The end of 2019 saw me making the cream-cheese filled cookies too many a time and the start of this year has heralded a new star– the one and only peanut butter olive oil cookie and the token chocolate studs for all-round appeal. I was skeptical about giving this one a go because I was worried the olive oil would be too strong against everything else happening, but the oil is not too pungent here and actually adds a moist and fragrant depth. Together with the liberal sea salt sprinkle and melting chocolate in the middle, this is quite a gluey, peanut buttery dream.

Peanut Butter Olive Oil Cookies (makes around 7 cookies)

Ingredients

120ml (0.5 cup) olive oil

120g (0.5 cup) chunky peanut butter

300g (1.5 cup) light brown sugar

1 tsp vanilla extract

2 eggs (vegan sub: use 3 flax eggs by mixing 3 tbsp of ground flaxseed with 7 tbsp water in a small bowl and let that gel for a couple minutes before using)

1 tsp baking powder

260g (2.25 cup) all-purpose flour

150g (a full bar) chopped chocolate

2 tsp salt

Directions

Preheat your oven to 180C (350F) and line two baking trays with baking parchment. In a bowl, whisk together the oil, sugar, egg, peanut butter (preferably chunky) and vanilla extract. Then briefly mix together the flour, baking powder, baking soda, chopped chocolate and salt in a separate bowl, then tip that into the wet mix and stir well until everything is just combined. Put golfball-sized pieces of batter onto your prepared baking trays, flatten them slightly with your hands and sprinkle on some Maldon salt (or regular salt) on top. Put them, one tray at a time, into the oven and bake for 15-17 minutes. A toothpick inserted into the middle of one cookie should come out with wet crumbs but the edges should be golden-brown and firm. Best enjoyed warm but can be kept for a few days in an airtight container, or freeze and reheat whenever you want (topped with vanilla ice cream!)