Proud East– Pop Up Japan

DSCF0486DSCF0487

I miss Japan. That much I can say. So upon invitation to check out ProudEast’s new Japanese-themed popup, I could quite literally feel my belly slowly move upwards. Not that belly-lurching could be any good, in any which way or form, it’s just that I knew all those juices were undeniably angry,  screaming for some oriental nosh. And you can indeed get that sort of thing here in London, little miss dressed-up International, though at hard-shelled prices pasted on seaweed I could get for two cents at my local oriental store back at home. Eat Tokyo (of which there are several outlets here) is pretty worth most bites of sweetly-vinegared rice, but there’s a certain degree of delicacy, an intricacy lacking that, to me, is so intrinsic to Japanese cuisine. Of course culinary chains aren’t meant to be all whimsy, but I can’t help it. Even the most chain-like places in Japan were more like fanciful culinary arenas, where sumo wrestlers gracefully dance and jiggle. But London is London and some things don’t change. Here was a chance to put my worn tastebuds to good use.

DSCF0490DSCF0492

DSCF0497

Seated along the blossom-lined path of Regent’s Canal, Proud East describes its pop up as ‘fusing Tokyo’s dynamic cultural hub with century old customs’. True enough, I was greeted with rich reds splashed amongst a contemporary monochrome palette. Lanterns. Clean wood. Sharp lines. Now if only there was a Japanese lady, but you can’t have it all, right?

I started my little self-made food sequence with their Aki Ban Cha, a light and fragrant green tea (though the lady who served it didn’t know what it was). They have a selection of three teas on offer, and mine stayed warm and life-giving for the hour I was there. There had to be some sort of meditation in case anything else went awry.

DSCF0499

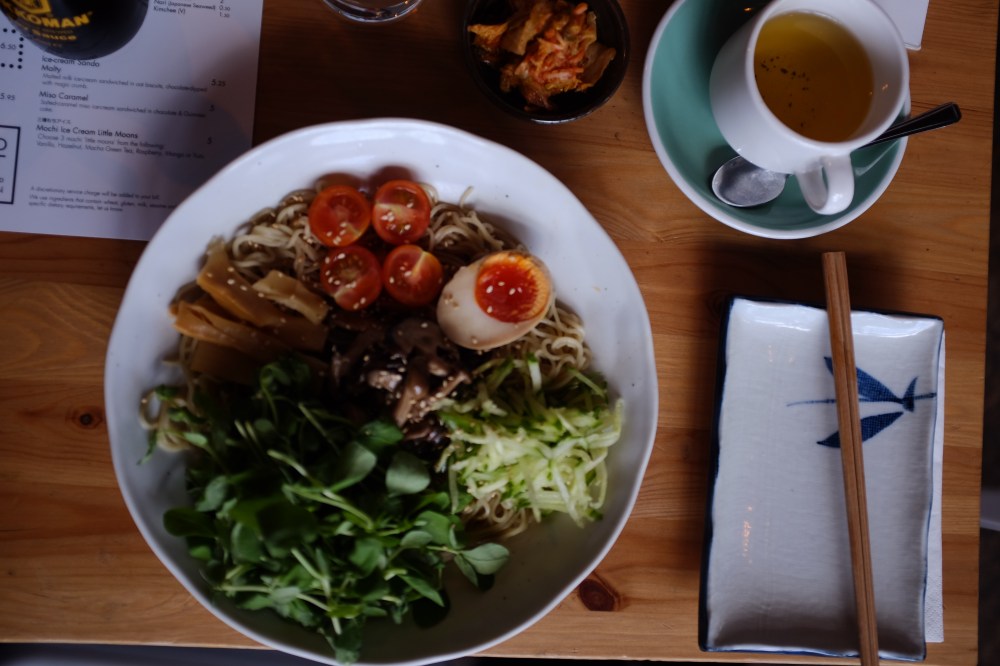
Shimeji and shiitake hiyashi (cold) ramen

The star, the silver, the gold. The Hiyashi Ramen, which I chose to eat with shimeji and shiitake mushrooms, bamboo shoots and homemade kimchi (hit the jackpot here! Not overwhelmingly spicy, delicately sour). Commending the traditional cooking method of soaking in cool water; the noodles turned out cold, bouncy and firm. A tender bite, mildly sweet and lusciously dressed in that supple, slippery ponzu (soy and yuzu, a Japanese citrus fruit like a light yet more bitter version of your typical orange). Though I keep eating eggs, dairy and meat to a minimum, hats off to the bright orange yolk tenderly cooked to perfection. A wobbly and ready-to-burst onsen egg would’ve fared even better, especially on this cool base. Well-cut, lovingly-marinated vegetables rounded up the savoury notes with an innate fresh and tangy zeal. I took it all quite seriously as the flavours were almost mesmerising, crisp silhouettes in my head. Almost as good as Tonkichi back at home in Singapore. I liked how they provide free chilli oil and white vinegar too on the side. The noodle volume was a little overwhelming for someone like me, but so worth it when priced at £9.50.

DSCF0506DSCF0507

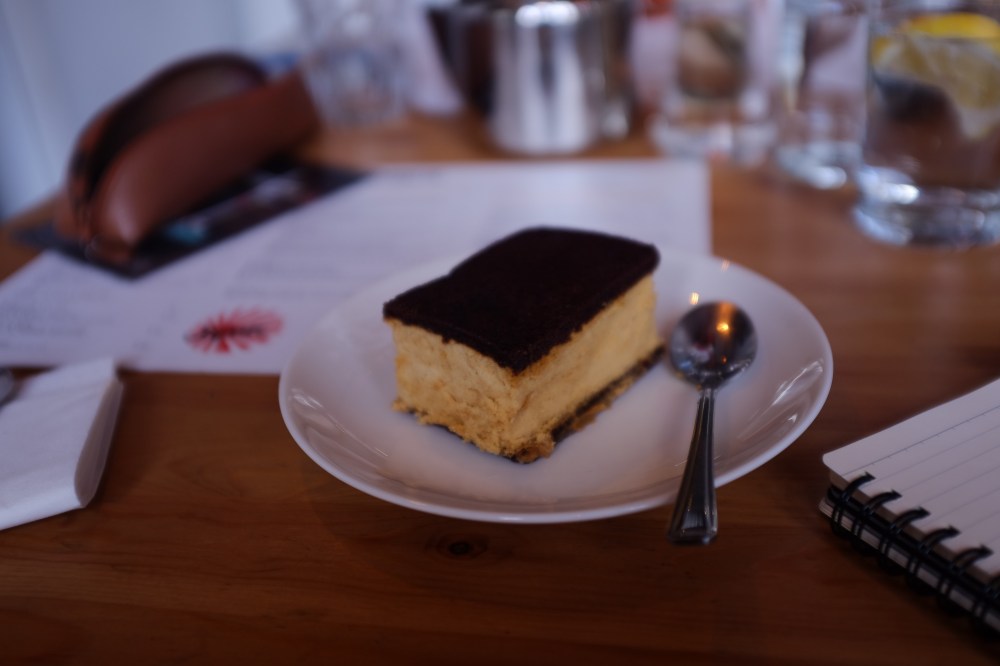
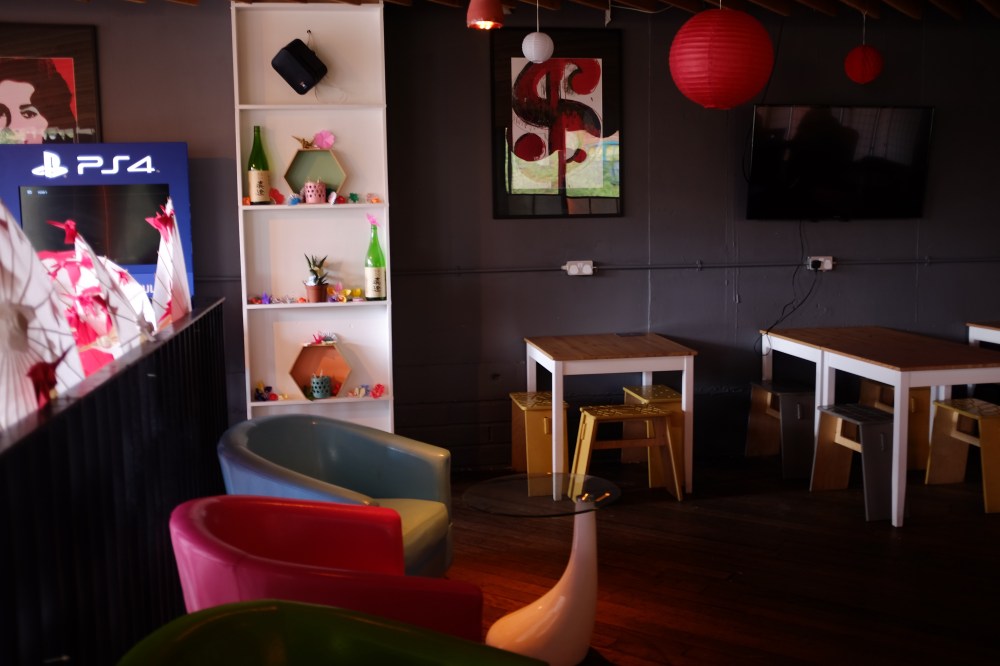
Salted caramel miso ice cream sandwiched between two layers of chocolate guinness cake (unwrapped)/ upstairs gaming and lounge area

I wasn’t expecting this to be wrapped up and sealed with ‘Happy Endings LDN’, which did sound a bit weird for obvious reasons but compelling all the same. The ice cream alone is its saving grace, for I did taste miso streaked through the marshmallowy fluff of ice cream. Sweet and pillowy. The easy sort of eating, say if you want to grab something unusual (albeit fast-melting) on the go.

The whole concept is cute– you also get to play games upstairs, watch some arthouse Japanese films and indulge in some sushi and sashimi making classes. As they mention, ‘Proud East’s open plan kitchen will be taken over by one of the finest London restaurants, Tonkotsu, with a tantalising menu including fresh Gyoza, Crab Korokke, Chicken Kara-age and Tonkotsu’s signature dish, their intensely flavoursome and creamy Ramen’. Some serious immersion going on here and this spot will satisfy your Asian tooth for as long as you like, just until it ends in about 10 weeks. So get your butts here guys.


Arlette Biscuits

Awake, breathing arlettes. Pastry doesn’t have to be painful.

3187071 Processed with VSCO with f2 preset

Coming across this recipe just once in Waterstones the past weekend was enough to convince me that this was the one and only thing I had to play with and hopefully do justice. So the hands got down to it, butter greased my fingers, and more vanilla-cinnamon perfume filled the air and softened a week-hardened soul.

3132229 Processed with VSCO with f2 preset4742860 Processed with VSCO with f2 preset

A simple matter of roll (tight enough), cut (with a sharp enough knife), bake (and ok, with a watchful eye and well-greased pan). After the pastry mess, of course.

Using a rough puff, go ahead and call me the ersatz princess, but what you see is indeed what you get, with the subtracted effort proving efficient and definitely worthwhile. I modified mine from Gordon Ramsay’s signature rough puff recipe, and found that I did not need as much cold water at the end. I then used Michel Roux’s recipe for the filling, so the insides were well-pressed with plenty of flaked almonds and more sugar. You do need plenty of butter and icing sugar, and if you’re reluctant to get just those two things I have no idea what you’re doing here. I mean sometimes even I haven’t a clue why I channel all my effort into heated baking blabber, but this passion is heated, and I just want you guys to be similarly enthusiastic about it!

The edges, crisp and caramelised, are angry enough to cut through jaws and convince the sharpest of tongues that the language of sugar and butter must never be underestimated. The anger is nuanced, but still there. Each disc wants to be cracked, then dipped in a luxury pool of vanilla ice cream or cream. Your yoghurt can be saved for this too, just crumble each disc between your fingers for some unanticipated granola, and these are your saved mornings, packaged in an airtight containers for the remainder of the month, or at least the next few days.

3722166 Processed with VSCO with f2 preset

Arlettes (makes at least 20; you can bake half and store the rest in the freezer for whenever else you want the babies)

*=vegan substitutions

Ingredients

For the rough puff pastry:

250g flour

250g unsalted butter, reaching room temperature but not entirely soft, cut into cubes (*sub: vegan butter)

pinch salt

100-120ml cold water

For the filling:

30-40g flaked almonds

1 tablespoon cinnamon

300g icing sugar

1 egg yolk (*sub: more vegan butter)

Directions

In a large bowl, add the salt to the flour, then rub the butter into the flour. The cold butter will warm up overtime and the bits will meld easily into the flour. Once the butter has been rubbed fairly evenly into flour (there will still be chunks of butter streaked through the mixture), add a quarter cup of cold water and mix. Add tablespoons of cold water until the dough just comes together. Roll the pastry into a shape that somewhat resembles a sphere or ball, put into the bowl, cover the bowl with foil/cling film and leave in your fridge to rest for a half hour.

Take your dough and place it on a slightly floured work surface. Roll the dough until it’s roughly 20x50cm, then take the top third and fold it down to the centre, and do the same with the opposite third, so you end up with a book with three layers. Roll this out again until its three times the book’s original length. Then fold the same way as before, and put back into the fridge for another half hour.

During this time, preheat your oven to 177C (350F). Grease a large pan, then sprinkle over a small handful of icing sugar (part of the 300g), then shake the pan so it coats it. Put this aside.

Liberally dust your work surface with flour and icing sugar. Roll the refrigerated pastry out on this surface until it’s 4mm thick. Brush the top with egg yolk, followed by the flaked almonds, cinnamon, and half of the icing sugar. You will need the rest for later. Roll the pastry from the long edge until your get a swiss roll-like swirl. Cover and leave in the fridge for 10 minutes (you can cut the log into half or in thirds to fit your pan, or to stuff half in the freezer if you don’t want to bake a whole batch right there and then).

Take out the log and cut it into discs around 4mm thick. Dip your fingers in icing sugar and press the discs on your work surface until they’re around 1 mm thick, then place them onto your pan. Don’t worry if some parts are thinner than others, it just means they will be crisper and easier to break for a more pleasurable mouthful afterwards. Bake for 6-8 minutes, then flip over with a spatula (or something that resembles that particular shape) and bake for another 2 minutes, before removing. They should look outrageously crisp and golden-brown, especially around the edges.

Serve with ice cream and more flaked almonds. They would also, unsurprisingly, pair fantastically with coffee or tea, the bitterness of either allowing for enhanced savouring of the delicate sweetness, each mouth-coating bite of butter.


Kaya Apple Cake

3414056 Processed with VSCO with f2 preset

These patches of bright light on my desk are rare, taking on sharp edges, hurting and twisting against the grim dark wall that is my computer screen shadow. A rare occasion, this sunlight. Its splendour screams safe but isn’t as unassuming and comforting as the 8am spillover of soft winter light, which funnily enough I do miss. Soft and unassuming. Just like the pot of homemade kaya sent all the way from Singapore. I can imagine my grandmother churning away with those pandan leaves on the weekend, thinking about how I would find her new recipe, sugar ratios in tow.

With school inevitably comes times of doubt and stress. I carefully pulled apart the bubble wrap neatly taped around the large tub of green. The smell of home propped my spirit on an invisible high horse and sent me straight to her kitchen thousands of miles away for a good 30 seconds. School didn’t exist for a good 30 seconds, too. Just standing there, one could believe nothing more than the present and past. Let the worries fade, let the senses of Now take over, and bake a cake.

There would seem to be a worrying mildness about kaya, yet when put together in a sea of cake batter and soft apple, its head pops out above the rest, an unmistakable coconutty hit serving well to blunt this seed of nonchalance.

A soft, cinnamony kaya apple cake, sandwiched with kaya, to be eaten only with something deliciously cold and creamy, as per pretty much everything I make. 

3420386 Processed with VSCO with f2 preset

This is an incredibly soft cake, more so than any of my other previous recipes. I suggest upping the amount of sugar by a few tablespoons for a more robust edge and crust, and feel free to use any sort of kaya; it need not be your traditional green kaya, for I envision the brown Hainanese sort works just as well, tailing along a more honeyed depth of sweet. And of course, the raisins are not de rigueur..

As usual, all substitutions are optional and vegan.

Kaya Apple Cake (makes one 9 inch cake)

Ingredients

200g plain flour

125g applesauce

60g butter (sub: flavourless oil or vegan butter)

100g kaya+ 100g for the fun sandwiching bit

1 egg (sub: one banana)

200g sugar

pinch salt

1 tsp ground cinnamon

1/2 tsp baking soda (eliminate if using self-raising flour)

1 tsp vanilla extract

100g raisins (optional)

190g chopped apple, peeled and cored (around 1 1/2 apples)


Directions

Preheat your oven to 177C and grease a 9-inch pan.

In a large bowl, whisk together the flour, baking soda, cinnamon, sugar and salt. In a separate heat-safe bowl, heat the applesauce and butter together, either in a microwave or on a stove. Whisk in the egg, 100g of kaya and vanilla. Tip your raisins and chopped apple into the dry mix, before tipping in the wet applesauce mix. Mix everything together until just combined, then pour into your pan and bake for 35 minutes.

Once out, let cool for at least 10 minutes and ready the extra kaya. Cut the cake down the middle of the pan. Spread the remaining kaya onto the first half, sandwich with the second half, then cut everything into bars. Serve á la mode!


Chocolate, Pear and Banana Clafoutis

4026530 Processed with VSCO with f2 preset

There’s been hassle in the head, but the kitchen binds all tassles of stress and chucks it out to the cold. I surmise it’s the cold, sometimes, that keeps me going. It’s a wakeup call, like a cold shower first thing in the morning.

4283106 Processed with VSCO with f2 preset4363016 Processed with VSCO with f2 preset

A chocolate, pear and banana clafoutis, packed with molten chocolate and moist, plump pear. To be eaten à la mode.

Rusticity once more, with wreaths of sugar, chocolate and love. There is a lot going for this clafoutis, and my favourite bits, edges aside, are the moist, pear juice-saturated bits of clafoutis right up next to the cooked pear. Forkable business, that. A past Saturday spent with someone special saw a rapid finishing of this beauty to enhance all that fun and whimsy, reminding me of all the times and things we take for granted or misunderstand. Guess it’s always good to stop and smell the roses, stop blurring the edges of pain with the fastest remedy. And this clafoutis is a remedy, to be enjoyed slowly, during and after, a candle in the wind. It’s just up to you what to make of that occasional sweet event.

I tend to vacillate between wanting the simple and complex. Usually it’s the former, with some variation/hop/twist/flicker. Chocolate and pear is a classic combination, and the banana adds a moist, sweet dimension without being too easily detected. Not that the flavour doesn’t pair well, but the mildest hint of it enhances and doesn’t shadow the two stars. Although I used a pan instead of the more desirable cast iron skillet, the edges still turned out very crispy, and yes I can vouch that I shall attain the crispiest ever result in time when I earn enough (ha ha). The clafoutis itself retained a lovely almost pudding-like consistency in the middle, flying the flan flag high and bright.

Served with the simple integrity of vanilla ice cream, this is the perfect breakfast, dessert, or in-betweener.

3243831 Processed with VSCO with f2 preset

Chocolate, Pear and Banana Clafoutis (makes one 9-inch wide pan)

Ingredients

2 large pears, peeled, cored and quartered

240ml milk of choice (whole/plant-based preferably)

65g white sugar

2 bananas, mashed

1 egg (sub: another mashed banana)

100g chopped dark chocolate, split into two portions

50g plain flour


Directions

Preheat your oven to 200C (400F) and butter a large iron cast skillet or pan (as I did). Lay your quartered pear in a ring in the pan so the tops all face and touch at the middle.

In a bowl, whisk together almost everything else– the flour, sugar, bananas, one portion of dark chocolate and milk. Pour this over the pears, making sure that there’s an even amount of batter between each quarter. Sprinkle the rest of the chocolate on top.

Bake for 35 minutes, then remove and let cool for at least 10 before tucking in with something cold like ice cream or creamy like custard. What a star show.

Rice Cake Molasses Granola

The kitchen seems to have closed upon the death of last week’s get-up. But the smell lingers. It’s rich, dark, carnal. I sit here now recalling the life-giving things of everyday. After making this last Saturday, I hopped over to a new cafe which I implore all of you to check out for some downright good, authentic Danish bakes, then to Piccadilly’s Waterstones for a good 5 hours just to read my heart out, the perfect excuse for not doing work I was meant to be doing. How sad it is to find joy in the unruly, yet how perfectly OK with it I am once or twice a week. It’s true that meaning and mental enlightenment can arise from nothing when given work to do, yet there’s a wild freedom only found in self-direction, reading and exploring things one would only find outside of a lecture theatre, as exciting a lecture may be.

With granola-making on the agenda last Saturday, I shook off the morning grog and effortlessly persuaded myself to Waitrose. Right opposite, to get some oats and rice puffs for a little bit of fancy. I came across a most moreish-looking granola recipe in Honey&Co’s cookbook just earlier in the week, overcome with fiery instinct. Rice puffs are something I always took for granted. Child’s play, too light to be in anything except standard mass-produced granola or cereal bars. This, however, seemed to take granola to something of a new level, choked with Mediterranean spices and a sultry undertone of rarity. Just as I was about to leave the house, my peripheral vision caught sight of these chocolate rice cakes I brought back from Germany just the previous week, and I knew something had to be done with those babies. A mini brainwave hit– why not crush those and chuck them in the granola instead? So I chucked off my shoes and got to work. It was going to be fun.

Starts off all sticky after everything is incorporated, and even seems a bit ‘leaky’ once taken out of the oven, but success is trust. Cooling will let the clusters form, and that’s where all the fun’s at, right? Each huge, outrageously crisp cluster is a thing of dreams. A heavy hand with the molasses will do the caramelisation process, and you, too much good. And of course, like all granola recipes, this is so easily customised. Raisins, nuts, chocolate, add and subtract as you will. How to granola: douse in milk, languish, enjoy.

5255318 Processed with VSCO with f2 preset

Rice Cake Molasses Granola (makes one large batch)

Note: all bracketed substitutions are vegan

Ingredients

80g unsalted butter (sub: vegan butter)

120g blackstrap molasses (sub: a rich, dark honey)

110g light brown, soft sugar

100g chocolate-covered rice cakes, chopped into thick chunks (sub: 70g plain rice cakes and 30g chopped chocolate)

70g oats or muesli

150g nuts of choice , chopped (I used walnuts)

100g dried fruit of choice (I used torn dates and raisins, though if you abhor either like many a friend of mine, then feel free to substitute with whatever else you would like, and this recipe works well even without any dried fruit!)

1 tsp cinnamon

optional: 1 tsp ground ginger


Directions

Preheat your oven to 190C (375F) and line a large baking tray with parchment. Combine the butter, molasses and sugar in a saucepan and bring to a boil. Take off heat, then pour in the rest of the ingredients.

Transfer to the pan and flatten a little so everything will cook more evenly in the oven. Bake for 10-12 minutes, then take out and let cool for another 10. You will notice a bit of molasses leakage, almost like a liquidy mess at the size. Not to worry, for this is expected. Leaving the pan to cool will rest everything and harden it all up nicely. Use a spoon to break everything up a little, but not too much– leave the large clusters! Store in an airtight container for up to 2 weeks. Enjoy with liberal drizzles of milk, topped with fresh/frozen fruit for a good adjacent tang.