Pistachio Fudge Bars

Processed with VSCOcam with f2 preset

Not sure if any of you can tell, but I’ve been a bit down with the pistachio bug lately. It’s almost unhealthy. A few mornings ago, I was relishing one of my favourite, unbeatable toast combinations: homemade pistachio butter, honey and coarse sea salt. Curiosity arose from this delicious ritual, and I researched recipes with the dominant theme of pistachio (and other random facts, such as how these guys have a 14% saturated fat content, and a chemical named aflatoxin may be found in poorly harvested kernels. Did you know that the pistachio tree can survive in 50C weather? Anyways). I decided, the toast fiend that I am, to kick the current bar/brownie game up a notch.

Anything, my friend, can be turned into bars.

Processed with VSCOcam with f2 preset Processed with VSCOcam with f2 preset
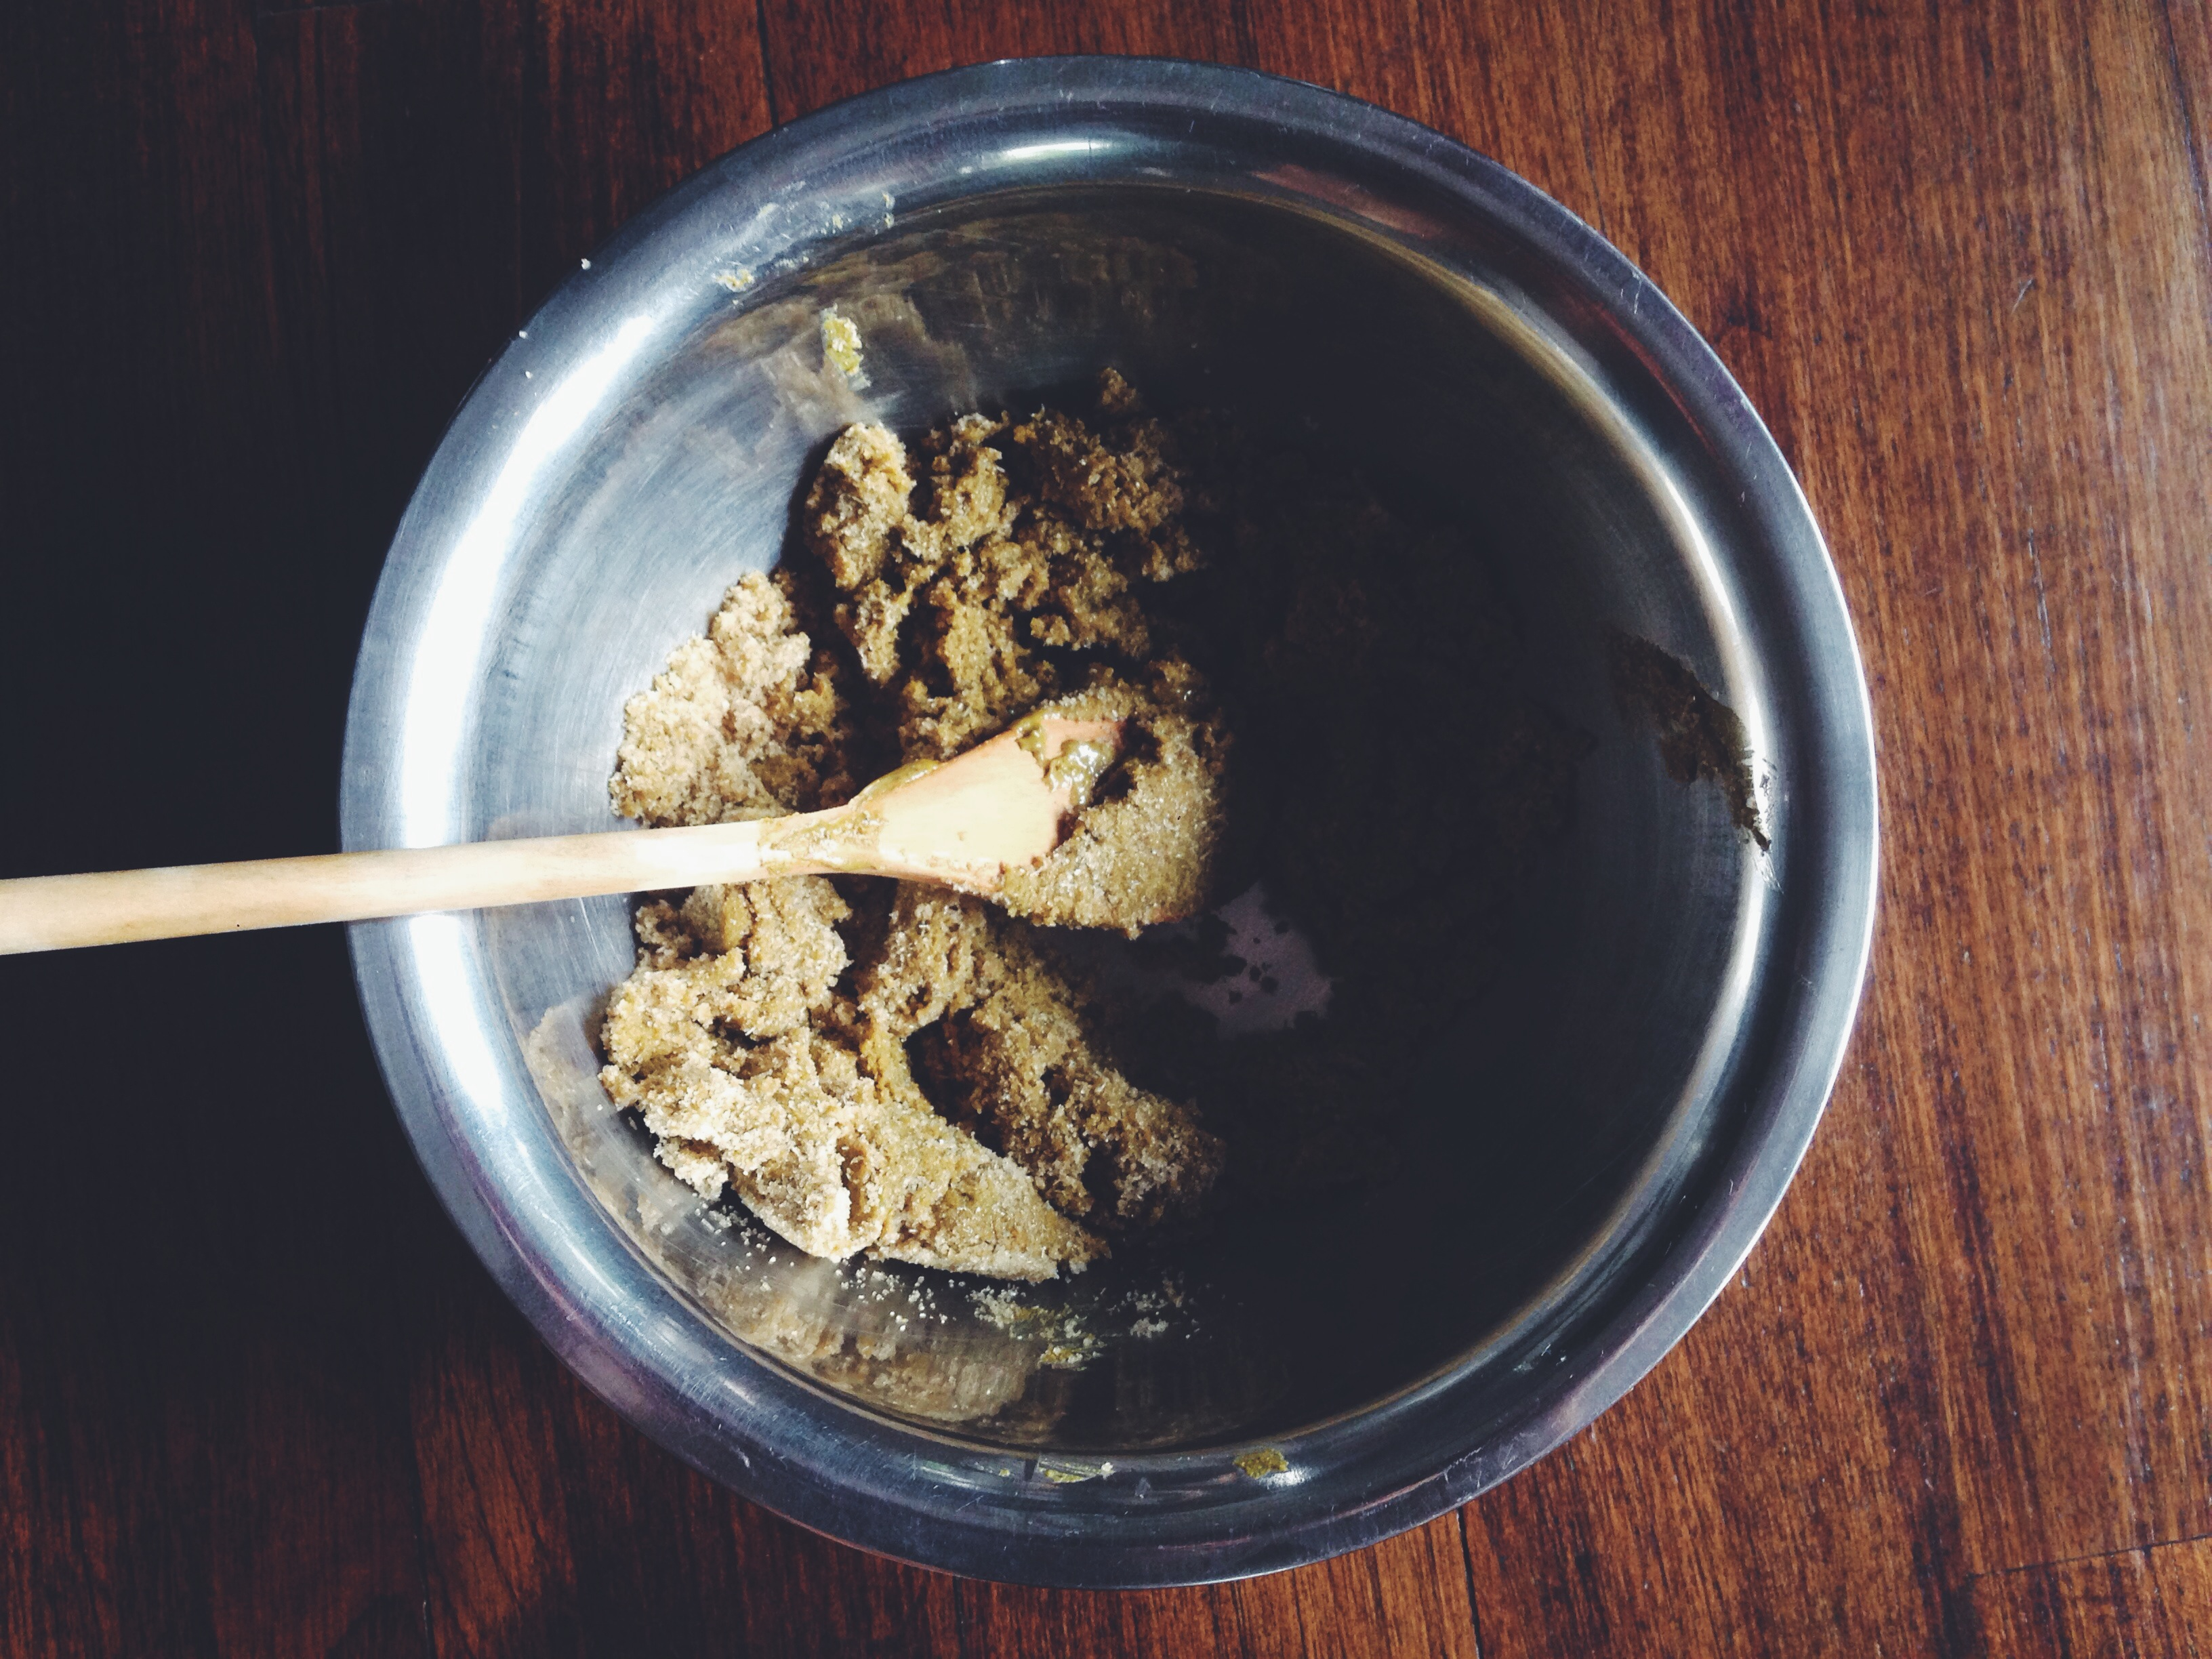
I can see how this recipe may come across as inaccessible. It’s true, the main component of these bars is pistachio butter, but I insist that you try making the stuff at home. It’s like bread. Make a loaf at home and you’ll never turn back to the packaged stuff. I’m lucky enough to have a supply of this divine concoction at home, since my mum occasionally makes a batch, and what you essentially do goes as follows: you roast a large batch of pistachios (around 200g is enough for this recipe, and you will have quite a bit leftover, which is perfect!), skin the babies, and grind for a good while in a food processor or other professional grinding device (cough a blender cough) with sugar and salt to taste. If any of you have experience making any sort of nut butter, then you know that the procedure is simple and completely worth it. This nut butter will make all your mornings golden and glimmering. It makes Skippy cower in fear.Processed with VSCOcam with f2 preset

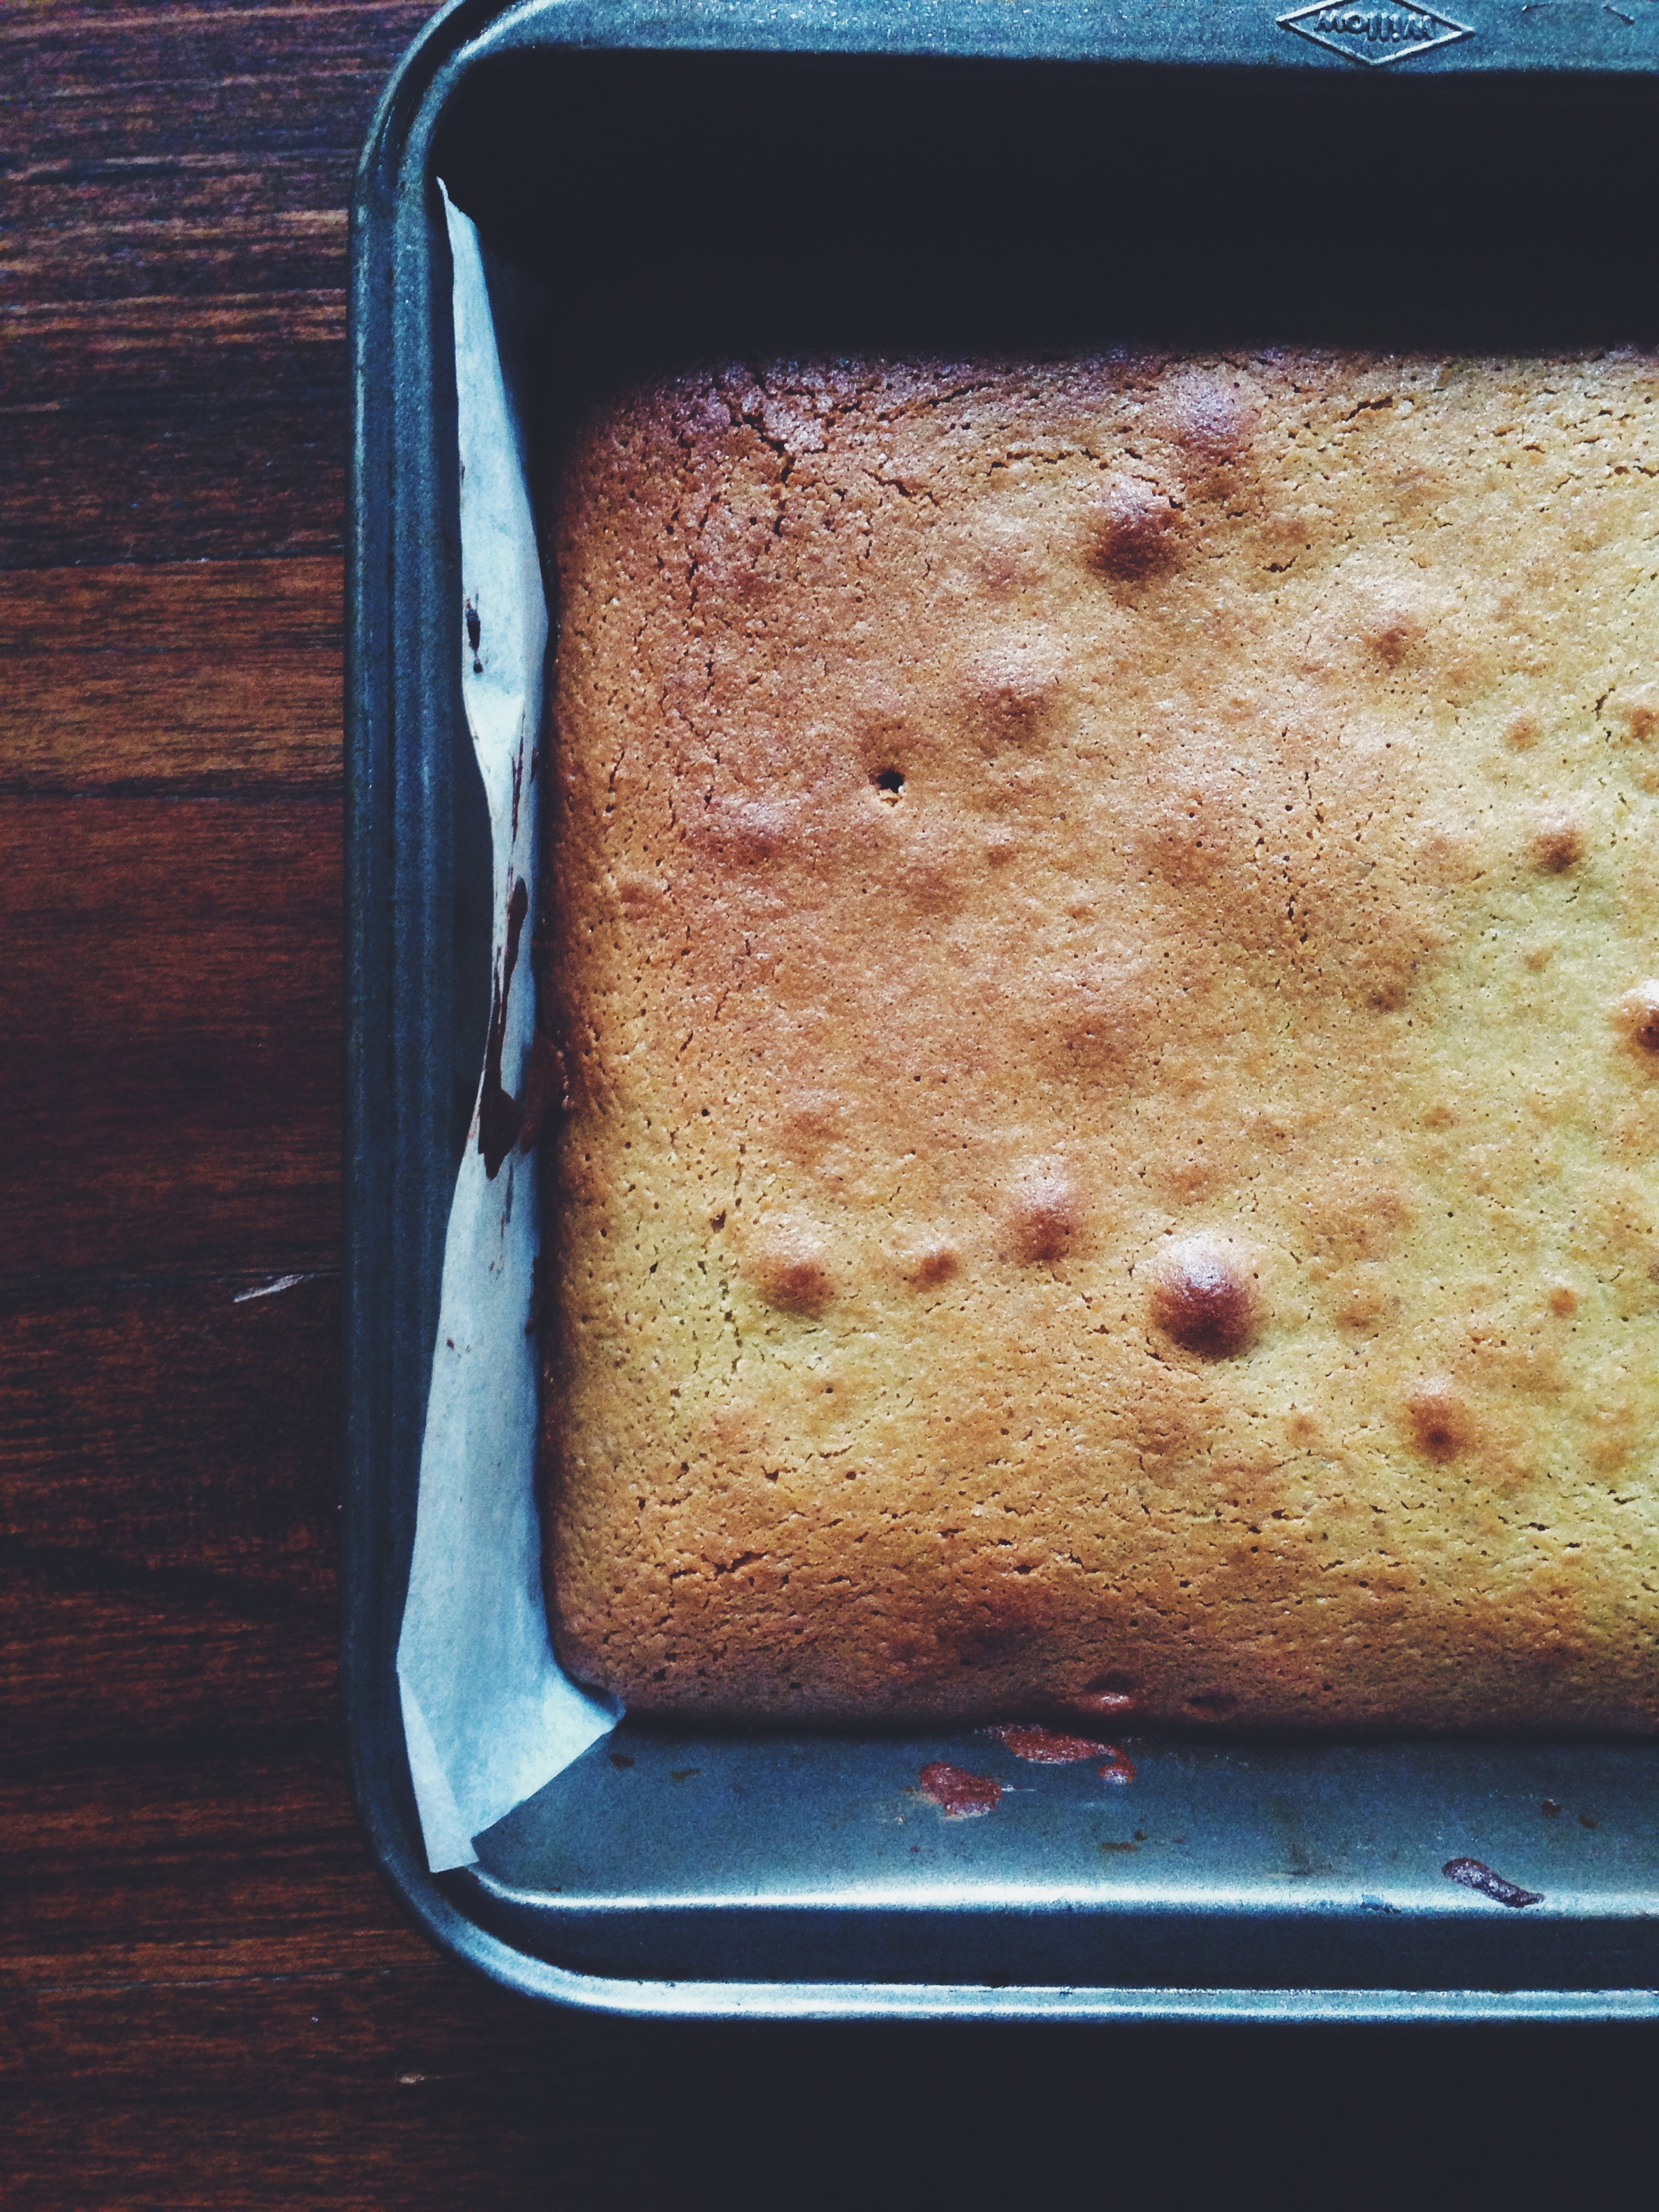
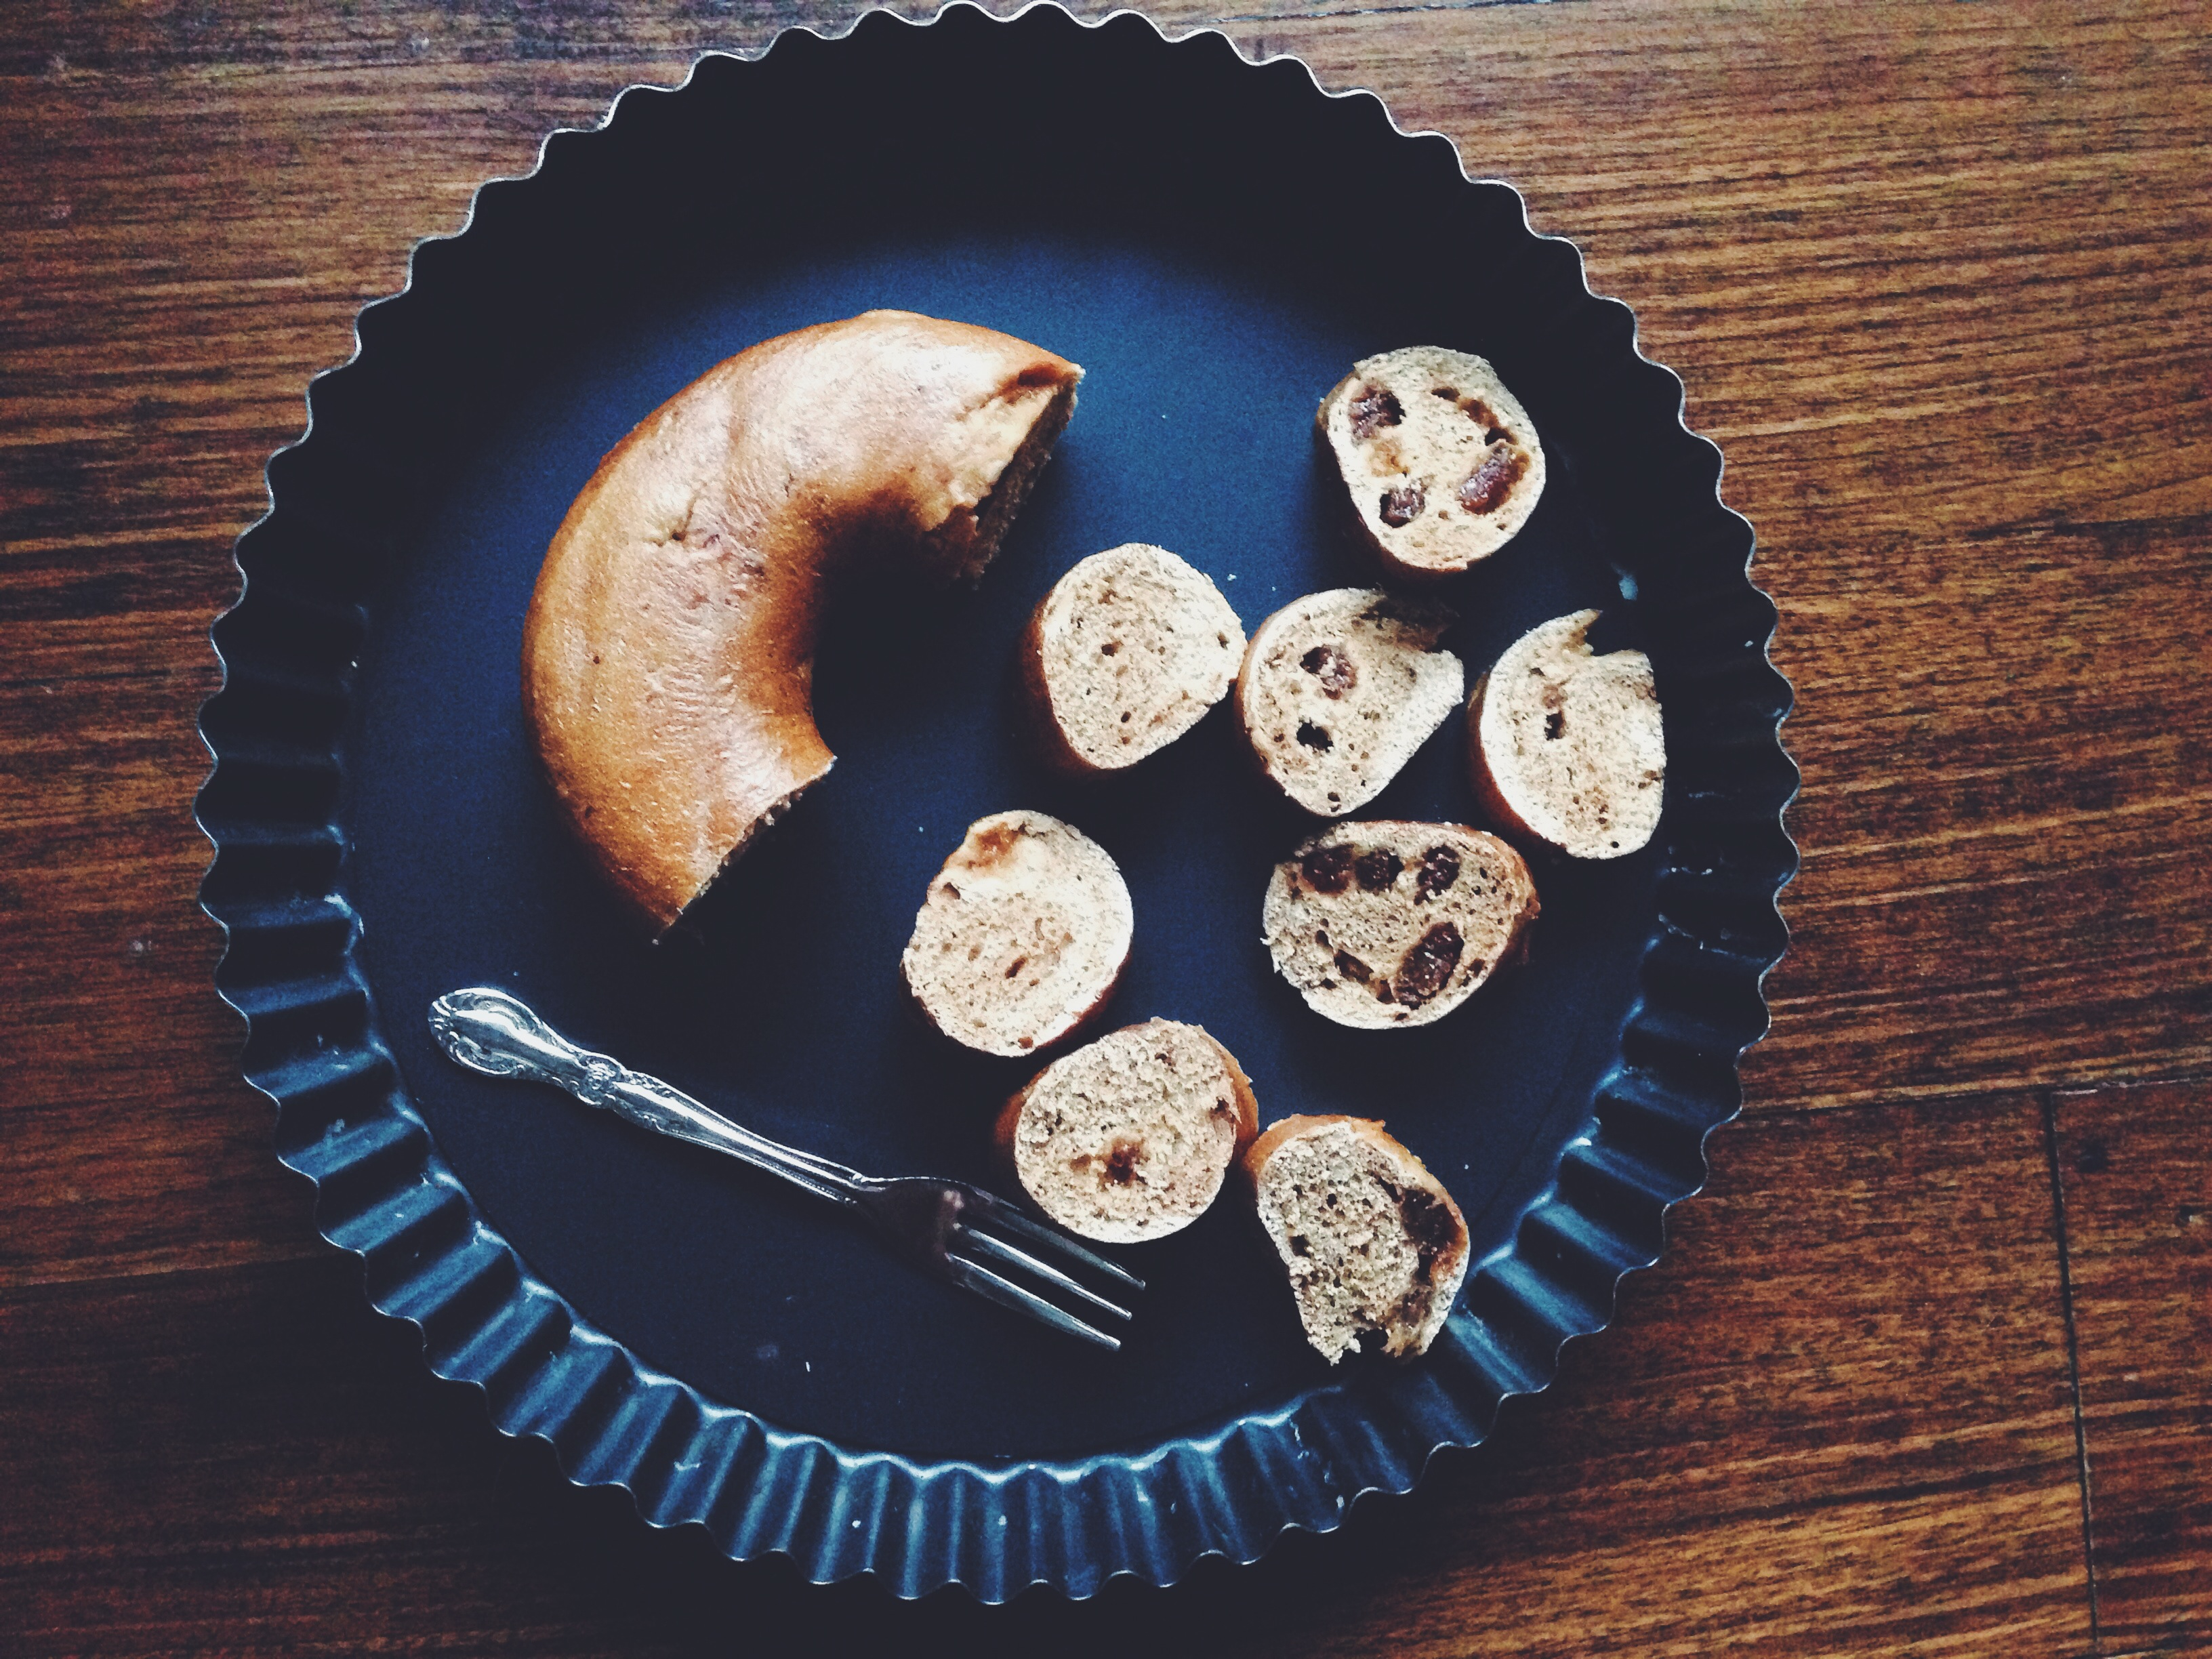
The little air bubbles you see are thanks to a bout of carelessness; I recommend dropping the pan containing the batter before actually baking it, in order to rid your batter of excess air bubbles. Yes, mistakes are abound in this one woman kitchen.

This is a pistachio fudge bar. ‘Fudge’ because of its texture and prominent pistachio flavour. Dense, squidgy, with a slight chew around the edges, the pistachio offering an earthy, naturally sweet touch. I topped it with a simple dark chocolate drizzle to highlight these notes and add a chimerical flair to the otherwise plain pistachio base.

Pistachio Fudge Bars (makes 16 in an 8×8-inch pan)

70g all-purpose flour

2 eggs

113g (half a cup, or one stick) melted, unsalted butter

1 1/2 teaspoons vanilla extract

120g (around half a cup) pistachio butter

190g light brown sugar

half a teaspoon of salt

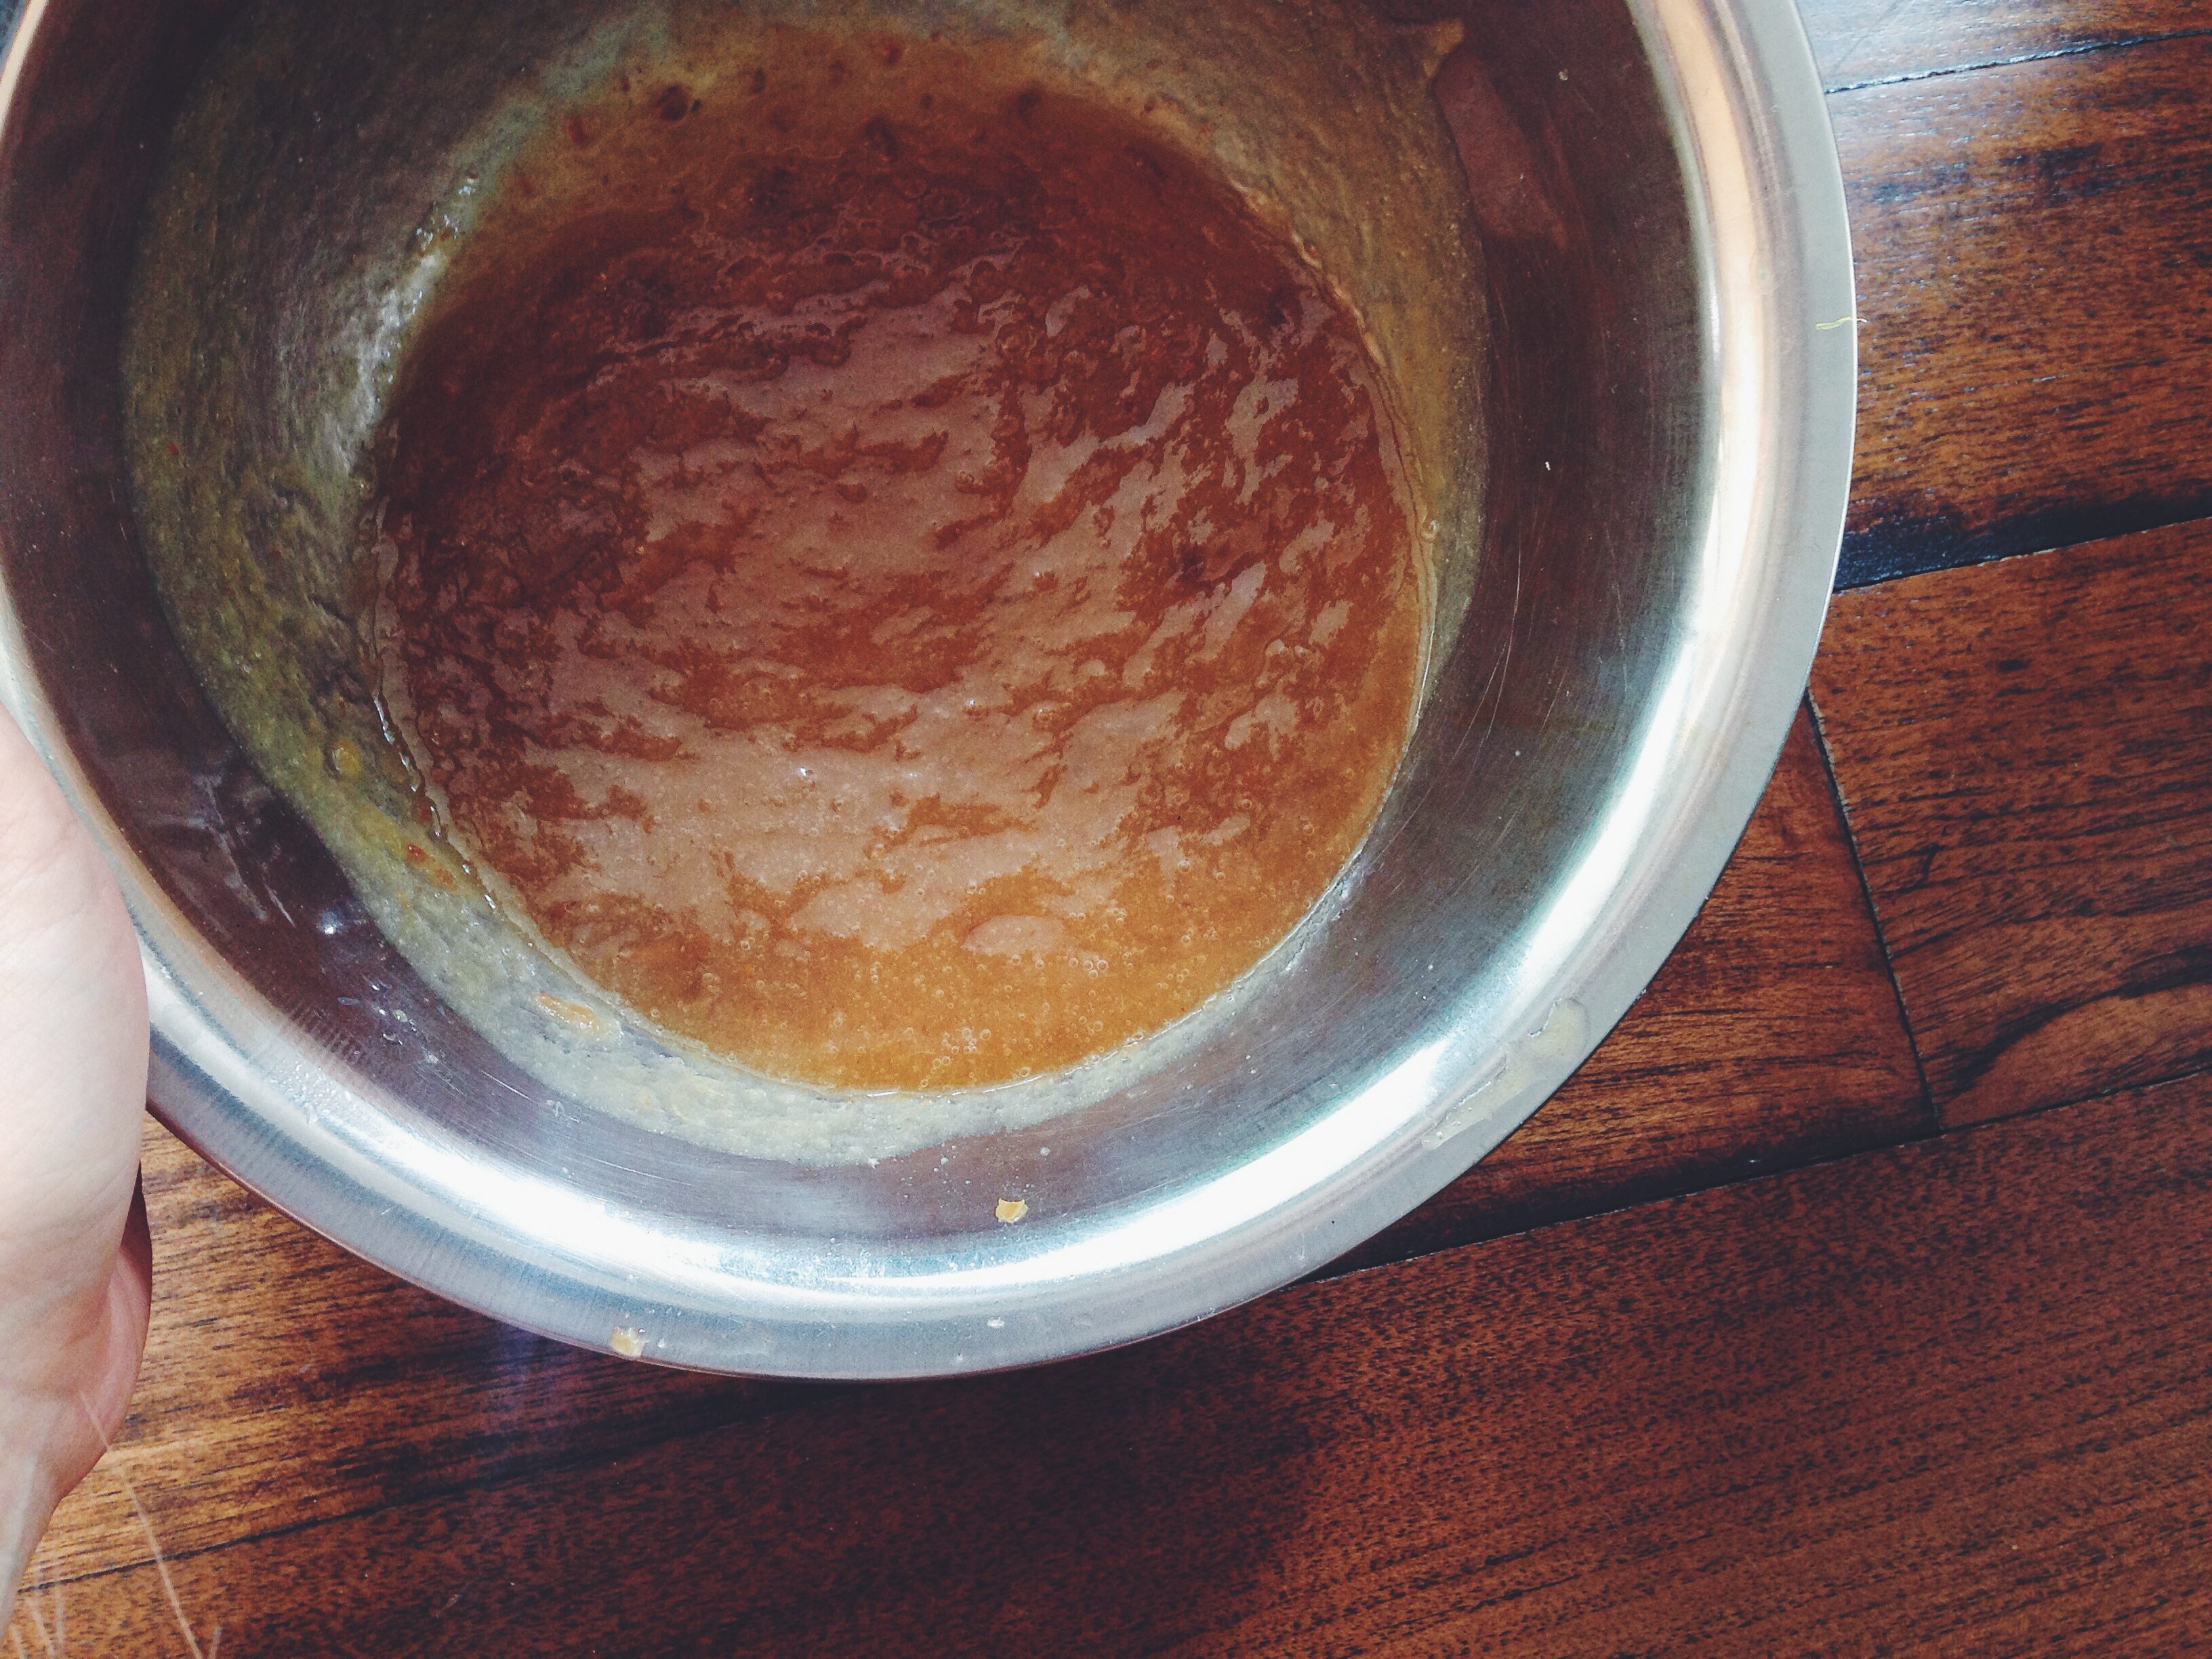
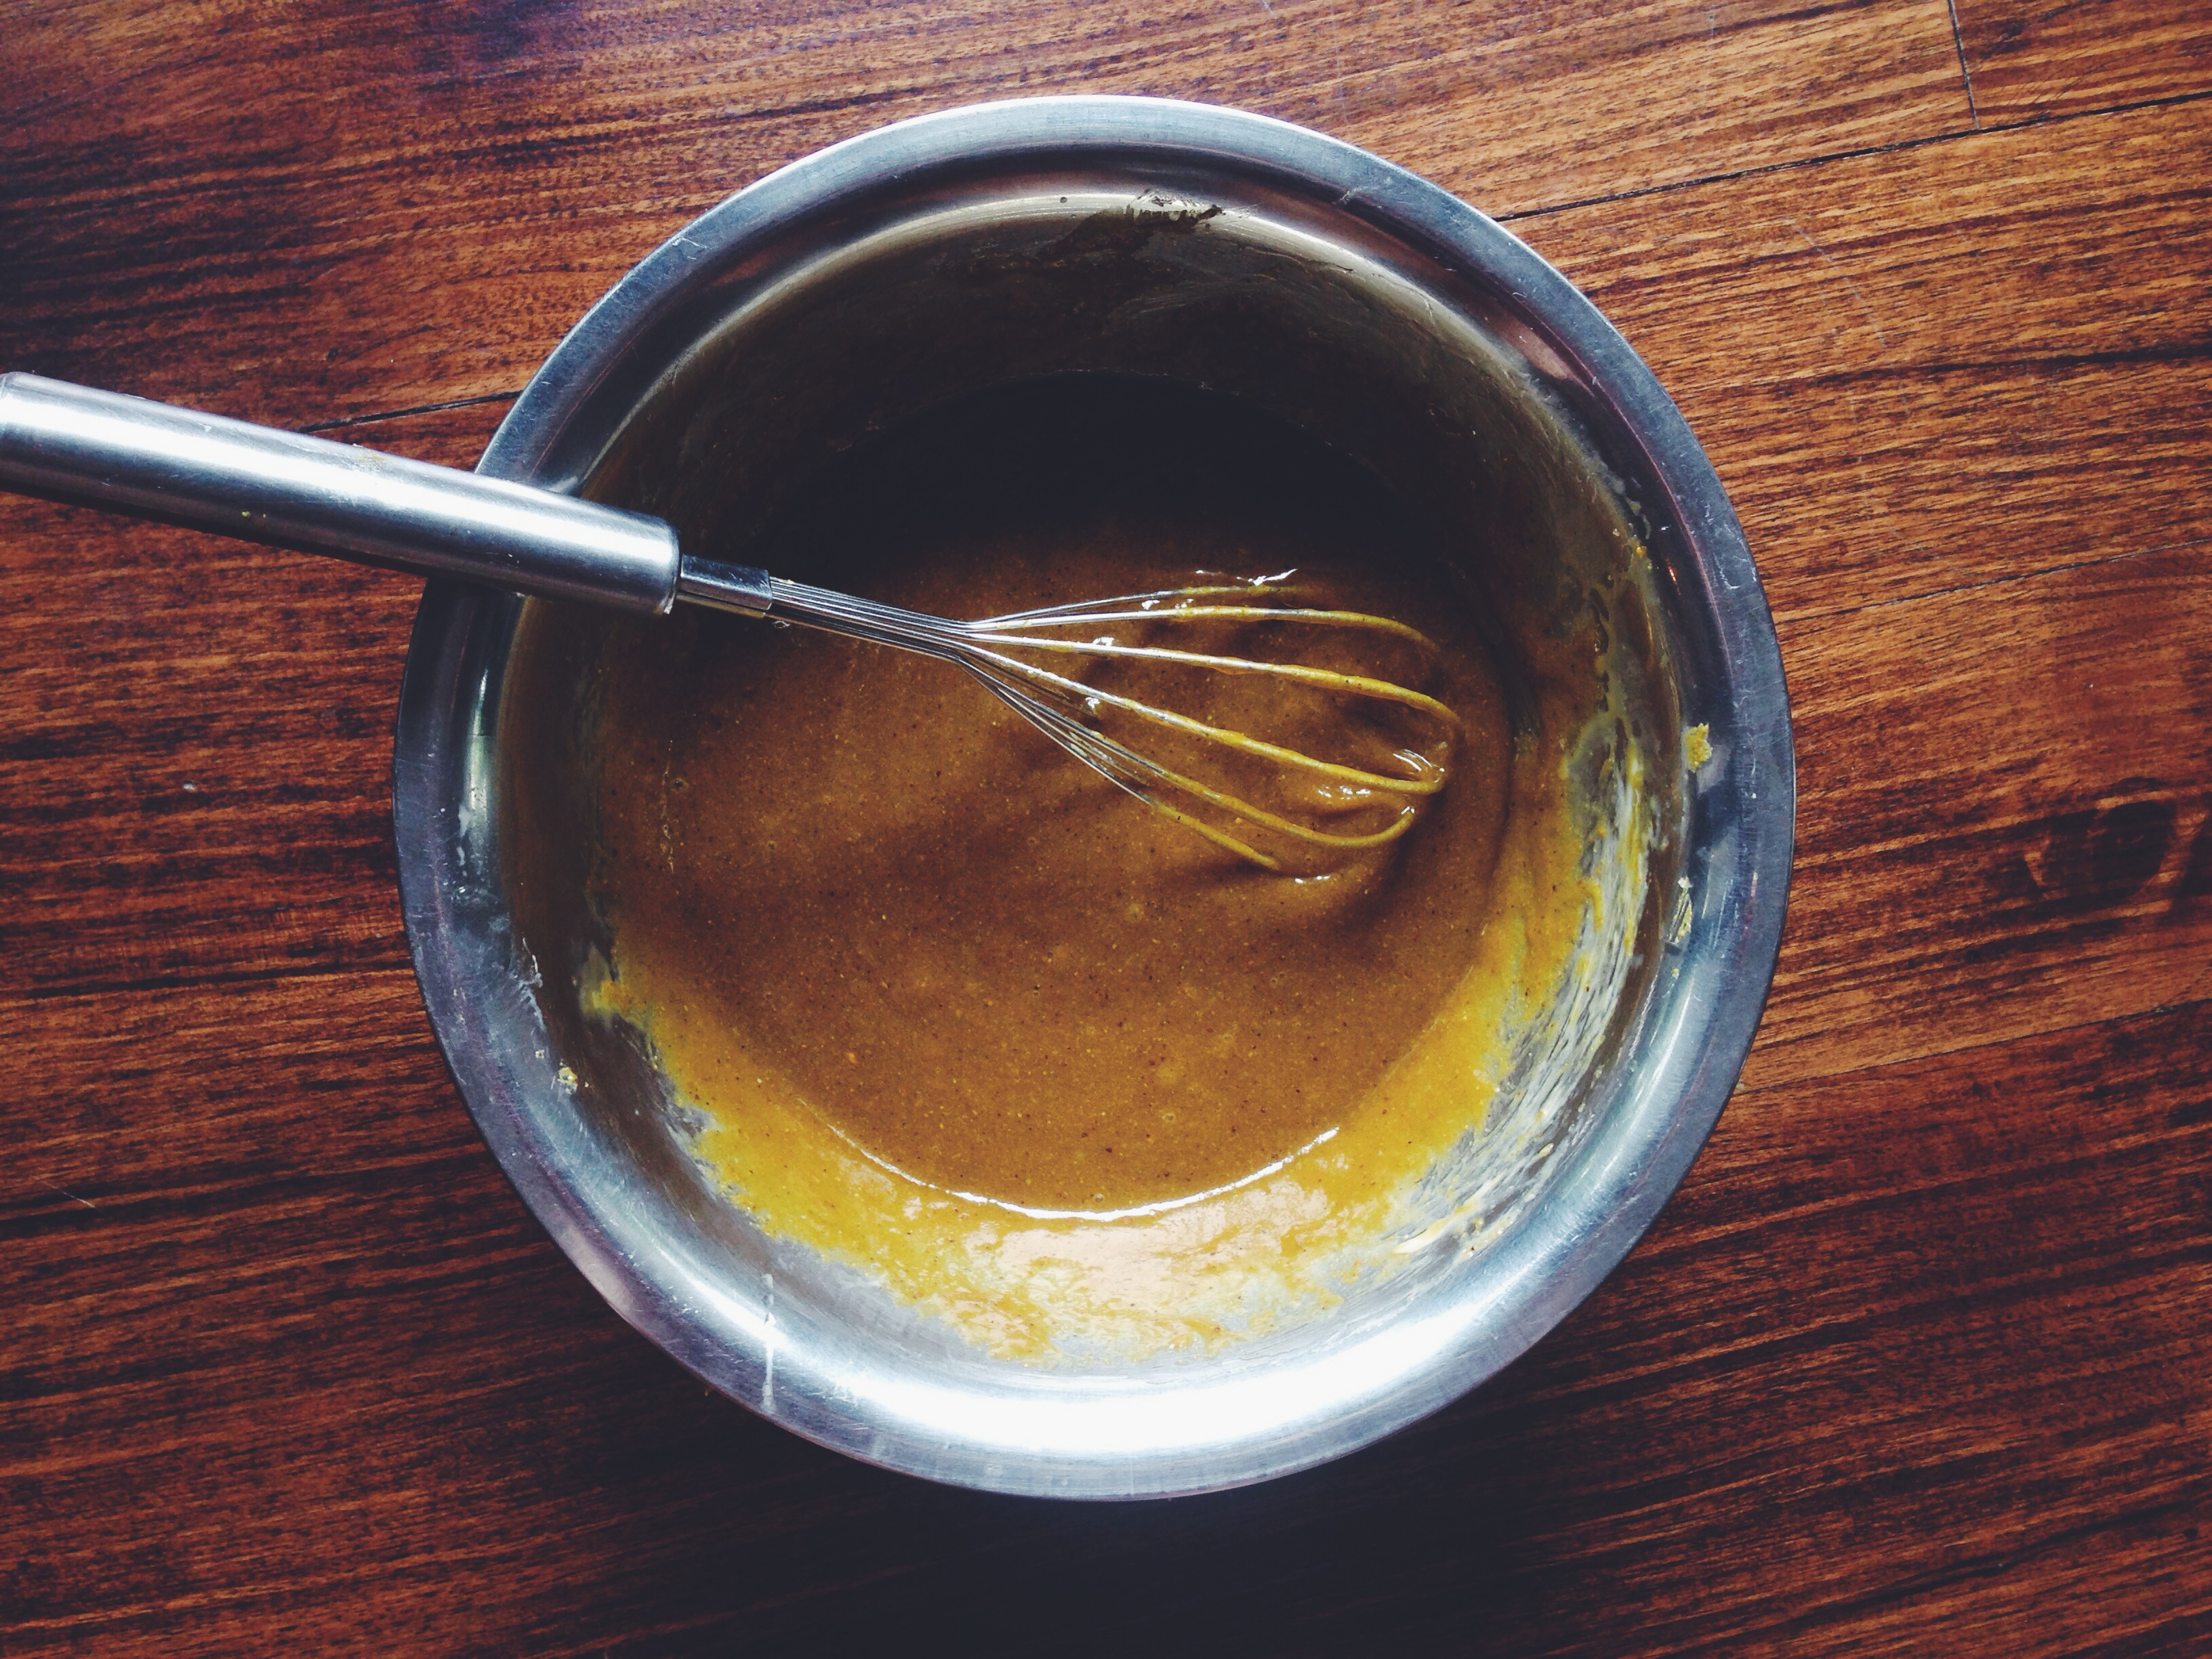
Preheat your oven to 177C (350F). Grease and line an 8×8-inch baking pan and set aside. In a large bowl and with a wooden spoon, mix together the pistachio butter and sugar. The mix should look clumpy, but will come together after a few seconds of mixing (see above). Add the melted butter, eggs and vanilla extract. Mix until smooth. The mix should be sticky and easily drop off your spoon. Add your flour and salt, and mix until combined. That’s it! That’s all there is to it. Pour the sticky gloop into your greased and lined pan, and drop the pan onto your counter a few times to get rid of any air bubbles. Pop it into the oven for 18-20 minutes. My batch was done after 18, so check it at this point. A wooden skewer inserted into the middle should come out dry, but the presence of little clingy crumbs at the tip are fine.

Let the pan cool on a cooling rack. Meanwhile, melt 70g of milk/dark chocolate in the microwave, using 20 seconds bursts and mixing in between, to prevent the chocolate burning and causing an unnecessary temper explosion in the kitchen. Put the melted chocolate into a small ziploc bag. Once the bars are cool, snip the tip off one of the two corners of the ziploc bag and drizzle the chocolate all over the cooled bars. Slice the batch into 16 equal pieces. These bars can be kept at room temperature for up to 3 days. Store remaining in the fridge and reheat whenever necessary, or store them in the fridge after the bars have cooled, if you wish.

Orange Yoghurt Pancakes with Pistachio Maple Sauce

There are few things in this world which get me like breakfast.

It’s the comforting push of the espresso button on my Nespresso machine, the warm streaming guzz. The silence in the air when I’m by myself, early in the morning, papers nestled on the table. Toaster’s on, get the butter out. Usually, it’s these 5-minute affairs, with toast and butter and honey, or any other topping combination you can think of, and morning’s set just about right. But come the weekend, something a little more.. lascivious demands to be made. I’m not talking Eggs Benedict or Crepe Suzette here (might get to either at some point in my life, kind of, maybe, hopefully), but Sunday’s always full of lazy reading and crude TV humour and, well, pancakes. With bags full of citrus fruit and a fresh tub of yoghurt at home, I guess you could say I knew what I had to do. Orange and yoghurt it was. I played around with orange in this recipe, one of my favourite cake bases by far, so check that one out in keen.

I think the magic of this recipe lies in the yoghurt, which makes everything supremely moist, and… this bloody good sauce! Once you go green, you’ll always be keen. In the language of pistachios, I mean. Ok, that was pretty bad.

Processed with VSCOcam with f2 preset

Oh, I can’t stop thinking about this sauce. It’s a revelation. Smooth sweet, buttery, with a hint of tang, complementing the orange flavour perfectly. The main component is pistachio butter, but if you do not have that, don’t fret! Any nut butter you have on hand is perfect for this recipe– natural peanut or almond works perfectly, for they have the same consistency. The only thing is flavour preference. Someone near and dear to me hates pistachios and I have nothing against that, so work with your palate! As for the pancakes, just be sure not to overmix the batter and let it rest for 5 minutes, before proceeding with the ladling, and you’re good to go. Each pancake is soft, on the thinner side, and very well-aerated. Stack two or three and eat in mini triangle stacks, with the sauce and fresh fruit.

Orange Yoghurt Pancakes with Pistachio Maple Sauce (makes 10-12)

For the pancakes:

150g whole wheat or all-purpose flour (I used a mix of both)

1/2 tbsp baking powder

1/2 tsp salt

110g yoghurt (avoid using greek, but if you must, thin it out a little with a drizzle of milk)

1 egg

100ml milk of choice (I used whole, but feel free to use almond milk; I imagine it would be lovely here)

90ml freshly squeezed orange juice (round about the amount yielded from one small orange) and the zest of one orange

For the pistachio maple sauce:

2 tbsp nut butter of choice (I used pistachio butter, mmm)

2 tbsp milk

one tsp yoghurt

one tsp maple syrup

In a large bowl, whisk together the flour, baking powder and salt. In a smaller bowl, whisk together the milk, egg, yoghurt, orange zest and orange juice. Pour the wet into the dry mix and, with a wooden spoon or spatula, slowly stir everything together. Mix until just combined, and there are still small lumps in the batter. Let rest for 5 minutes. Preheat your pan on the stove to medium heat. Hold your hand above the pan to see if it’s hot, and once so, grease with a knob of butter.

Using a quarter-cup measurement or two tablespoons, ladle the batter onto the pan. The large amount of leavening in this recipe means you will see little air bubbles pop up quickly. Once you see a fair bit of bubbles strewn randomly on the surface, go ahead and flip. The other side will take much shorter; around 20 seconds on average.

Let the cooked pancakes rest on a paper towel or in an oven preheated to 160C, if you’re cooking for a few people in the morning. If not, these pancakes freeze and reheat wonderfully. Just cook  a batch, let them cool for 15 minutes, then place in a single layer on a baking tray and pop into the freezer. An hour later, take the pancakes off the tray and put them all into a ziploc bag.

Make the sauce. In a small bowl, mix all the sauce ingredients together. Adjust according to taste– for a tangier finish, add more yoghurt, for a sweeter one, add more maple syrup. The stated quantities makes enough for 2, so if there are more, then adjust the ratio. To serve, place a stack of two or three (or more) onto a plate, drizzle on some pistachio maple goodness, and add fresh fruit for textural and flavour contrast.

Chelsea Date Buns

Processed with VSCOcam with f2 preset

So I have just a few weird habits.

1. Occasionally listening to Phil Collins and Westlife late at night when nothing else seems to appeal to my senses as much.

2. Burning toast on purpose.

3. Eating properly burnt toast with a knife and fork.

And lately, it’s been trying to perfect a specific recipe which is both nutritious and spectacularly delicious– a date lemon glaze!

But more on that a little later. I’ll get to the real meat (or should I say, crumb) of the whole situation first. I’ve been wanting to make chelsea buns for a while now, after coming across Paul Hollywood’s (anyone else here a massive Great British Bakeoff fan?) recipe online. It all seemed simple enough. I modified it a little, using a different proportion of dried fruit, as well as dates, and softened instead of melted butter for the filling. Chelsea buns are traditionally flavoured with lemon zest, cinnamon and dried fruit, but I incorporated the lemon more so in the glaze rather than the actual dough. If you’re giving this a shot, there’s no harm going all traditional as well.

Processed with VSCOcam with f2 preset Processed with VSCOcam with f2 preset

I’ll tell you now– this dough is a dream to work with. Probably the best ‘roll dough’ I’ve worked with in quite a while, and kneading was a pleasure even in this 38C weather. Is it just me or has it been extra sauna-like here recently? Once baked, the bun itself is soft, white and fluffy, though not as buttery as a brioche cinnamon bun or something of the sort. It’s a little headier, denser, but nevertheless upholding a tender, moist crumb. Those punch marks made my knuckles feel like they were in heaven, by the way.

Processed with VSCOcam with f2 preset Processed with VSCOcam with f2 preset Processed with VSCOcam with f2 preset

You can use any sort of dried fruit here, but I knew dates might be a little different given their soft, squidgy, texture, and I didn’t want anything too sickly sweet either. I was rather afraid of creating a mess of melting dates, but that fear was quickly replaced with hope ad excitement because it’s just these dates, not the cranberries or apricots (top), that, when mixed with the brown sugar, butter and cinnamon, created the most glorious soft, caramelised inner filling. The bottoms were dripping with toffee-hued, sweet goodness. So yes, dates were a terrific idea, a sublime encounter.

Processed with VSCOcam with f2 preset Processed with VSCOcam with f2 preset

Pretty much a date caramel, now that I’m sitting here recalling its texture and taste. All it is is dates, hot water, and a squeeze of lemon. Oh wait, and just a touch of cream. My my, it’s healthy (??). These chelsea buns aside, it can also be drizzled on fruit and whipped cream, or ice cream. Quite versatile, so easy and forgiving.

Processed with VSCOcam with f2 preset

Chelsea Date Buns with a Date Lemon Glaze (makes 10-12)

For the dough:

500g white all-purpose flour

7g instant yeast

3/4-1 tsp fine salt

300ml milk of choice (I used whole)

45g unsalted butter, melted in the microwave

1 egg

For the filling:

30g unsalted butter, at room temperature

2 1/2 tsp ground cinnamon

80g brown sugar

170g dried fruit (I used a mixture of dried apricots, dried cranberry, and chopped, pitted dates)

For the date lemon glaze:

10 dates, pitted (I used medjool)

juice of half a lemon

250ml hot or boiling water

1 tbsp heavy cream

Make the dough. In a large bowl, whisk together the flour and salt, then add the yeast on one side of the bowl. In a medium bowl, mix the melted butter and milk together. Add this milk-butter mix to the flour-yeast mix, then crack in the egg, and mix everything together with a wooden spoon, or in a mixer if you’re using one.

Flour your work surface and turn out the dough. Sprinkle a little more flour on top. Knead the dough for a good 5-10 minutes, until it’s no longer sticky and it looks smooth, pale and elastic. After kneading, put the dough back into the large bowl, cover with cling film or a damp cloth and leave to rise until it has visibly doubled in size, around 60-90 minutes. Grease two baking sheets and set these aside. Preheat your oven to 190C.

Whilst waiting, make the filling. In a medium bowl, mix the cinnamon, sugar and dried fruit together. Take the butter out so it can soften to room temperature during this period. After the dough has proven, lightly flour your work surface and tip it out. Lightly punch down on the dough, and with a floured rolling pin, roll the dough into a rectangle roughly 12×8 inches. Using a pastry brush, brush the softened butter all over, leaving a small border round the edges. Sprinkle on the mix of cinnamon, sugar and dried fruit. Roll the dough starting with the long side, so you end up with a 12-inch log. With a serrated knife, cut off the jagged ends (if you have any), then cut the log into 12 rolls. You may have more or less, but you should end up with 12 1-inch thick rolls. Put the rolls swirl side down on the baking pans, with a little space between each one. Cover the rolls with a piece of aluminium to prevent the tops from burning, then pop in the oven (you can do one baking sheet at a time) and bake for 18-22 minutes. Mine were perfect after 20.

Make the date lemon glaze. Take your dates and put them in the hot water, then add the lemon juice. Let this mix rest for 15 minutes. After waiting, put them in a blender (I have a Vitamix, so I used that), and blend for a full minute. The mix would look like it has already been fully blended after around 15 seconds, but don’t stop here. The dates thicken the glaze once they fully break down, and this only occurs a few seconds later. So don’t stop blending. Once a minute is up, pour the glaze into a bowl. It should be smooth, almost lump-free, and golden-brown. At this point, add the tablespoon of heavy cream.

Once the buns are baked, let rest on the baking pan and a cooling rack for half an hour. Drizzle the buns liberally with the date lemon glaze and, if you wish, top with slivered almonds.

Bagel French Toast

Processed with VSCOcam with f2 preset

Indeed, I am fully aware of the fact that this is not a totally novel idea. But what does make it outstanding is this– whipped cream cheese french toast batter. And no, I didn’t snap a picture of that because it’s not the most photogenic thing in the world, but hey, it’s the end result that counts, right? It’s all stupendously easy.

Processed with VSCOcam with f2 preset Processed with VSCOcam with f2 preset

I’ll let the pictures do the talking here. Ideally, the bagel you use should be fresh or at most 2 days old. I know what you’re all probably thinking– aren’t these guys too dense to soak up enough batter?

Oh, you smart farts. But cutting the bagel into discs which are thin enough ensures the right amount of lovely cream cheese egg batter to be blissfully soaked up into the dense little bread bodies. Eating this was pure joy; think tender, chewy bread chunks, slightly sweet and tangy thanks to the cream cheese and honey, and surprisingly dunkable (I’m talking strong maple syrup game here), because they don’t disintegrate like your typical store-bought white bread slices.

For one person, take one bagel (I used cinnamon raisin here) and slice into discs around 3/4-inch thick using a serrated knife. Preheat a pan on the stove to medium heat. In a shallow dish and with a fork, whisk together one egg, one tablespoon of softened cream cheese, a squeeze of honey and a splash of whatever milk you have on hand. I didn’t use cinnamon because I used a cinnamon raisin bagel, but add a dash of that if you would like. Soak each bagel disc in the egg batter for at least 10-15 seconds on each side, and then flip to do the same on the other sides. To your preheated pan, add a generous pat of unsalted butter, then lay all the discs on the pan. Wait around 30 seconds to cook on the first side, then flip, starting with the disc you first laid down.

Pair your french toast bagel with anything! Lay on the maple syrup, or top simply with icing sugar and fresh fruit.

Mini Orange Layer Cakes With Blackberry Lavender Buttercream

Processed with VSCOcam with f2 preset

I’ve learnt a few things in the past few days. Firstly, it is actually impossible for me to do a tripod headstand. I’m sure this is a familiar term for all you yogis out there. I’ve been practicing yoga for years (to be fair, not so much during the later years of high school) and I still haven’t mastered it. It bothers me to no end.

Secondly, 1984 is almost blowing my mind. Not the literal 80s, of course, but Orwell’s magnum opus. I’m almost done and can’t wait to get my hands on Animal Farm. Sadly, I’m pretty slow with the classics.

Thirdly, right about this time of year, I feel completely and utterly at ease. Yet, I’m perfectly aware of the fact that way, way too much suffering is going on in the world to be ignored. Everyday I go about my business– practicing yoga, journalling, a little revision for my future course here and there, baking (what’s new!), fretting about hair and makeup… And all around me, bombs are dropped, little ones suffer, the clocks stop ticking for thousands, millions. With all the privileges that surround me, it’s easy to take things for granted. To continue living in a bubble of selfishness and oblivion. I just hope most people in the world are more.. aware. That’s all. Me included.

I shall now proceed to wax lyrical about my favourite (orange) cake recipe in the world. And that says something because I’ve made a fair bit of cake in my lifetime.

Processed with VSCOcam with f2 preset

Oranges, oranges. I initially thought lemon, but lemon and blackberry is already a kill-me-classic, and with fresh, sweet oranges in the pantry, what’s there to fear? The citrus note of the cake using these was indeed milder, yet the flavour and goodness of that pulp and zest did all the talking. It still feels odd to have so much free time with the holidays in full bloom. Experimentation takes flight all the time, anywhere. Ideas flying left, right and centre. If I’m not thinking about what biology/biochem or fiction book to buy next, I’m recipe brainstorming, and goodness does it feel good. I was dying to sculpt mini layer cakes, because they’re the epitome of simple, refined, easy bakes. The blackberry lavender buttercream sandwiched between three layers of incredibly light, orange sponge adds aesthetic and textural oomph. The sweetness hits the palate just before you enjoy the moist and tender cake crumb. It truly is one of my favourite cake recipes.

Processed with VSCOcam with f2 preset Processed with VSCOcam with f2 preset Processed with VSCOcam with f2 preset

You added actual blackberries…? With the… seeds?

Alright, that part is optional. Though most recipes state the addition of blackberry puree sans all the gritty bits, I personally prefer the addition of the seeds for added flavour and texture. Combined with the dried lavender, each bite is like pink fairy dust. Pink and purple aren’t exactly up there on my list of favourite colours (which actually just comprise black and burgundy), but the saccharine delicacy of each little cake is irresistible. I had to adjust the initial buttercream recipe because it yielded too thin a consistency. It all worked out pretty well in the end. If anything, I might just add a touch more tang, be it salt or cream cheese, to the buttercream.

Processed with VSCOcam with f2 preset

Mini Orange Layer Cakes With Blackberry Lavender Buttercream (makes around 4 mini 3-layer cakes)

For the cake:

188g (1.5 cups) all-purpose flour

3/4 tablespoon baking powder

large pinch of salt

113g (half a cup) of soft, unsalted butter

225g (1 cup) sugar

2 eggs

1 teaspoon vanilla extract

zest of one small or medium-sized orange

160ml (2/3 cup) whole milk

50ml freshly squeezed orange juice

For the blackberry lavender buttercream:

226g (one cup) unsalted butter at room temperature

500 grams icing sugar

1 tbsp vanilla extract

large pinch of salt

1-2 tablespoons of dried lavender (optional)

55g fresh or frozen blackberries (around half a cup)

Preheat your oven to 177C (350F) and grease a 7×9-inch (or 8×8-inch) baking pan. In a medium bowl, whisk together the flour, baking powder and salt. In a larger bowl and with either a normal or electrical whisk, beat the butter and sugar for at least a couple of minutes, until light and fluffy. Beat in the zest of the orange, 2 eggs, and vanilla extract. Add a third of the flour mix, stir briefly with a spatula (no need to fully incorporate), then add half of the milk. Fold in briefly again. Add another third, the rest of the milk and the orange juice. Fold in briefly for a few seconds, before adding the rest of the flour. Mix until just combined. That part is so important, for there is a fine line between tender crumb and dull, dense, bleh. Don’t forget to scrape down the sides of the bowl and make sure the flour at the very bottom is well incorporated.

Pour the batter into the pan and bake in the preheated oven for 19-22 minutes. Put 21 to be safe (that’s how long it took mine). While you wait, make the buttercream.

In a large bowl and with an electrical whisk, beat the butter until it looks lighter and, well, fluffier. Add half of the icing sugar and vanilla, and beat. Take your blackberries and microwave on high for around 20 seconds, until you can see the juices seeping out and they are easy to mash. Mash them with a fork. Add to the mixing bowl, together with the remaining icing sugar. Beat until all is well combined. If you wish, fold in the dried lavender with a spatula. Place most of the buttercream in a piping bag fitted with whatever tip you like. Leave all the buttercream in the fridge for later use.

Assembly:

Once the cake is done, remove from the oven. It should be light brown and ever so slightly domed on top. Let cool in the pan on a wire rack. It will take at least half an hour to fully cool.

Once cool, take a 3-inch round cutter (or scallop-edged, up to you) and cut out little circles. Remove the buttercream from the fridge to let it warm up a little. Save the cake scraps for your family, before you eat everything yourself. You should get around 6-7 little circles, around 2 inches thick. Using a serrated knife, cut each little cake in half horizontally so you end up with two thinner cake discs. Pipe a circle of buttercream on the centre of one half, and press down with the other half. Pipe another circle on this half and then take a half from another cake and press down on that, so you end up with a mini 3-layer cake, each layer around 1 inch thick. Using a normal or palette knife, smear the sides and top with buttercream (reserved from the bowl) for make the crumb coat. Leave the cakes in the fridge to set and firm up for at least 2 hours, or overnight.

Take your piping bag and pipe more buttercream on top, then sprinkle with extra dried lavender.

Ah, life’s a playground.