Kaya Maple Loaf Cake

Processed with VSCOcam with f2 preset

If I had to choose the one local breakfast item I miss most from Singapore, it would have have have to be good, buttered kaya toast. Made complete with a steaming, frothy cup of teh tarik and half-boiled eggs. Thinking about it is already making me salivate.

Kaya toast to me is the epitome of simplicity done right– warm, charred white toast, the crusts traditionally, almost clinically removed with a sharp serrated knife, slathered thickly and unevenly with unsalted butter and a thick layer of homemade kaya. For those of you who do not know, kaya is basically coconut jam. A creamy, sweet, thick curd made from coconut milk, eggs and sugar. Some days I want butter and marmalade on my toast, others warrant almond butter, honey and banana, and sometimes it’s all about good old butter and kaya. The latter occasion has greatly increased in frequency.

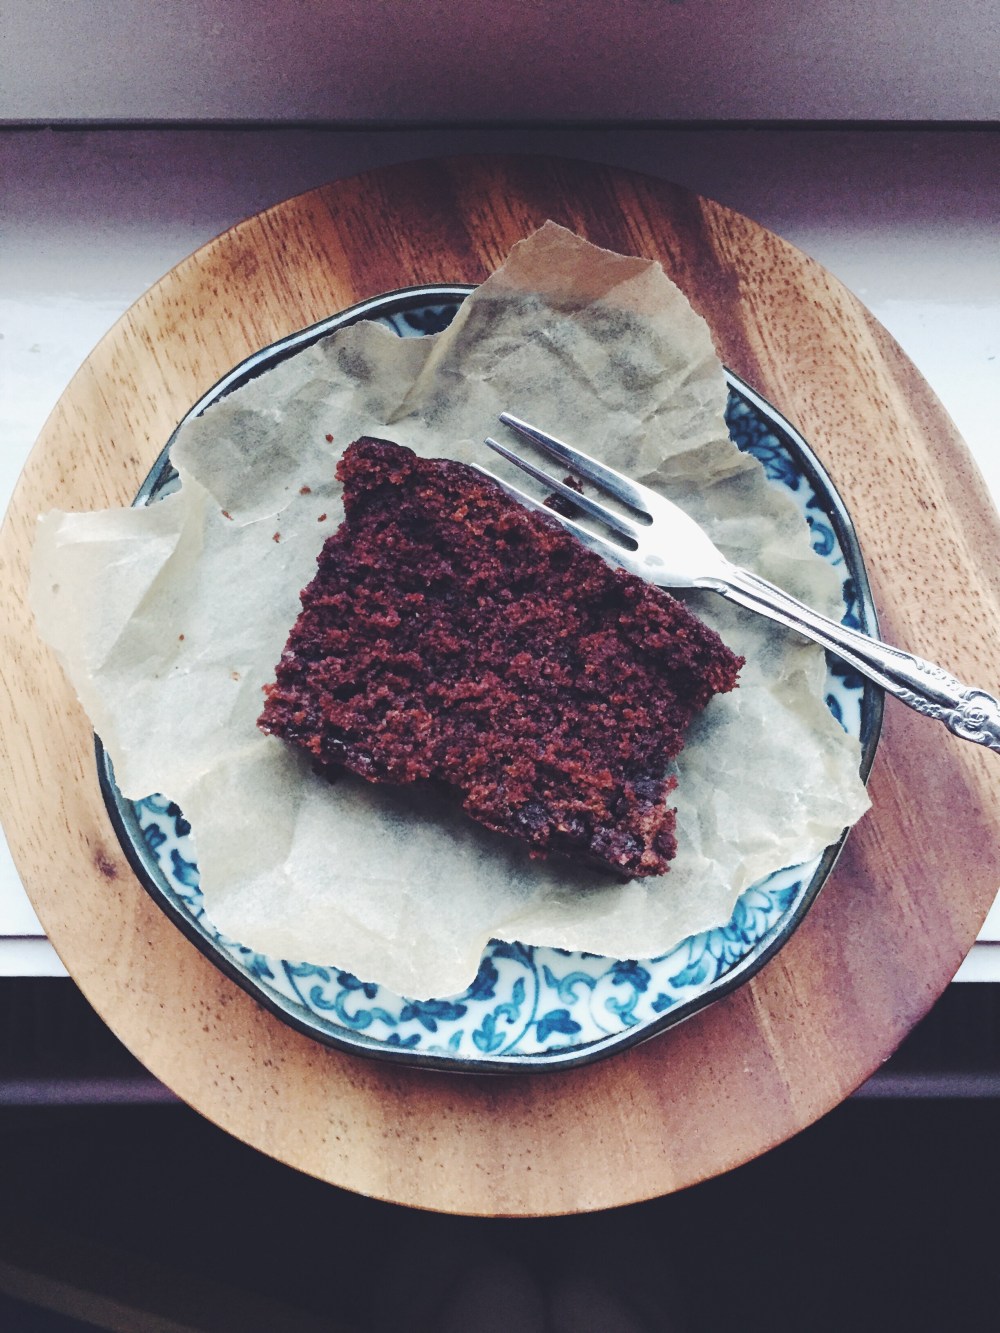
This kaya loaf cake made with olive oil and maple syrup is your favourite local breakfast in one big warm hug of a loaf. It’s :

  • sweet, earthy, tender
  • such a breeze to make!!
  • got the most amazing sweet and crusty top
  • heaven in the morning
  • actually your new wake-up call

Processed with VSCOcam with f2 preset

It’s one of the most moist, dense (in a good way) and tender loaf cakes I’ve baked in a while, undoubtedly due to the texture of kaya itself, as well as the addition of olive oil, dark brown sugar and maple syrup.

The components all possess deep, earthy, sensual undertones which complement each other fantastically, the dark brown sugar providing a hint of molasses, the kaya’s almost-fluffy consistency offering milky sweetness and volume. I used nyonya kaya (couldn’t find the traditional brand on Amazon; the link I provide is the closest I could find but you should be able to find it at any oriental supermarket), but Hainanese kaya, which uses caramelised sugar and sometimes honey and is brown instead of green, would work perfectly too.

Processed with VSCOcam with f2 preset

Processed with VSCOcam with f2 preset

Kaya Maple Loaf Cake (makes one standard 9×5-inch loaf), based loosely off my banana bread recipe

Ingredients

190g (1 1/2 cups) all-purpose flour

one generous pinch salt

1 1/2 tsp ground cinnamon

1 tsp baking soda

60ml (1/4 cup) maple syrup

1 cup kaya (no metric measurement eek– you should be fine!)

2 eggs

120g (1/2 cup, packed) dark brown sugar

2 tbsp plain yoghurt (I used coconut yoghurt for extra pizzaz, but you don’t have to go that far)

120ml (1/2 cup) olive oil

1 tsp vanilla extract

For the crusty top: 2 tbsp dark brown sugar+ 1 tsp ground cinnamon


Directions

Preheat your oven to 180C (350F) and grease (line as well if you wish) a 9×5-inch loaf pan.

In a medium bowl, whisk together the flour, salt, baking soda and cinnamon.

In a large bowl, whisk together everything else except the ingredients for the crusty top. Pour the dry mix into this wet mix and stir everything together well with a whisk or wooden spoon. Pour the thick, green-tinged mix into your greased loaf tin– the batter should appear quite wet and not very lumpy (like a typical banana bread batter). Mix the topping ingredients briefly with a fork in a small saucer and sprinkle evenly on top.

Bake in your preheated oven for 50 minutes, then remove and let cool for at least a half hour before slicing. Any leftovers can be stored at room temperature for 3-5 days, or kept in the fridge for a week. It’s wonderful toasted on its own, with a smear of salted butter and hot coffee.


No-bake Chocolate Peanut Butter Tahini Oat Bars

Kind of a mouthful. The good sort.

Processed with VSCOcam with f2 preset Processed with VSCOcam with f2 preset

Some breathing time during the week makes way for occasional creative insight. The early morning heralds possibility, and it’s only when my head hits the pillow that I realise how startlingly tired I am from the events of the day. The night pulls you in. Processed with VSCOcam with f2 presetProcessed with VSCOcam with f2 preset Processed with VSCOcam with f2 presetProcessed with VSCOcam with f2 presetProcessed with VSCOcam with f2 preset Processed with VSCOcam with f2 preset

There are so many things that make life sweet. Like this recipe. But there are also the cute coffee shop corners, insightful nutrition links I keep finding online, and inspiring folk everywhere. Here in London especially, there’s just no shortage of things to do, eat and see.

But yes. There’s just so much yes in this recipe.

No-bake chocolate peanut butter oat bars, bound together with earthy tahini, maple syrup and oats. 

There’s:

  • no flour
  • no egg
  • no sugar (as in your typical white sort, but the maple syrup provides all the goodness, and a wonderful flavour dimension)

and heck, even though I love all these things, it just means another 3 things you don’t have to lack and cry over. Easy.

The formula is simple, the taste lush. You don’t need much to handle in the first place. In fact, it’s so simple I won’t even provide a proper list of ingredients. Just some instructions, with a few cup measurements thrown in here and there. Oh right, and you need a pan. But I thought you would’ve figured that out.

Processed with VSCOcam with f2 preset Processed with VSCOcam with f2 presetProcessed with VSCOcam with f2 preset

No-bake Chocolate Peanut Butter Tahini Oat Bars (makes 36 medium bars in a 9×9-inch baking pan)

Grease (line if you wish) a 9×9-inch baking pan. In a saucepan over low heat, melt together 100ml (a little more than 1/3 cup) maple syrup, 113g (one stick) salted butter, 270g (1 cup) peanut butter (smooth or chunky, do as you wish) and 180g of chopped dark chocolate. This will take about 3-5 minutes.

Take off the heat and stir in 80ml (1/3 cup) tahini, a half cup of chopped nuts (or more chopped chocolate), and 135g (1 1/2 cups) whole rolled oats. Pour the thick mix into your pan and let sit in the fridge until firm– around 30 minutes (yes that’s it!)

Cut into bars with a sharp knife and have a ball. There’s no real need to dress these up with anything, but I imagine them nice with chocolate hazelnut spread or more peanut butter on top.

Chocolate Coffee ‘Mochi’ Cake

Processed with VSCOcam with f2 preset

I guess I should stop with the chocolate some time. Some time. In the future. Not now.

It’s been weeks since I left Japan, but I occasionally find myself reminiscing bits and parts of it. The little alleys, and corners, and scarily magnanimous people. Oh right, and the food. That.

I remember strolling into a little sweets shop with the rest of the family, and we were greeted by mile-high packs of mochi– little rice cakes made with Japanese glutinous rice. Mochi’s kind of like a magic food, consisting of polysaccharides, proteins, lipids and water. All weaved together to form this sticky, chewy, yet delicate mass. The gel-like consistency is actually due to lack of amylose in the starch grains of mochi rice, and it’s that sort of texture I wanted to recreate in this cake.

When I came across Food 52’s recipe for a chocolate mochi snack cake, I knew I had to give it a shot (and a little twist). Now I didn’t have the sort of rice necessary to make traditional mochi, but rice flour came close enough. And so rice flour it was.

I know I know, it’s a chocolate cake. Yet it’s much more than that. It’s akin to something bolder, and brighter, yet lighter. The crumb is so fine, yet each slice is perfect and straight-edged, holding its own, each bite one of chocolatey integrity.

This cake has:

  • an almost-crisp, sugary, crusty top
  • a soft, incredibly fine-crumbed interior
  • oozing pockets of chocolate chunks
  • a slightly squidgy, chewy middle
  • me smitten

Processed with VSCOcam with f2 preset Processed with VSCOcam with f2 preset

The secrets here are the addition of coffee, use of confectioner’s sugar, and the melting of chocolate, butter and honey as one of the first steps. Take your time making this– it’s simple but harbours close precision. I couldn’t resist adding a dash of coffee into the wet mix, and the result was moist and fragrant. You won’t regret dashing out to get that extra pack of confectioner’s sugar either– it yields the most fine and delicate cake crumb.

Yeah, pretty ethereal.

Processed with VSCOcam with f2 preset Processed with VSCOcam with f2 preset

Chocolate Coffee ‘Mochi’ Cake (adapted from Food 52’s chocolate mochi snack cake recipe; makes a thick 9×9 pan of cake)

Ingredients

325g (2 cups) rice flour (I used Doves Farm)

190g ( 1 1/2 cups) confectioner’s sugar

1 tbsp baking soda

pinch coarse salt

180g (1 heaping cup) dark chocolate (70% cocoa), chopped into chunks

1.5 tbsp honey

1 tsp vanilla extract

2 eggs

500ml (2 cups) whole milk

120ml (1/2 cup) coffee (I used instant– one tablespoon dissolved in half a cup of boiling water, but use the better stuff if you can!)

113g (1/2 cup) salted/unsalted butter

160g (slightly less than a cup) chopped dark chocolate, mixed with 2 tbsp extra of rice flour

5 tbsp maple syrup/honey (for the topping)


Directions

Preheat your oven to 180C (350F) and grease and line a 9×9-inch brownie pan.

In a medium-large bowl, whisk together the rice flour, sugar, baking soda and salt. Put the 180g of chopped dark chocolate, butter and honey into another bowl and microwave for 1 minute. Take it out and stir until you get a smooth, homogenous mixture. Alternatively, do the same in a saucepan and over a low-medium heat.

Scrape the smooth chocolate mix into a large bowl (large because it’s going to hold quite a volume), then stir in the 2 eggs, milk, coffee and vanilla extract. Add the dry mix and fold into the wet mix until you get a smooth, rather wet, light brown batter. Probably much wetter than what you would expect, but not as sticky or glutinous as your typical brownie batter. Then stir in the extra 160g of chocolate chunks mixed with the extra 2 tbsp of rice flour.

Scrape the batter into your greased pan, and bake for 50 minutes in the preheated oven. Once out of the oven, pierce random parts of the cake with your fork or knife, then drizzle over the honey/maple syrup. Leave to cool for half an hour, then cut and serve. This cake can be kept for a week in an airtight container in the fridge, but as the original recipe from Food 52 states, it does taste better at room temperature (ah, what are microwaves for). Serve on its own, though it’s also delicious with a heavy hand of chocolate spread (as shown above) or whipped cream.

Tea Drinker?

Processed with VSCOcam with f2 preset

Tea? Me?

My typical early mornings comprise a bleary-eyed kettle-boiling-plus-toast-making session. In a few minutes I have toast and black coffee. In less than half an hour the sun is way up there and I’m ready to do whatever it is that I have to get on with. Tea rarely makes the cut.

But when I received a lovely assortment of teas from the enthusiastic guys of Clipper Teas, I knew I’d be ready to make a change to this morning agenda. Read: I’m never one for aimless advertising. I have to seriously love a brand’s aesthetic or flavour, or support their cause, or both. So why Clipper?

Before you read any further, please take a minute to click on this link.

Doo doo doo.

Da dum.

Processed with VSCOcam with f2 preset

Done? OK.

Shocked? Disconcerted? Yeah, same here. What it really boils down to is this:

Do you know what’s in your tea?

So many of us buy bags and bags of the stuff each week, not once considering how we’re cheating ourselves. I too was completely unaware of the reality of the industry. Though I’m not the biggest tea drinker, I have friends who drink copious amounts of tea every day, and, if not the usual black, green tea is what accompanies those stressful revision sessions.

With Clipper, which also became the UK’s first Fairtrade tea company in 1984, you can be sure to get every bang for your buck, every brew fresh and free of anything artificial. Their mantra is ‘it’s what’s on the inside that counts’, and I completely agree. No bleaching of tea bags, no quarter-filled bags, no chemicals, nothing. Just pure, unbleached, natural goodness in a cup.

Processed with VSCOcam with f2 preset
A breakfast to complement this hot, flavourful cup of tea. My mother’s amazing homemade pistachio butter, which I here paired with caramelised banana, is one of the best things your lips will touch.

This early morning I enjoyed their lemon green tea, which exudes a bright, true flavour. Knowing the story and aim of Clipper made every sip all the more enjoyable. Here you can find the whole range of their delicious and reasonably priced teas! I’m already planning to smuggle as many flavours as possible back home to Singapore for the family to try.

Next time you think of having a cuppa (tea) or need something to accompany that slice of cake, just remember:

It’s what’s on the inside that counts.


Classic Pancakes

Currently (sadly) alternating between periods of intense revision and:

  • wondering what Leonardo da Vinci’s Snapchats would be like
  • researching the nutrition of scallops and uni, in other words my two current favourite types of seafood
  • embarking on The Kitchn’s baking school program, which is definitely one of the most interesting and exciting things I’ve started in a long time.

Busyness aside, there will always be time for a good settle-down in the kitchen. Like a good breakfast. Something like this:

Processed with VSCOcam with f2 preset

thin, tender, lacey (English) pancakes (here topped with fresh ripe banana, drizzled with almond butter and salted caramel walnuts+melted matcha chocolate I saved all the way from Japan)

For creativity and mood’s sake, I gave in to the whole almond-matcha theme the first time round. It’s one of those things I’ve done before, loved, and you can check it out right here. Admittedly, the day after, I reheated a couple of extra pancakes and went for the classic, ever-loved combo of freshly-squeezed lemon juice and sugar. Deliciousness= lemon and sugar soaking into thin pancake flesh, into every crevice of the crumpled carpet. That being said, there’s also something magical about the combination of a fresh, warm pancake with a creamy slather of almond butter. The melted matcha chocolate hits everything with a sweet and slightly bitter kick.

Processed with VSCOcam with f2 presetProcessed with VSCOcam with f2 preset

Sorry– trypophobics beware.

Having made plenty of American pancakes, the sort which fluff up and bounce and you top with butter and maple syrup, I thought it fitting to try something else. That’s when I came across Nigella Lawson’s recipe for classic crepes. And so another question popped up:

  • what’s the difference between a crepe and a pancake?

After trying out the recipe and doing the research, I had a hard time deliberating whether the final result was more akin to one or the other. The nuances of the recipe made this more a pancake than crepe, so pancakes it was. The main difference lies in waiting time, so calling it a crepe wouldn’t be sacrilege.

These pancakes are a real treat any morning. Very thin, lacey, and have a light brown, crispy underside. The great bit? You can put them together in a pinch and any leftovers can be chucked in the fridge and reheated the next morning/ whenever you want.

Took a while for me to get these pancakes as thin and lacey as possible, but a few good tricks to have up your sleeve are:

  • when putting melted butter into the pan before ladling of the pancake batter, do not use a paper towel to remove excess butter– add a generous amount of butter, let melt and swirl around. This will promote excellent browning and crispiness at the edges.
  • I repeat– generous amount of butter.
  • use medium-high heat– should hear a mild sizzle when batter hits the pan and a heavier-bodies sizzle when batter is ladled into pan.
  • After ladling, lift the pan off the heat to swirl it around evenly. This prevents any batter that’s already been ladled from cooking too fast and lets you swirl everything nicely and thinly.

Processed with VSCOcam with f2 preset

Classic pancakes (makes 8–10 medium pancakes; adapted from Nigella’s crepes recipe)

Ingredients

150g plain, all-purpose flour

2 tbsp white sugar

pinch salt

28g (2 tbsp) melted, unsalted butter, plus more for the pan during cooking

1 large egg

340ml milk of choice (I used both whole and almond milk on 2 occasions and both worked perfectly)

Directions

Preheat your pan or crepe pan on medium-high heat and ready some butter for cooking. In a large bowl, tip in the flour, salt, sugar, milk, egg and butter, in that order, and whisk everything together. Continue whisking until no lumps remain, and the batter is pale and silky. Use a small ladle to ladle in a little batter and immediately swirl in a circle formation to spread the batter evenly in the pan. As mentioned earlier in the post, you should hear a heavy-bodied sizzle upon the application of melted butter to the pan, and a mild batter when the batter actually hits the pan and starts cooking.

Your first and second pancakes might be a little dodgy, but it gets better as you go along (promise). Once the edges of the pancakes crisp up and brown, slide your spatula underneath and flip. Cook for up to 45 seconds on this side, then remove from the pan and place on a paper towel. When cooking the pancakes/crepes, layer paper towels between each to absorb the condensation.

Serve warm with more butter and honey/maple syrup, or lemon juice and sugar. Try out the combination in the picture above too– does wonders for your tastebuds, friends.