Strawberry Chocolate Vanilla Bean Baked Doughnuts

IMG_4497

Somewhere in between rubbing fragrant vanilla bean into sugar and popping these guys into the oven, I found myself at the beck and call of Strawberry.

Out they came, and my heart was singing. A subtle burst of tang. Gooey bursts of warm chocolate dispersed throughout the batter, little nuggets of treasure. Plump, light-as-air cakey batter to encase everything. Two bowls, whisk, an oven, done.

I was skeptical at first. Initial thoughts gravitated to classic vanilla bean with a more exotic fruity frosting, or chocolate whatnots. Some people don’t like the combination of berry and chocolate, and I get it, but I just couldn’t help myself when I saw fresh, fat strawberries sitting, beckoning in the fridge, round-butted, the promise of sweet juice pulsating under firm and uneven flesh. I thought of strawberries dipped in melted chocolate, and couldn’t get the theme out of my head. So after my good daily dose of reading and writing, I jumped up and got to work. It had to work. And I’m glad it did.

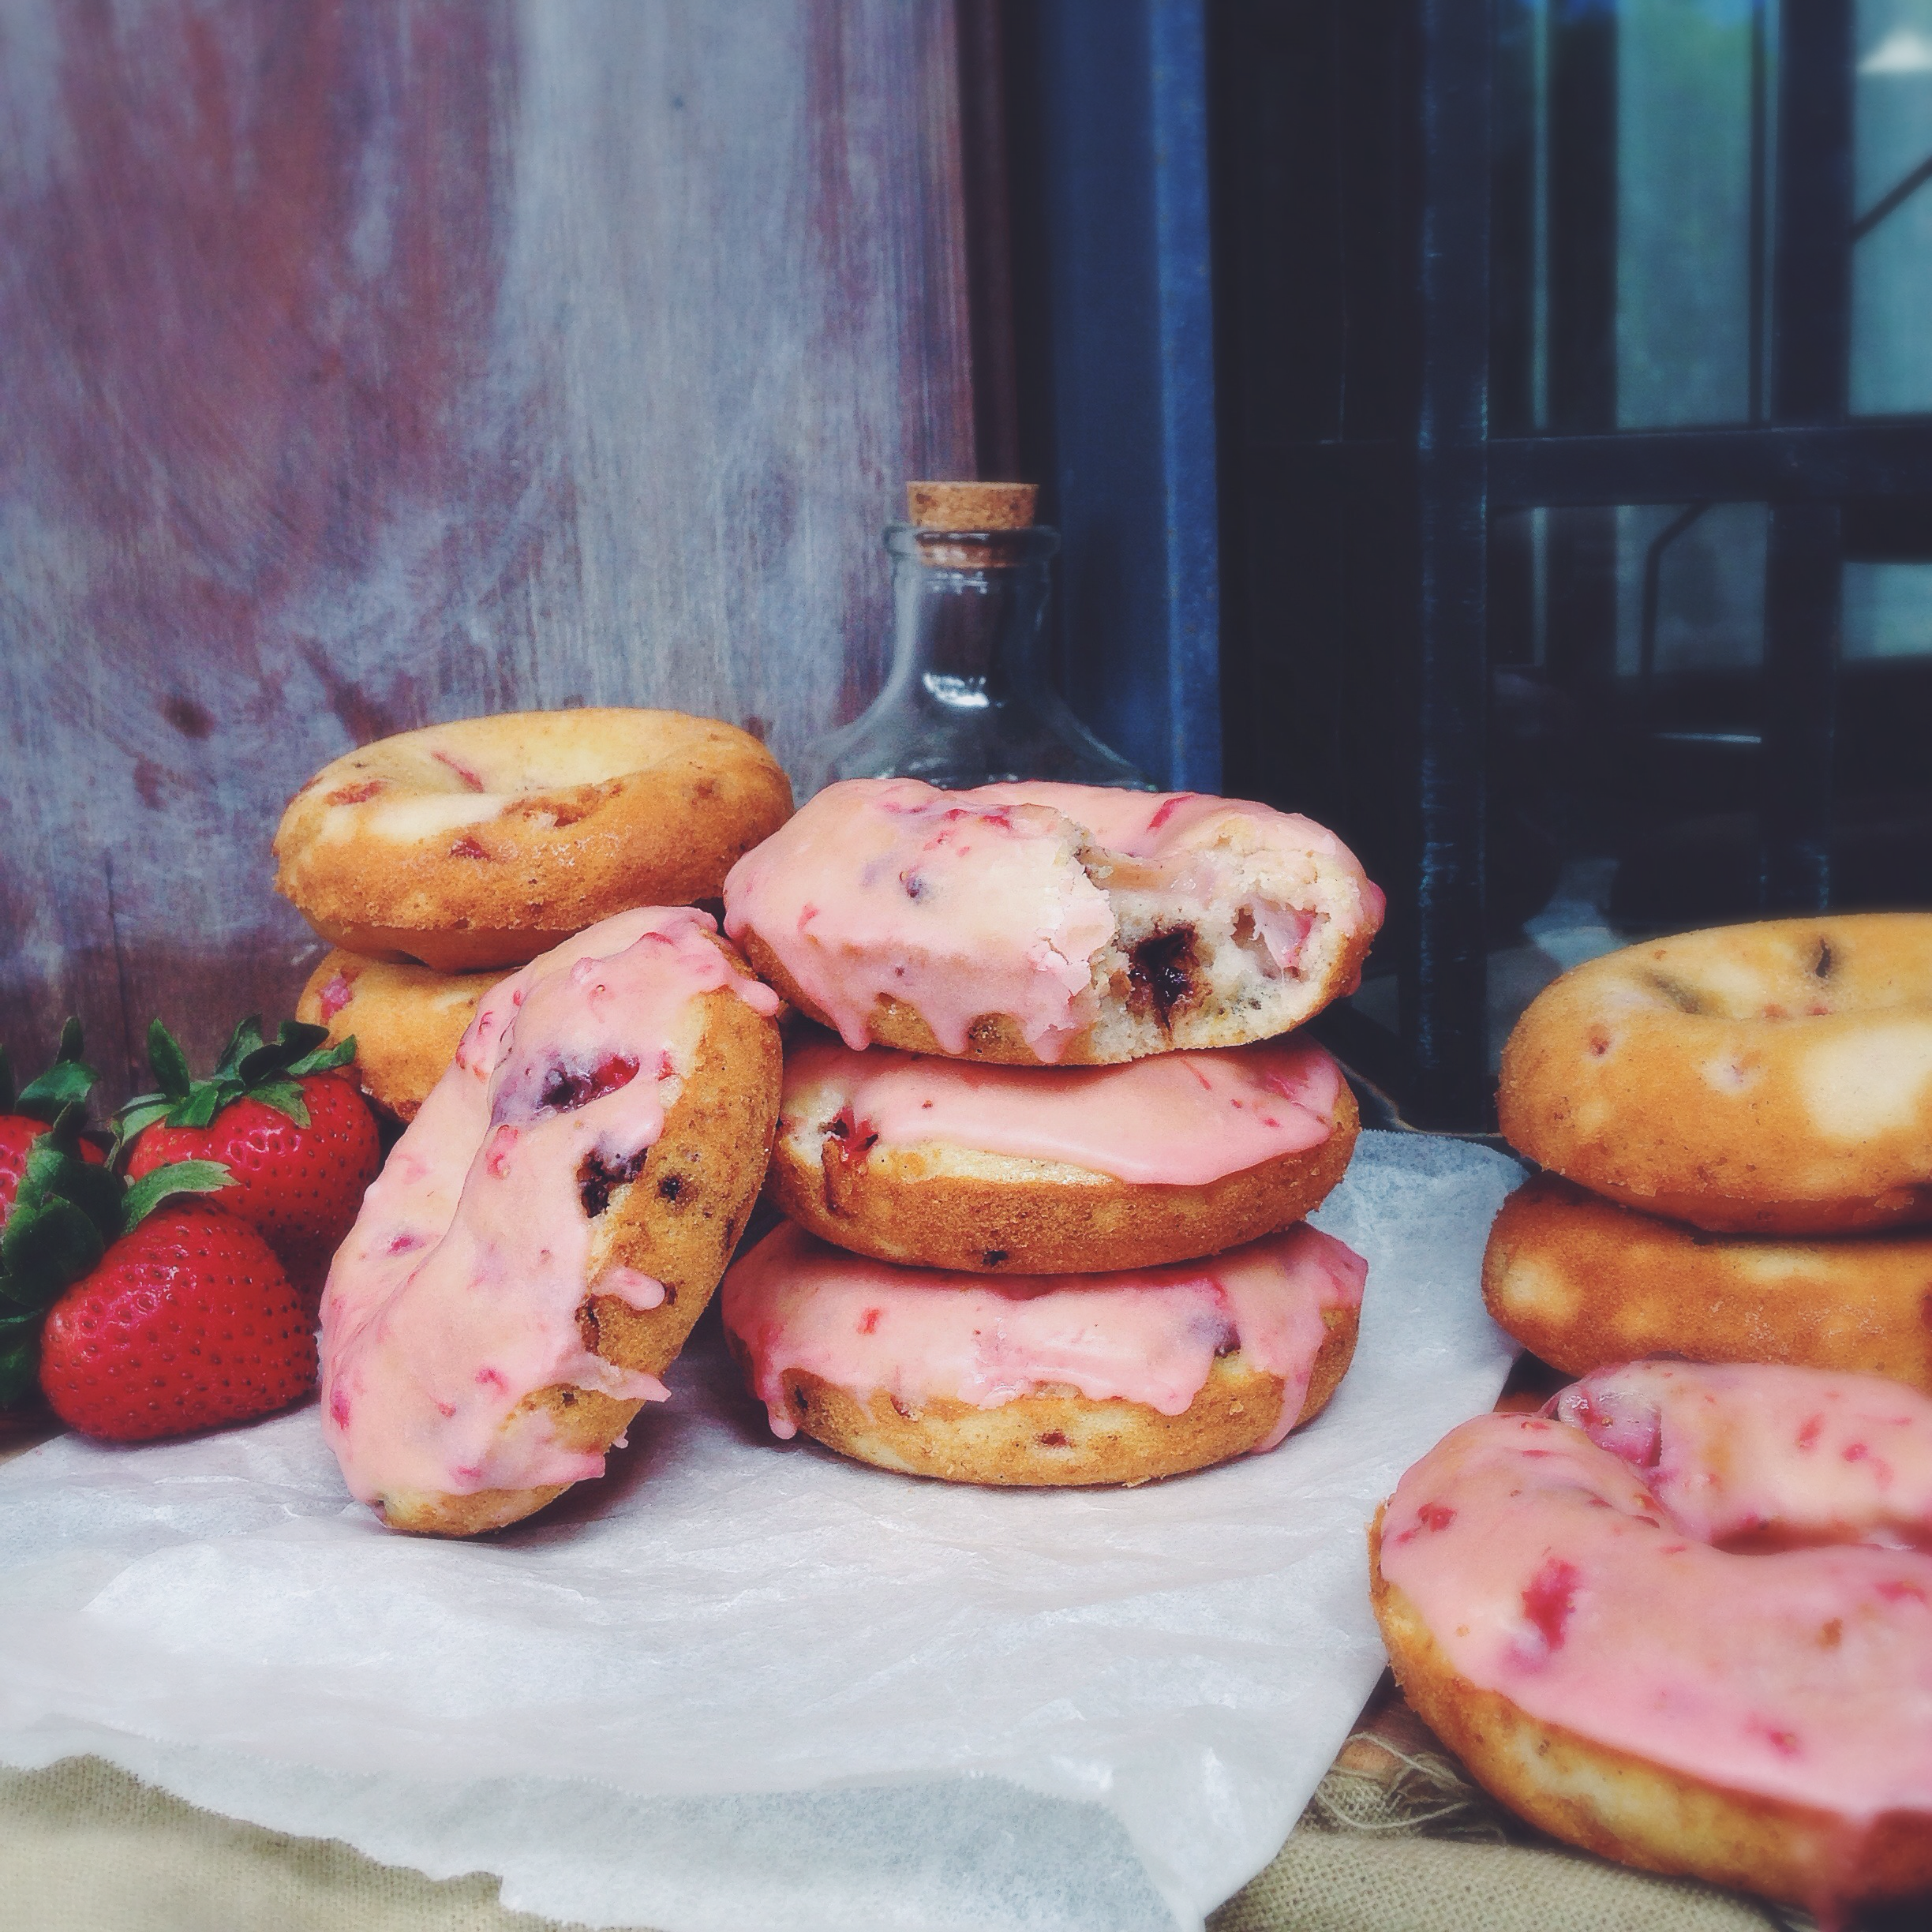
You could say the addition of vanilla bean is pompous, but goodness does it add a whole new dimension of flavour and (slight) grandeur to the whole thing. The speckles are endearing, no? It’s exotic, it’s fearless. Each little doughnut is jam-packed with bits and bobs of strawberry and chocolate, so every bite is a great deal of wonder, a different experience, a slight surprise. In between, you can savour a dandy cake-like medium, the vehicle for all those pockets of tang and sweet. A standard batter so silent and unassuming it almost feels guilt-free.

What’s a doughnut without the glaze.

The magic lies in the incorporation of puréed strawberries, without which this recipe just wouldn’t be the same. J’adore. Pink isn’t my favourite colour, and never will be, but the muted tangy notes elevate this from airy-fairy to plain wicked. Despite my not being accustomed to having real chopped fruit in a doughnut glaze, or any topping for any baked good in general, the whole experience made me realise what a difference the real deal makes.

There’s something about a simple doughnut, enjoyed alone at home or at a coffee shop with a large cup of black coffee, which makes a breakfast get-up or solitary pondering session all the more sensual. It’s homey, and pretty bad, but pretty good.

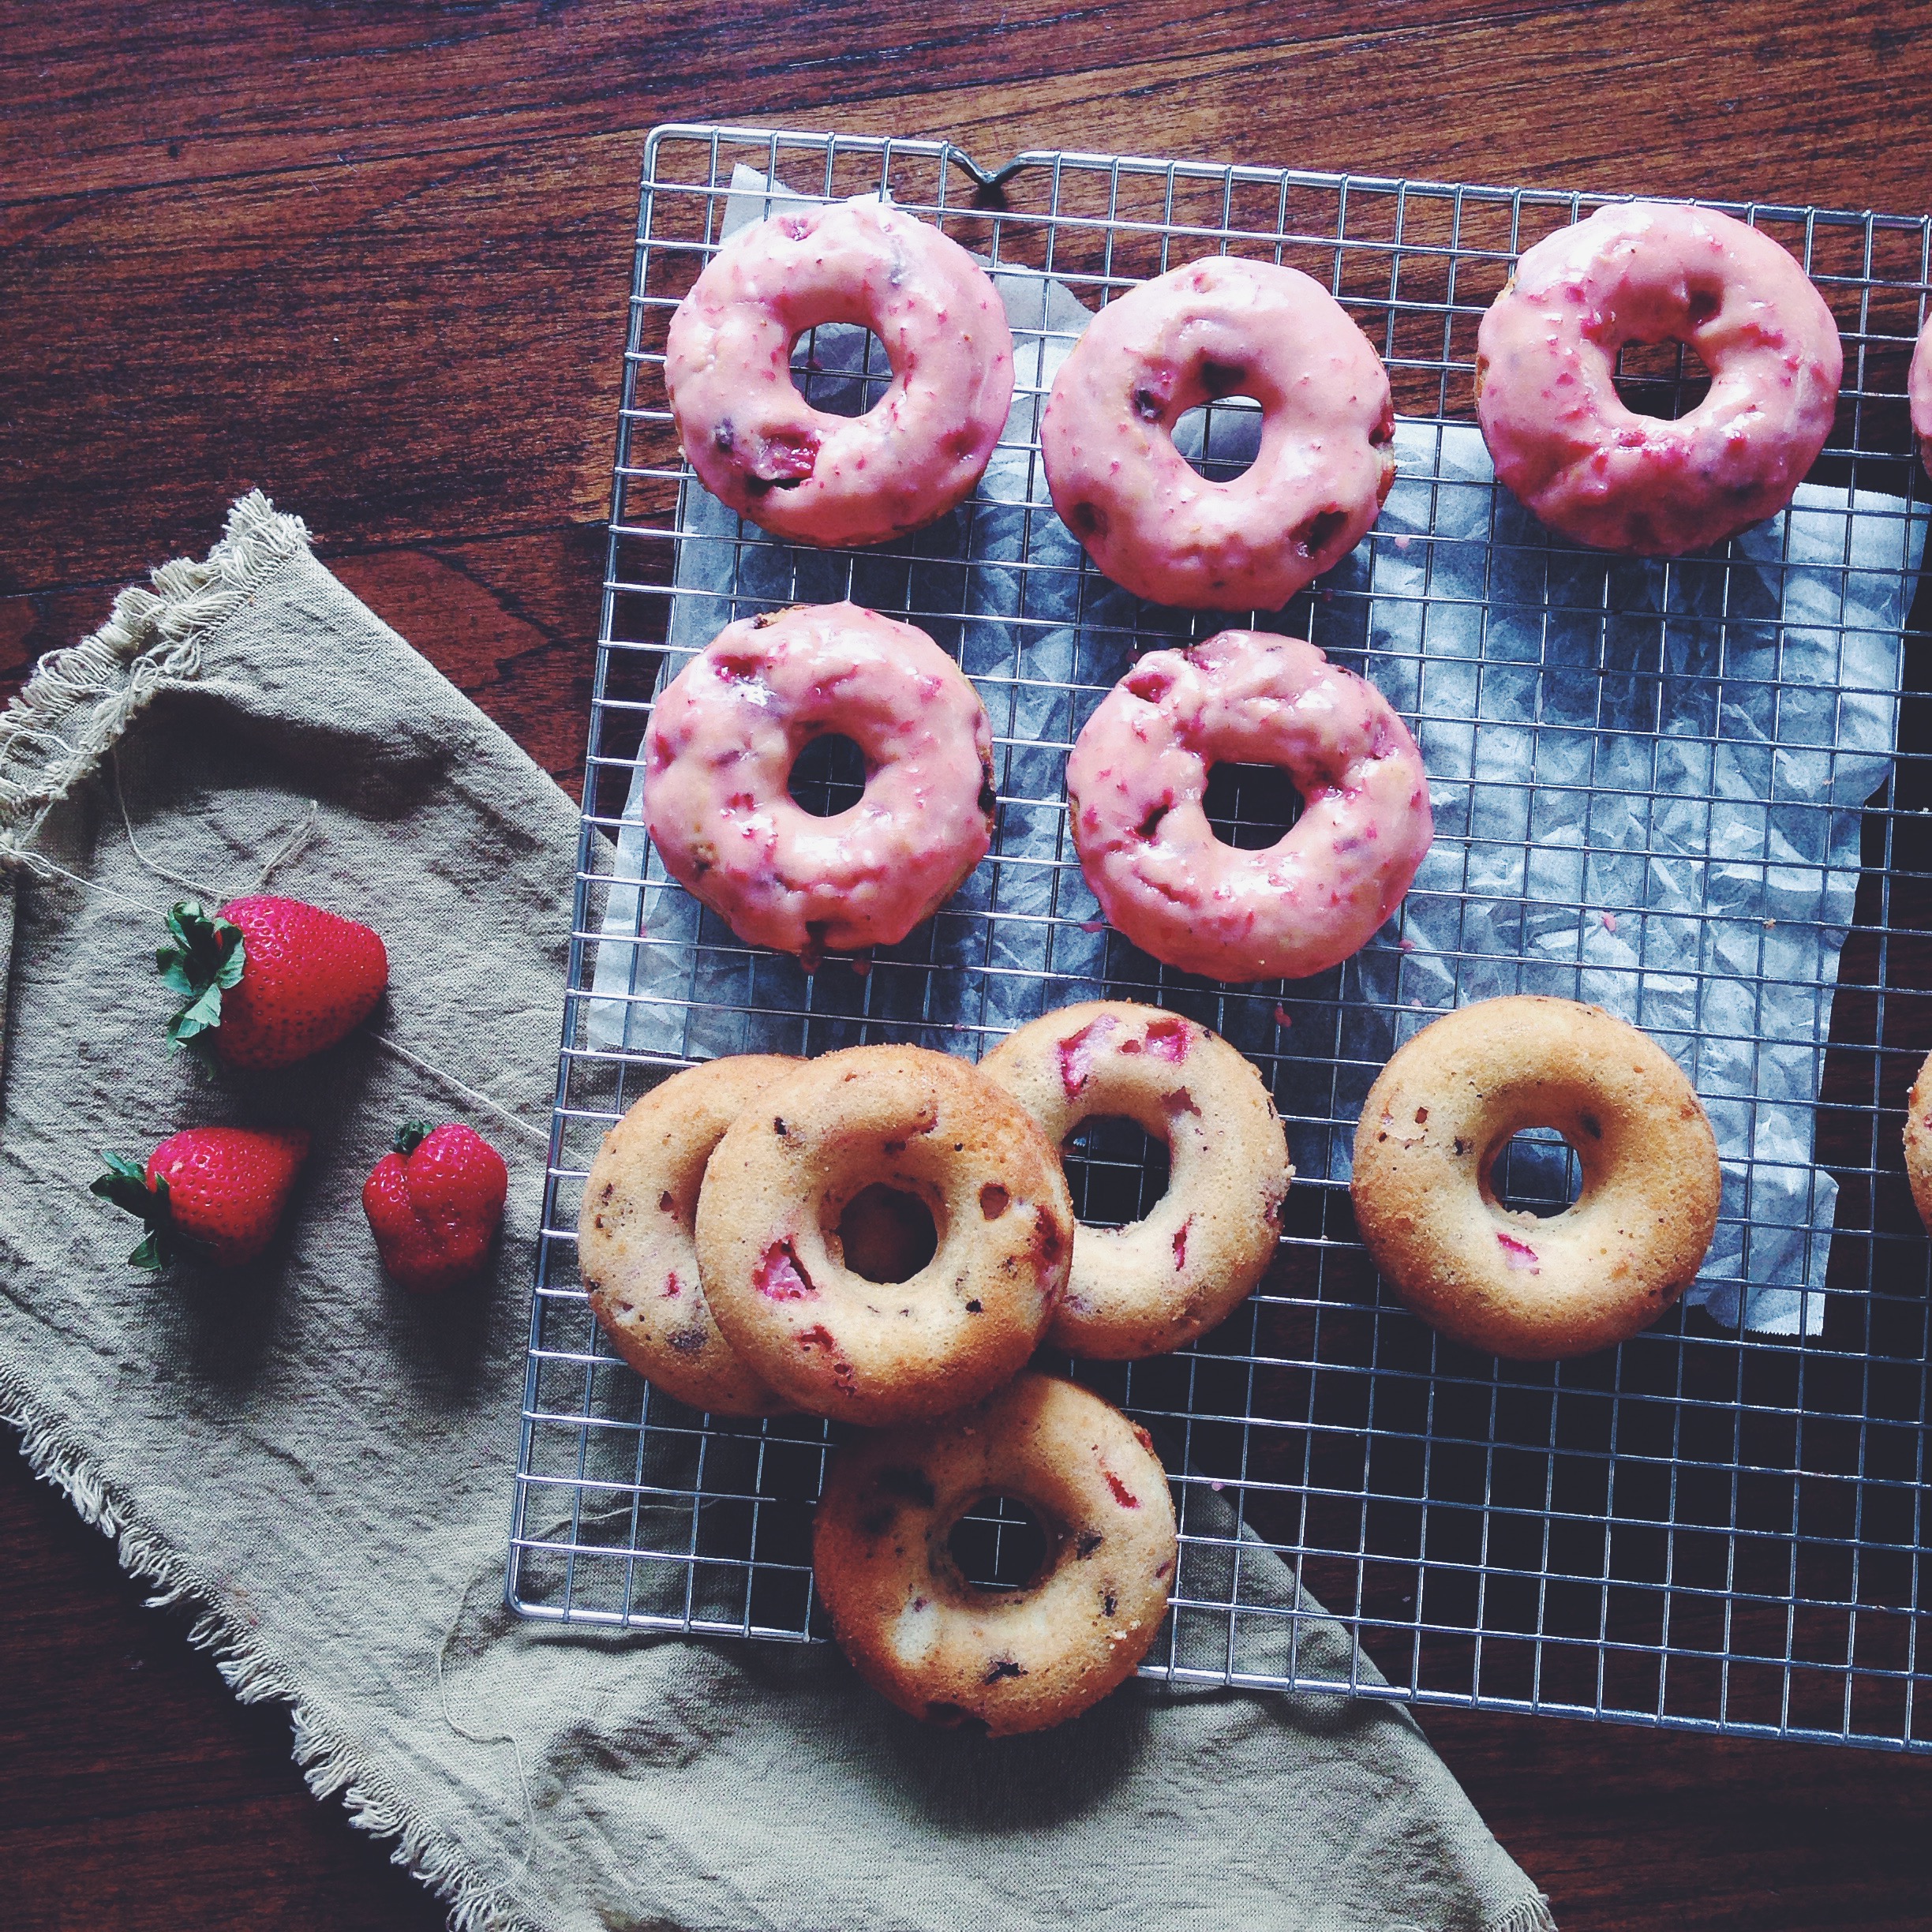
Strawberry Chocolate Vanilla Bean Baked Doughnuts (makes 16)

Ingredients

For the doughnuts:

265g (slightly less than 2 cups) all-purpose flour

170g (3/4 cup) white castor sugar

1 vanilla bean

1/2 tsp salt

1 tsp baking powder

1/2 tsp baking soda

60g melted, unsalted butter

180ml (3/4 cup) buttermilk, or take a tablespoonful of white vinegar and place it in the bottom of your measuring cup before filling it up to the 180ml-mark with whole milk

70g chopped dark chocolate

2 eggs

170g (1 cup) finely chopped strawberries

For the glaze:

60g (1/3 cup) strawberries, washed and finely chopped

230g icing sugar

pinch salt

Directions

Preheat oven to 180C (350F) and butter doughnut pans with melted butter. In a large bowl, whisk together the flour, baking powder, baking soda, chopped chocolate and salt. In a separate, slightly smaller bowl, pour in your sugar. Take a sharp knife and run it firmly down the middle of the vanilla bean, then scrape out the insides. Dump the clumps of black into the sugar. With your fingertips, rub the vanilla bean into the sugar, so most of it is evenly incorporated into the white mass. Tip the vanilla and sugar mix into the bowl with the rest of the dry ingredients and whisk everything together well, for at least 30 seconds or so.

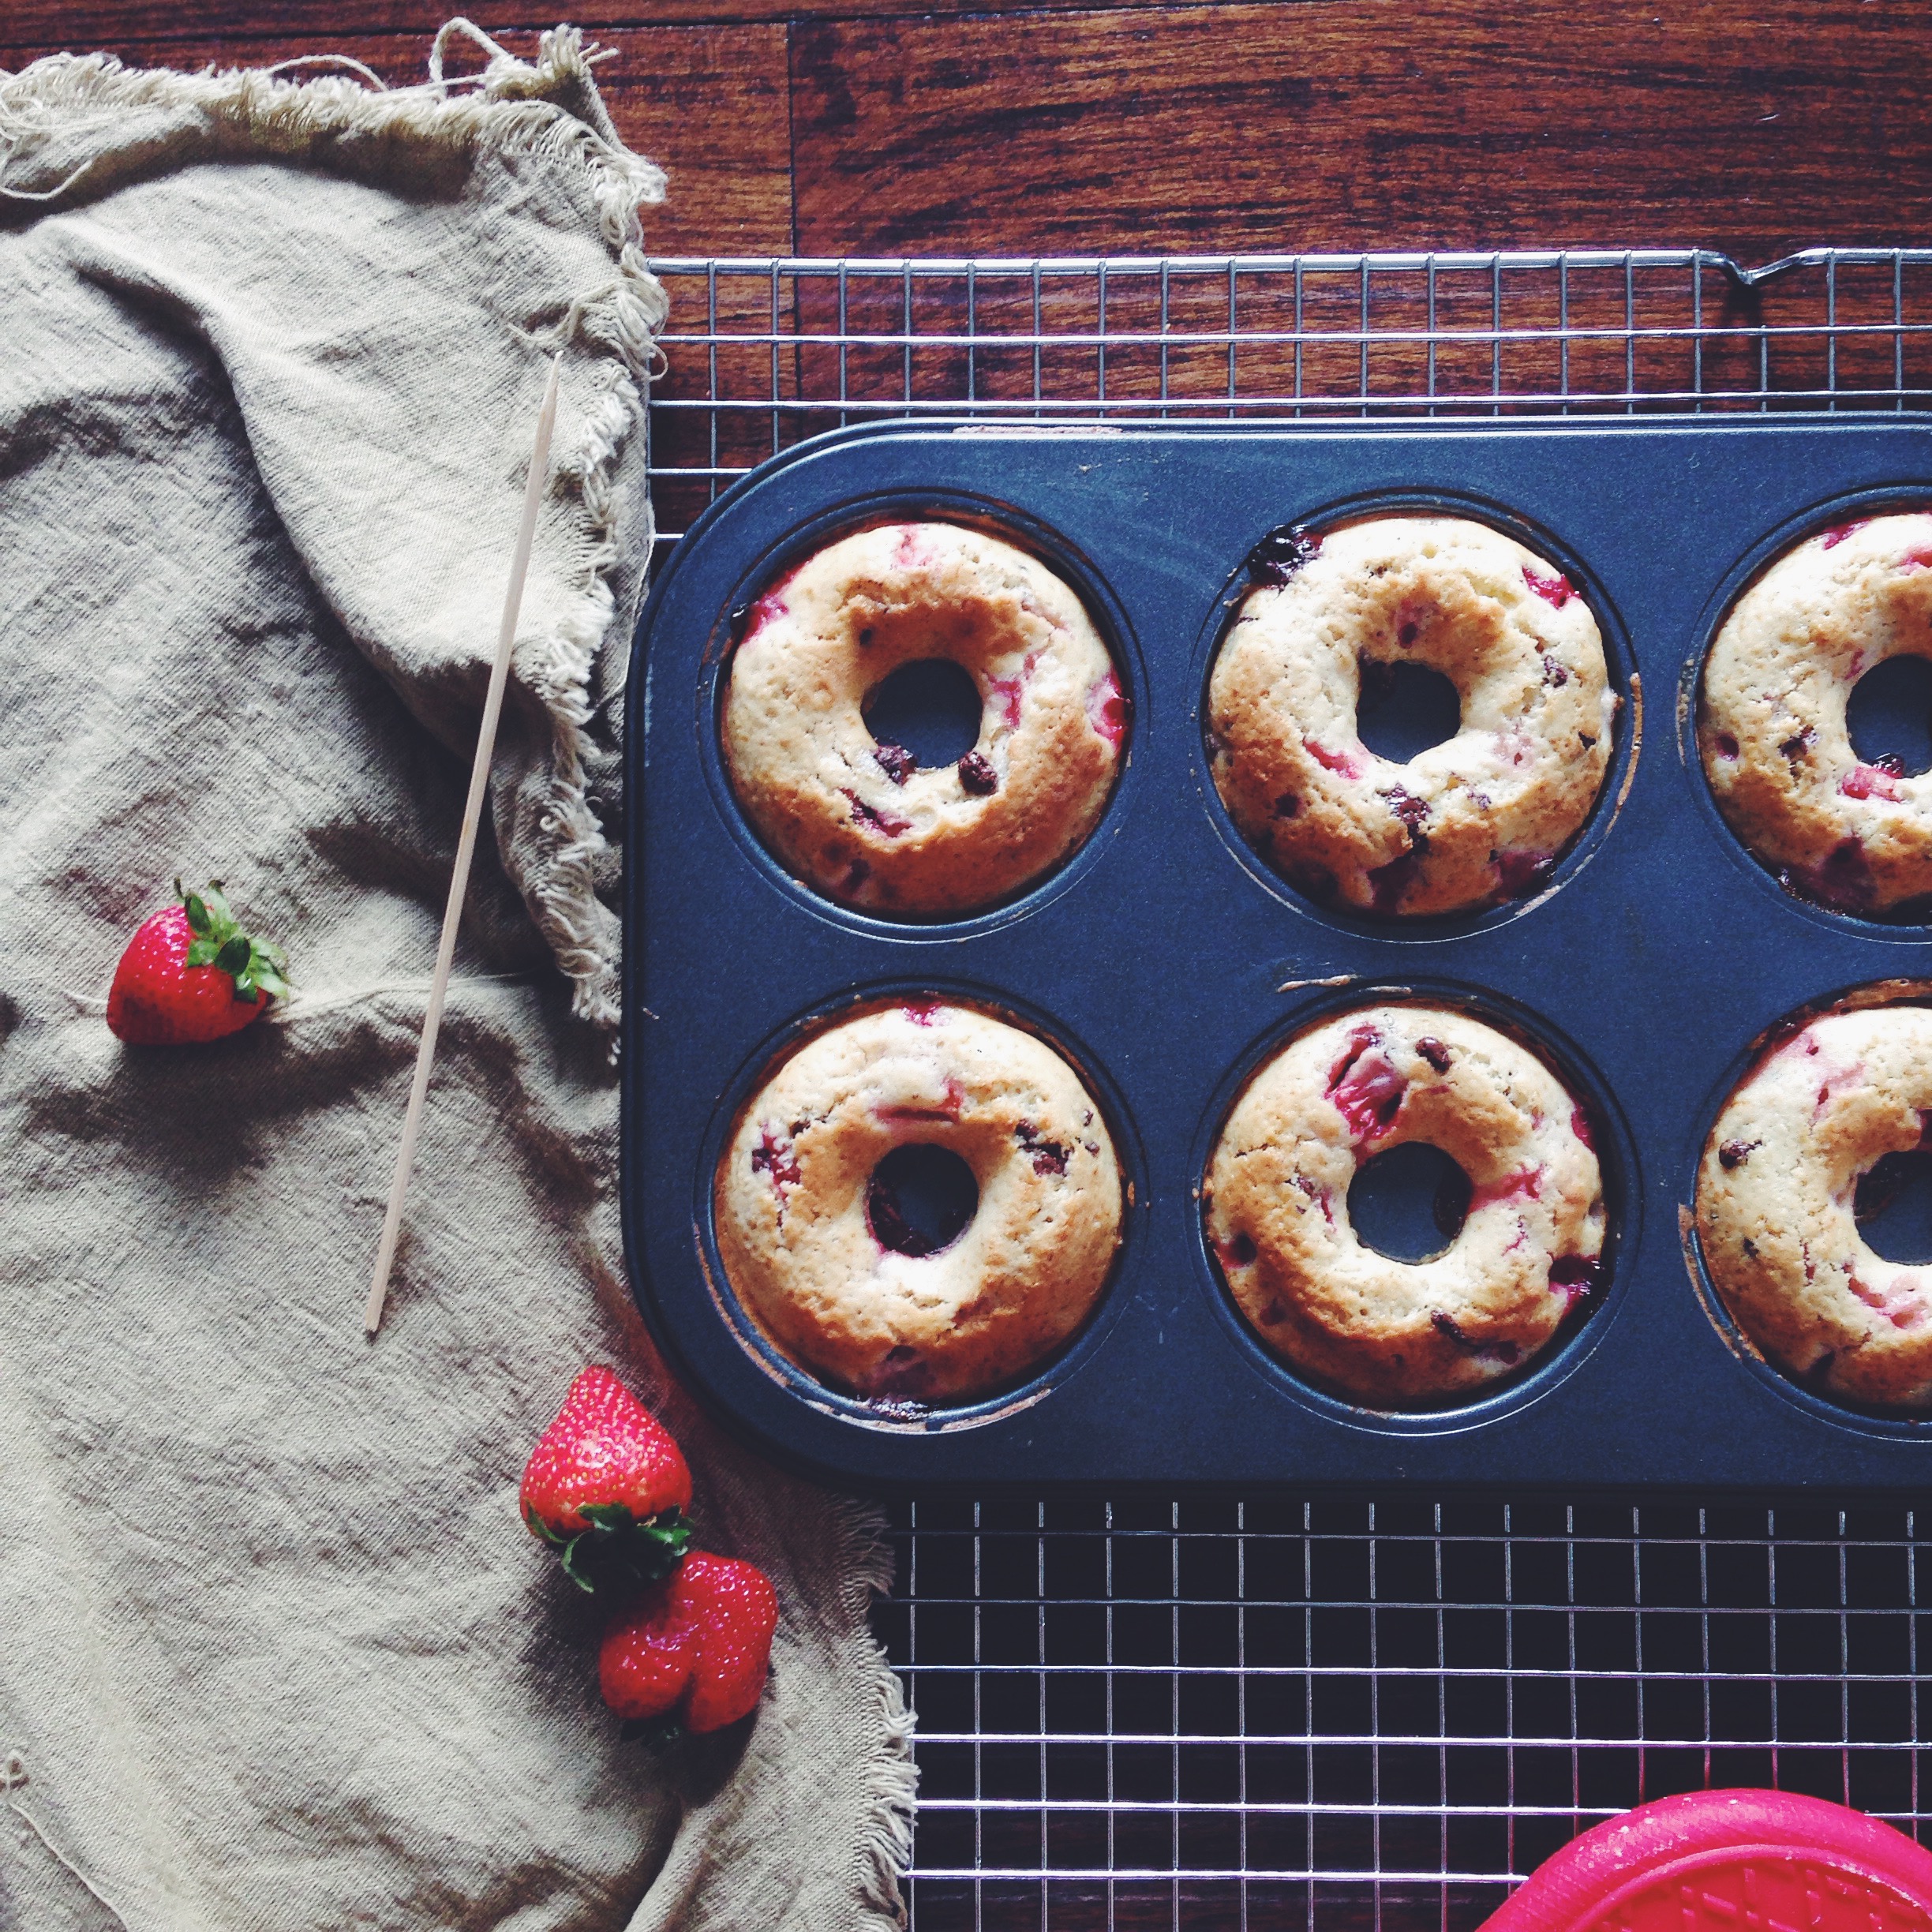
In a separate bowl, whisk together the eggs, buttermilk (or milk and vinegar mix) and melted butter. Pour the wet mix into the dry mix and mix everything together slowly with a wooden spoon until just combined. The batter should be a little lumpy and slightly thick. Not in the least bit liquidy. Pat your chopped strawberries with a dry paper towel just to remove excess moisture, then stir them into the mix. Using 2 tablespoons, dollop the doughnut batter into the greased doughnut pan(s) (I only have one so I did this in batches). Bake in the preheated oven for 15-16 minutes.

While they are baking, make the glaze- no electrical beaters needed!!

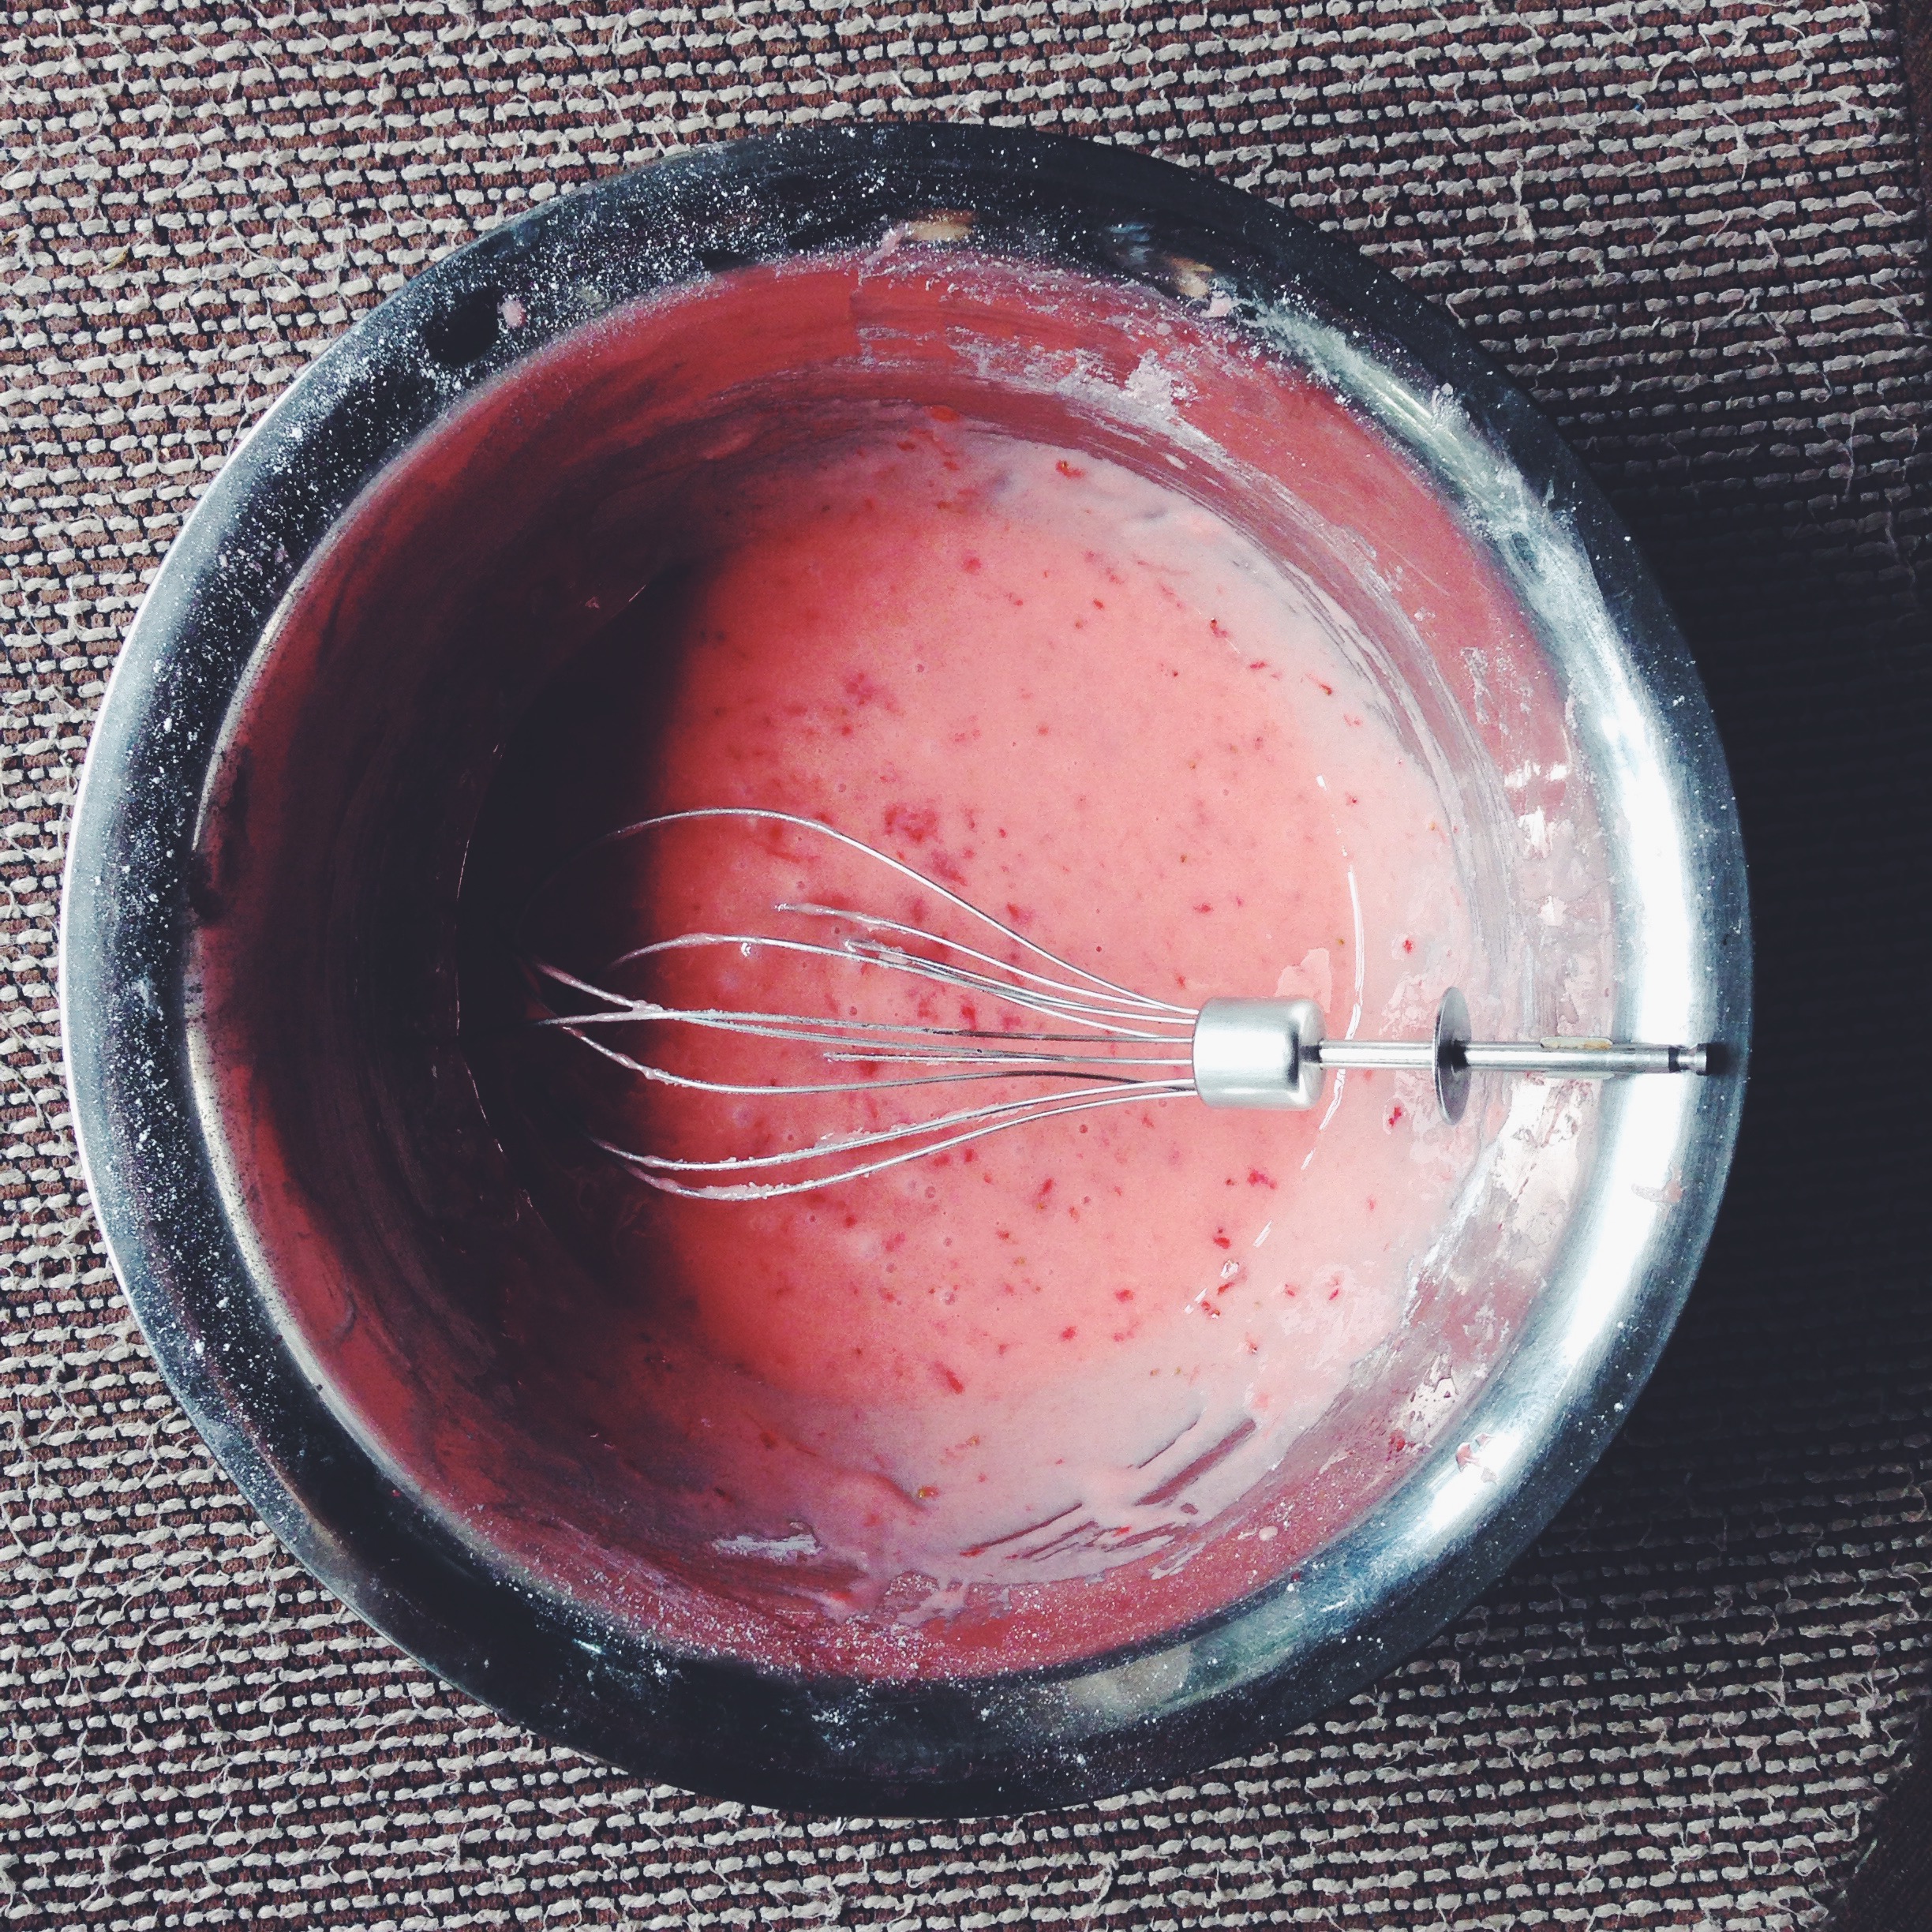
Purée the chopped strawberries in a blender, or you could microwave them and then mash with a fork. Put the strawberries into a large bowl, then using a tablespoon, remove any extra liquid that seeped out. It won’t be much, and you need not remove all of the extra juice. Add half of the icing sugar first and the salt, and mix together with the same tablespoon until you get a wet, dark pink mixture. Add the rest of the icing sugar and continue to mix until you achieve a thick, spreadable consistency.

Once the doughnuts are baked, leave to cool in the pan on a cooling rack for at least 15 minutes before turning them out. Once fully cool (around another 15 minutes later), dip the tops of the doughnuts into the strawberry glaze, then let them rest on the cooling rack again. Store the doughnuts in the fridge, because the glaze doesn’t sit too well in a warm environment.

Pink kinda pleasure.

Black Sesame French Toast (with a twist)

If there’s one sort of breakfast I have to live off for the rest of my life, as long or short as it may be, it’s french toast.

And yes I like the good old classic stuff, whereby all you have to do is whip together eggs and milk and cinnamon and voila, you get a comforting, nourishing plate, eggy and soft and saturated, and now I use the word ‘and’ too much. Well. One of my personal favourite french toast recipes is actually eggless, and I implore you to check it out here.

But twists are welcome. Despite the familiarity of routine, twists and little leaps off of a classic theme are necessary to uphold the graciousness of the central perk. In this case, that perk is normal french toast. I love normality in that sense, all tried and true. But the addition of black sesame here, the little flick of the pen at the end of story, is the enhancement factor, serving not to distract, but uplift.

I’m a flexible eater, but I’m also the sort who thinks that if you’re going to enjoy something, you must enjoy it well. This might not be to everyone’s taste, but I do love dousing my french toast in whole milk, well accompanied by frigid coffee, because the sogginess factor makes my heart the same consistency. It all sounds a bit absurd, I know. But do what you do best, right? Adjust to taste. It’s all delicious in the end, anyway.

Black Sesame French Toast (For 1)

Directions

In a shallow bowl, whisk together one egg, a dash of cinnamon, a large splash of milk (whatever sort you prefer, I used whole) and a tablespoon of honey. Into another bowl or plate, sift 2 heaping tablespoons of black sesame powder.

Take 2 slices of sourdough/ brioche/ baguette and soak each side in your eggy batter for 10-20 seconds. Whilst waiting, preheat your pan to medium heat, and ready some butter. Once the pan is hot, butter it, making sure you hear a good sizzle upon first contact. Cook your french toast as you usually would, around 2 minutes on the first side and a little less on the second, just so it’s not rendered dry. You want a fair bit of eggy saturation in the middle (yes, even if you like drowning your french toast in milk like moi).

Once your french toast is cooked, generously slather the tops with the black sesame powder, which will go moist and a bit sticky upon contact with the heat and moisture from the toast.

*variation: To serve, place the toast on a plate, top with almond butter, chopped strawberries, a drizzle of coconut cream and, if you wish, coconut chips. The black sesame with fruit and coconut here is a divine combination!

Chocolate Tiramisu Pancakes with Mascarpone Lemon Curd Cream

IMG_4337

There is a special eating method for this one, but you’re gonna have to scroll right down to the bottom to find out!

Well. This morning. A coffee cup, orange juice glass and water glass. All empty. My father gulps it all down every morning, a robotic ritual. Like me, he’s a man of routine (yes I’m female but you get the point). I love how we both wake up early. I also love how I can ask him absolutely anything and he’ll probably know the answer, like what paraesthesia is or the difference between arthritis and gout. Anyways, it feels good to have settled into a workable routine, each day glistening with fun and possibility. It all sounds very childish but the good thing is that it’s all very true. Routine means allowing yourself time for everything without too much compromise, and I love early mornings when it’s just simple and quiet. Like Sundays with pancakes and the papers, instead of a meaningless spray of pixels on my phone or laptop. Just being, just living. All the Instagram posting, as much as I love this social media platform in all its filtered wonder, usually comes much later.

But. I hate that part of the morning when my cup of coffee is done, is no longer young, and I want another, but ultimately I give up embarking on another 1-metre trek to the espresso machine because I know the jitters will come on just a tad too strong later on. I’m no weakling, but I am pretty sensitive (will usually wait till after lunch before I have another)! A while ago, I thought of making pancakes which incorporated just a little bit of coffee, because I still wanted my sisters to try them and wholeheartedly believe in their wondrousness. I thought of doing the whole coffee and chocolate thing because a little coffee always brings out the flavour of cocoa. These chocolate tiramisu pancakes with the most perfect complementary cream were born.

If my honey and vanilla buttermilk pancakes are the fluffiest, then these are the most tender. After a little more flavour experimentation, and the proportions seemed just about right, I could sit down one Sunday morning and indulge in a mini stack. Indeed, that morning was made all the more fine. I would think the highlight of everything is the tenderness of the baby pancakes studded with chopped chocolate, with the most divine mascarpone lemon curd cream stuffed between each little pancake. I love those moments when you cut in with your fork and the prongs are smothered in gooey bits of chocolate. You’ll get the subtle hint of coffee. Ok, I know lemon curd isn’t really on the tiramisu ingredient checklist, but trust me on this one. You will adore this delightful amalgamation of sweet and tangy and creamy.

These need your attention.

Chocolate Tiramisu Pancakes with Mascarpone Lemon Curd Cream (makes 16 small pancakes)

Ingredients

For the pancakes:

190g (1 1/2 cups) all-purpose flour

1 tsp baking powder

1 tsp baking soda

generous pinch salt

1 tbsp white sugar

60g chocolate, chopped into small pieces (you can do the same with chocolate chips if you don’t have a bar; just be sure to use the dark sort for optimal flavour)

1 egg

35g unsalted butter

180ml (3/4 cup) buttermilk, or make your own by placing a tablespoonful of vinegar (any sort; I usually use apple cider vinegar) in the bottom of your measuring jug or cup, then fill to the required volume mark with whole milk

2 tbsp strong espresso

1 tbsp honey

For the mascarpone lemon curd cream:

115g mascarpone

generous pinch of salt

1 tbsp sugar

1 tbsp lemon curd

Directions

In a large bowl, whisk together the dry ingredients– flour, sugar, salt, chopped chocolate and leavening agents. In a small microwave-safe bowl, melt the butter in a microwave and set it aside, letting it cool. In another medium bowl, whisk together the egg, buttermilk, espresso and honey. Pour the wet mix into the dry mix and mix briefly with a wooden spoon. Before it’s all combined, pour in the melted butter. Continue to mix until everything is justt combined, which means there will still be a few lumps, but no more streaks of flour. The batter should be of medium-thick consistency.

Preheat your pan or griddle on medium heat and ready some butter. You know the pan is hot enough when you flick a little water onto its surface and there’s a clear sizzle. At that point, generously butter the pan and ladle tablespoonfuls of batter into the pan. Once you see a few bubbles, take a spatula and give every pancake a flip. The next side always takes much shorter; less than a minute or so. Once the second sides are done, let cool on a paper towel or in a warm oven. These freeze well, so you can make a whole batch, have one or a couple and stash the rest in a ziploc bag in the freezer.

The cream!! In other words, the super moreish bit. In a small bowl, whisk together all the ingredients needed for the cream with a fork. This makes enough for half the number of pancakes in total, so adjust proportions accordingly. Leftover cream can be stored in the fridge. To serve, place a small pancake on a plate, dollop on some of the cream, then place another pancake on top. Repeat until you have a mini stack of 2 or 3. Top with more cream or maple syrup if you wish, and more chopped chocolate.

OK. Now for the fun bit. When eating, try dunking your pancake in iced coffee for the full tiramisu effect. This is the way to eat your tiramisu pancakes. The pancakes are the lady fingers, and they need that little soak. So get to work. Dessert for breakfast. You will feel so proud.

Try This Toast Combination Now

When the going gets tough, it’s easy to give up on a lot. But fret not, for you’ll have a slice of toast that will get you over that hump.

It’s the perfect little snack, or breakfast if you have a birdy appetite, like me on some days. I can attest to its pre-yoga workout effectiveness. Energy boosting, almost wholesome. Here is a slice of whole wheat toast, half slathered in tahini, maple syrup and salt, half with a generous coat of butter and marmalade. 

The second bit is a classic, the sort of thing you might fall back on at an endless breakfast buffet (or if you’re a plain old novice). I love love love butter and jam on most days, and some days it’s good old almond/peanut butter, honey and a pinch of maldon salt. Today demanded a switch in routine, and so this was born.

Directions (because the ‘Ingredients’ bit isn’t necessary, right?)

Take one slice of any sort of bread you like (preferable whole wheat, sourdough or a dark rye), and toast in your toaster. Cut in half any which way, then top half with butter and marmalade (or jam, if you don’t have any marmalade, but marmalade is still the best option!), and the other half with tahini, maple syrup, and  apinch of coarse salt (Maldon). Eat the halves separately or, for optimal pleasure, sandwich together and bite. Savour that crunch, then the nuttiness mixing with the sweet jammy middle. A tick of salt at the end. Savour, swallow, maybe repeat.

Orange Chocolate Bars with Mascarpone and Honeycomb

This morning, my fork did all the talking, and I let it. Let’s get to the meat before I lose your attention.

The four main components here may sound frivolous, but get along like four great friends. Anyone else here like Terry’s chocolate oranges (insert happy girl with hands over her head emoji here)? If you do, I kid you not, these will satisfy you any time of day, and this batch makes quite a lot, so the satisfaction isn’t short-lived. Here we have a sweet and sticky baked citrus batter topped with a rich chocolate glaze (all delectable frozen goo and sludge), on a double butter crust, topped with mascarpone (no, I didn’t make this, ha), and honeycomb.

I want to call them tiger bars because that’s exactly what they ended up looking like, with the stripes and all. A most desirable marriage of chocolate and orange. As you can tell from the picture below, I was a bit too excited to cut everything up and slather stuff on, hence the slipshod effect. By the way, this double butter crust is bloody good. But bad. And messy. Either way it’s all good.

Processed with VSCOcam with f2 preset

Sweet on sweet on sweet, right? Well, not totally. The flavours here all meld into one another in a manner more sophisticated than what I expected, but I do think the mascarpone is necessary to soften excess cloy. This was my first time making honeycomb, and this batch turned out desirably sweet, light and crisp, like the chewier end bits of the inside of a Crunchie bar. Hopefully with time, I will master the art of thicker, ‘holier’ honeycomb. Slightly less deep in colour, less chew, more whimsical and airy-fairy. The golden shards offer a brighter mien to the whole dessert get-up. A sort of ‘ooh, what was that? YES’ kind of crunch. With the layers of texture and flavour established, the final addition of mascarpone cheese on top ties all the components together, like the ribbon on a present. A blander, but necessary note, a complementary creaminess.

Orange Chocolate Bars with Mascarpone and Honeycomb (makes 12 bars)

Ingredients

For the crust:

160g unsalted butter, cold and cut into small half-inch cubes

210g all-purpose flour (around 1 1/3 cups)

pinch salt

50g icing sugar, sifted (slightly less than a half cup)

For the orange filling:

zest and juice of 1.5 large oranges (120ml or half a cup of freshly squeezed orange juice)

juice of half a small lemon

230g (1 cup) white sugar

large pinch salt

50g all-purpose flour

1 tsp baking powder

4 eggs

For the chocolate glaze:

1 tbsp water

15g unsalted butter

1 tbsp unsweetened cocoa

1 tbsp milk

50g (or more, this is according to taste) of sifted icing sugar

For the honeycomb (adapted from BBC good food’s traditional take):

180g white caster sugar

5 tbsp golden syrup

2 tsp baking soda

Directions

Preheat your oven to 177C (350F). In a large bowl, whisk together the flour, pinch of salt and icing sugar. Rub the cold, cubed butter into this mix until you get coarse crumbs, and they are able to stick together in clumps when you squeeze the mix in your palm. Press this mixture into the bottom of a greased 9×13-inch pan, and then place into the preheated oven and bake for 11-13 minutes (I took mine out at 12).

Next, make the filling, which is the easiest bit!! In a large bowl, whisk together the juice of the oranges and one lemon, zest of the oranges, sugar and eggs. In a smaller bowl, whisk together the flour, baking powder and pinch of salt. Add this flour mix to the wet mix and mix well to combine. You will probably find little clumps of flour post-mixing, but they will go after whisking for a while. You should have a smooth, slightly viscous, wet mass of orange. Once the crust is done baking, remove from the oven and let cool for 5 minutes on the cooling tray. Pour the orange filling batter into the pan, then carefully (because the batter is predominantly liquid) place the pan back into the oven. Bake for 17-20 minutes, or until you can see the top go a medium brown in colour. I took out my pan at 19 minutes, when there was a visible dark brown rim around the edges, and the surface was mottled with bits of brown. When you take out the pan, the inside will still be mostly wet, or moist at most. Leave to cool for 15 minutes, before placing in the fridge to allow it to fully set.

Make the chocolate glaze. Again, easy peasy stuff. In a medium microwave-safe bowl (I always use my handy Chinese porcelain dinner bowls, so convenient), add the butter (it can still be cold from the fridge), water and cocoa powder. Microwave this on high until you get a smooth chocolate mix, at least 30 seconds or so. At this point, at a tablespoon of milk, and then add 50g of sifted icing sugar. You might add more if you want a slightly sweeter chocolate glaze; 50g yields a deeper overall chocolate flavour. Drizzle this chocolate glaze all over the orange bars.

Time for the honeycomb. The recipe I used here is classically British, incorporating the use of golden syrup instead of light corn syrup. You can find a myriad different honeycomb recipes online, and though this is a nice, safe one to start with, don’t be afraid to try others out. I’m eyeing Joy the Baker’s one next! Grease a 9×9-inch baking pan and set aside near your stove and saucepan. In a medium saucepan, add the sugar and golden syrup. Melt everything together on a low heat, mixing briefly with a wooden spoon in the beginning, and wait until the sugar crystals have visibly dissolved. Don’t touch or stir it at this point. Try not to let the mixture boil because this will change the structure of the crystals before you have a chance to aerate everything with the baking soda. Once the sugar has dissolved, turn up the heat just a little and let simmer for 2-4 minutes, or until you can see that the mixture has turned slightly deeper in colour, a light amber shade. At this point, add the baking soda and quickly whisk it into the mixture. It will go thick, slightly paler and foamy (it’s beautiful), but slightly darker again once you whisk. Immediately pour the mix into the pan you greased, and then set your pan under cold running water in your sink to dissolve any caramel that might’ve stuck to the sides.

The mix will set after around an hour. Since it’s always so bloody hot here, I left mine at room temperature for half an hour, before placing in the fridge for another half hour. At this point, take out your pan and overturn it onto your counter. Hit the pan hard with your hand or a large spoon to release the honeycomb onto the counter, and this will simultaneously break it into large chunks. You may then proceed to break it up further into shards of whatever size you wish.

Assembly: Cut the orange bars into 12 with a sharp knife, cleaning the knife with a paper towel after each slice. Top with mascarpone and homemade honeycomb, and send yourself to heaven.