White Chocolate Caramel Banana Bread

Because we all know banana bread is actually cake.

Side note: I’m back!!

An apology is necessary and expected. The past few weeks have been an absolute blast, busy busy busy, what with moving to London to embark on a very science-y and exciting adventure. Early lectures, lots of note-taking, and the constant fear that I’ve done nothing to deserve a place in this wonderful university. The people are amazing, the work intriguing, and nothing beats the nighttime kitchen adventures, midnight study sessions and later-night parties. Nothing I say here could ever fully justify the experiences that have been thrown at me as well as those which I have yet to encounter. It’s still incredibly surreal; like a dream come true, yet somehow better.

IMG_0719

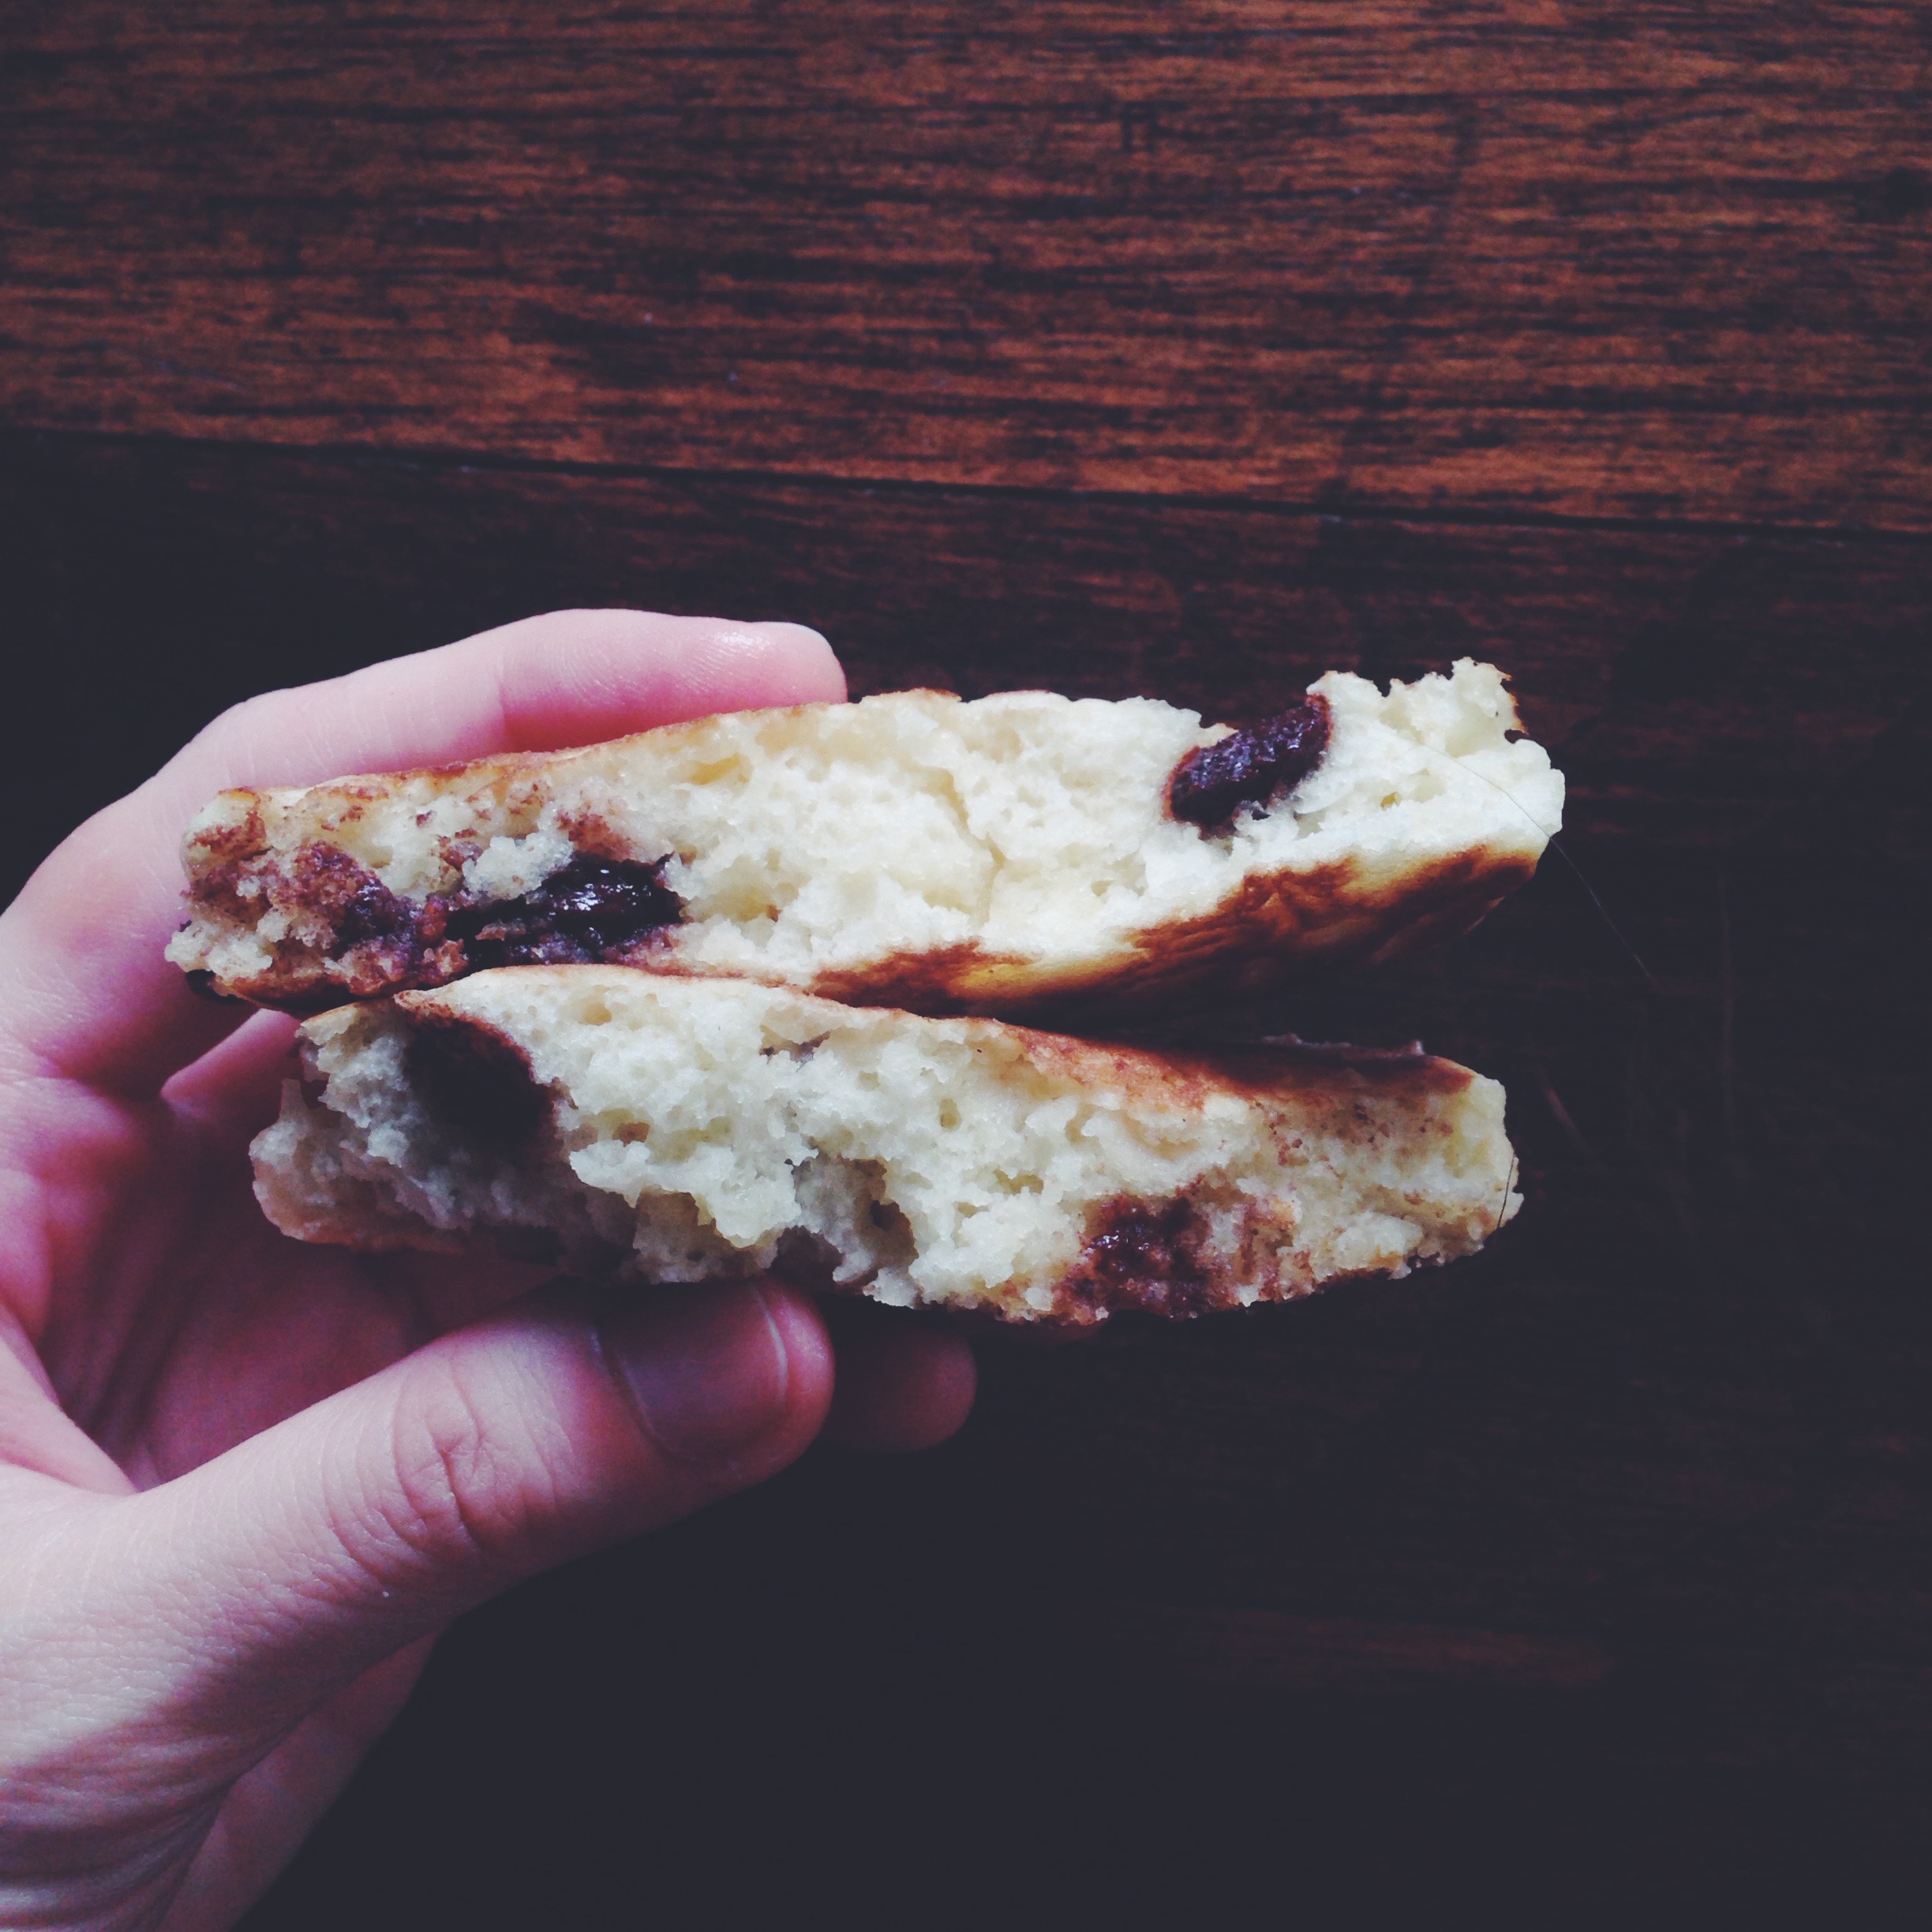
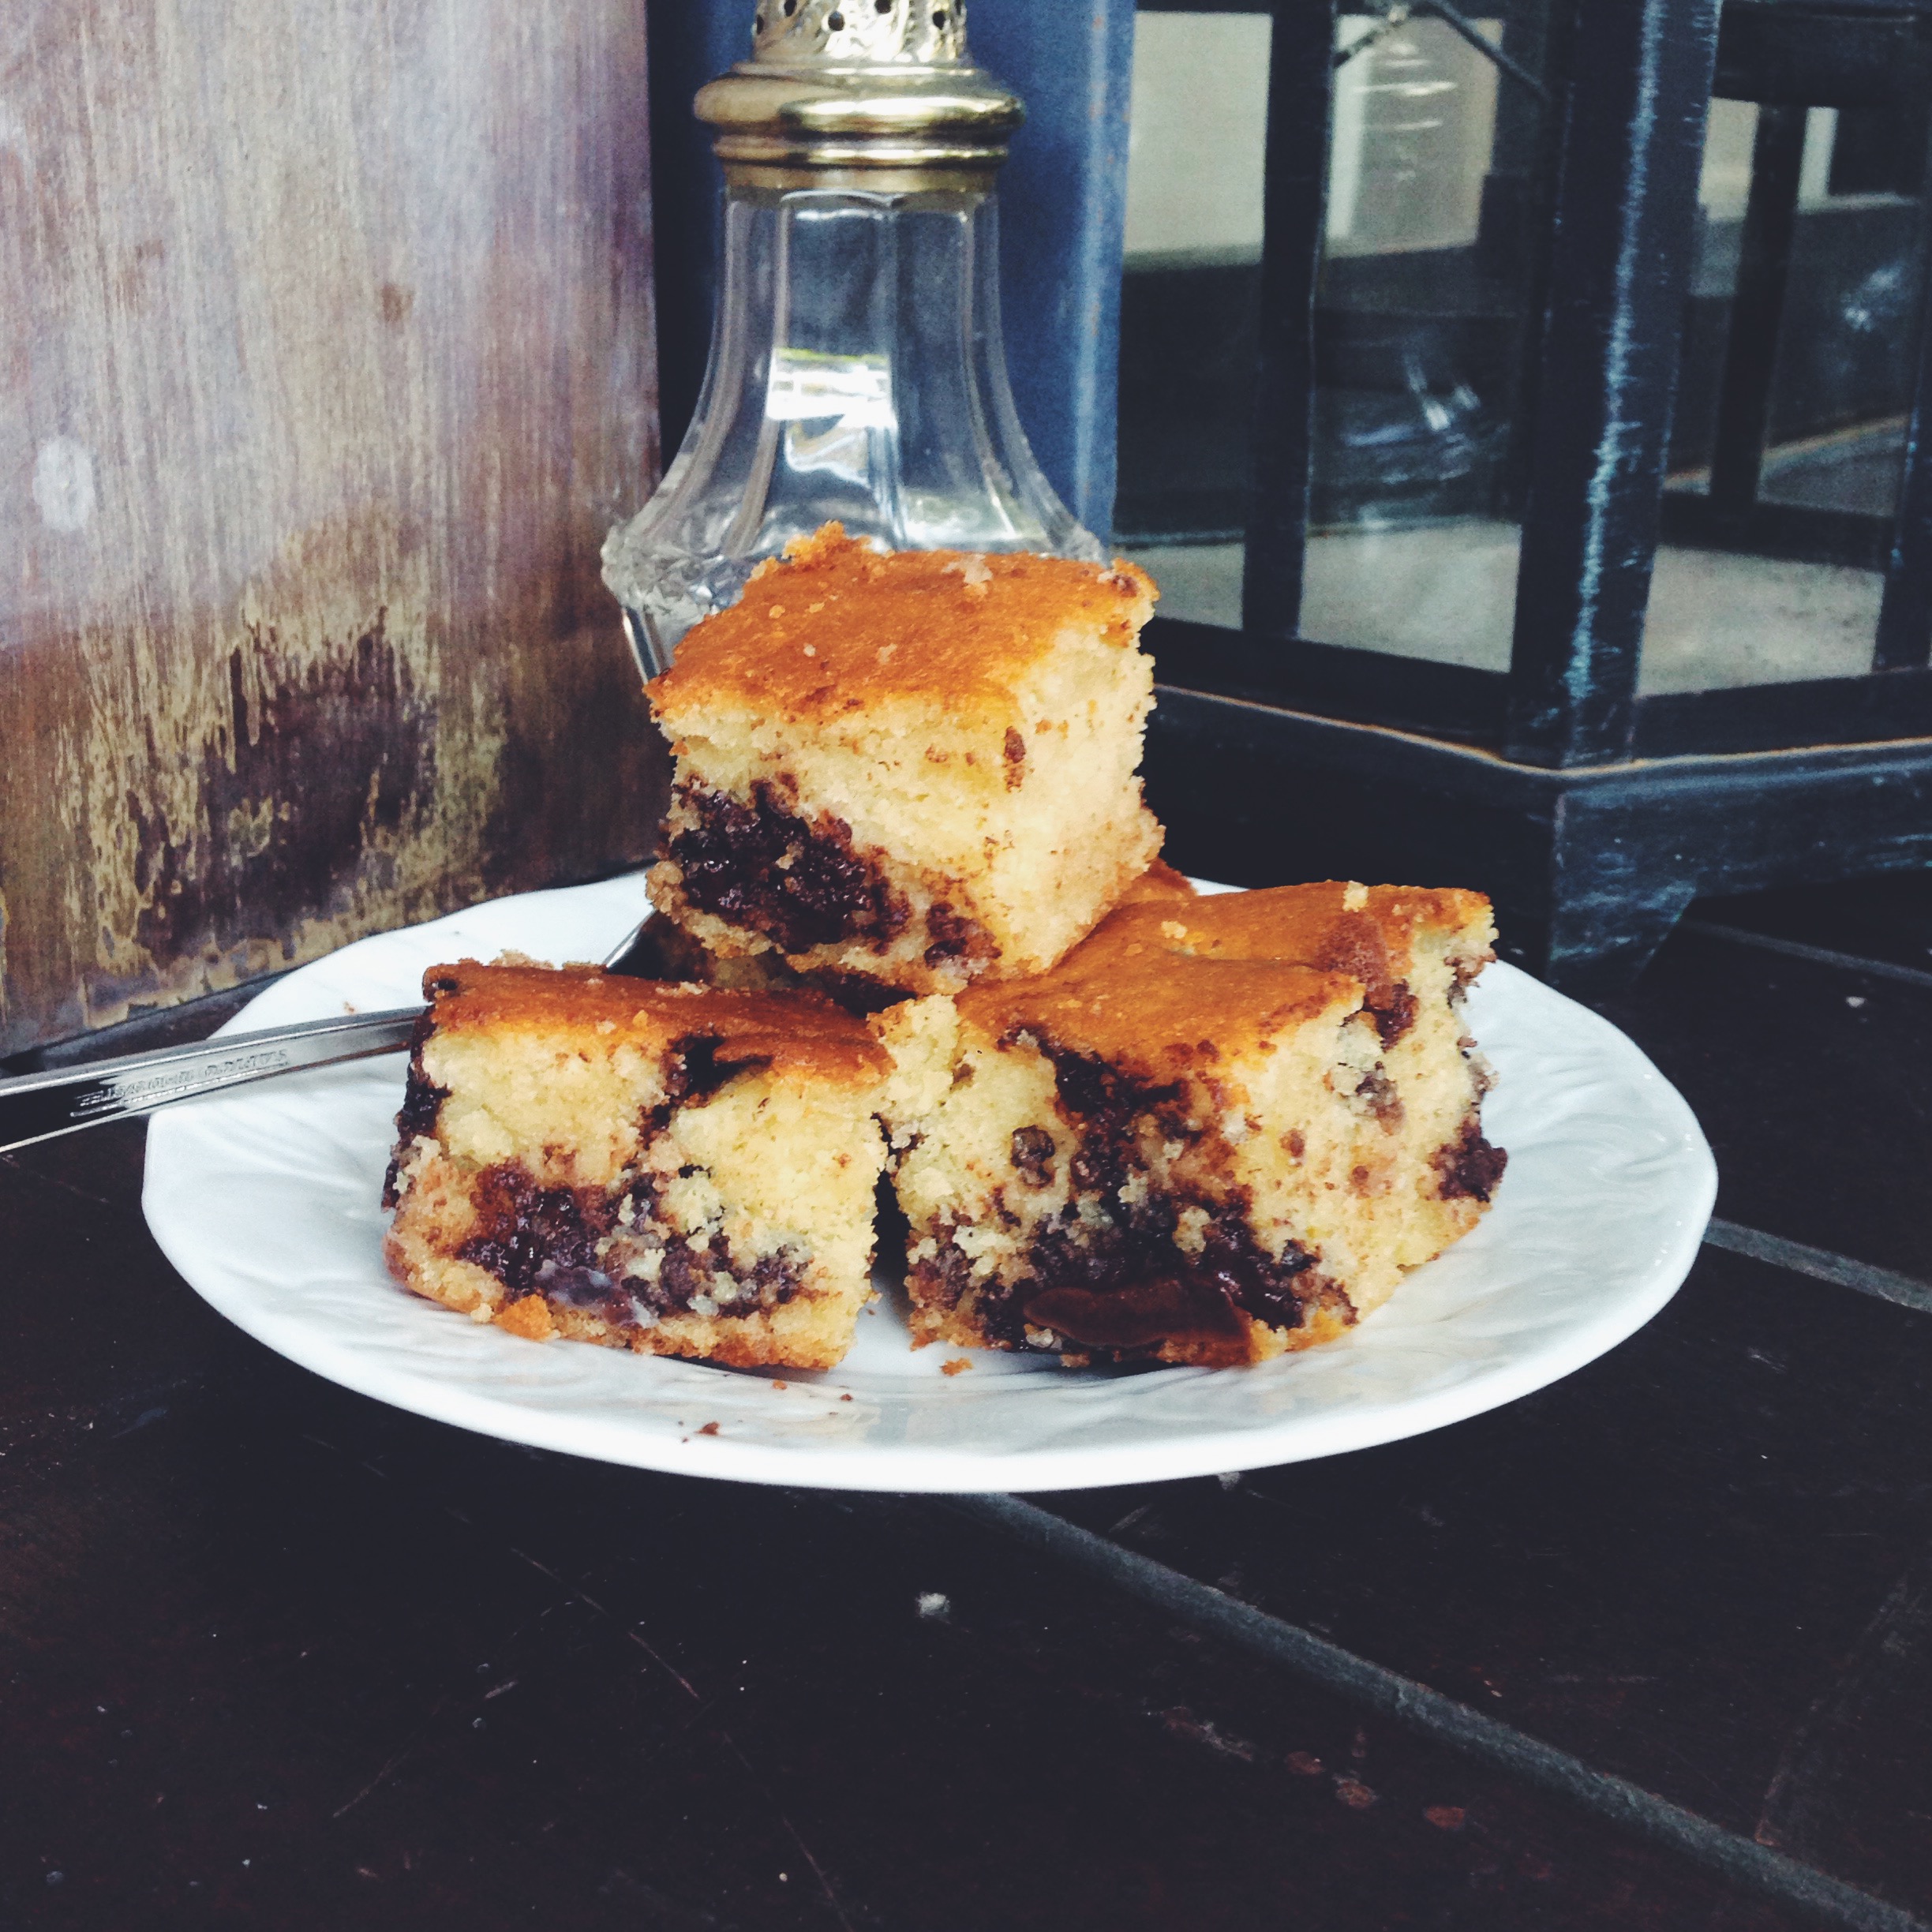
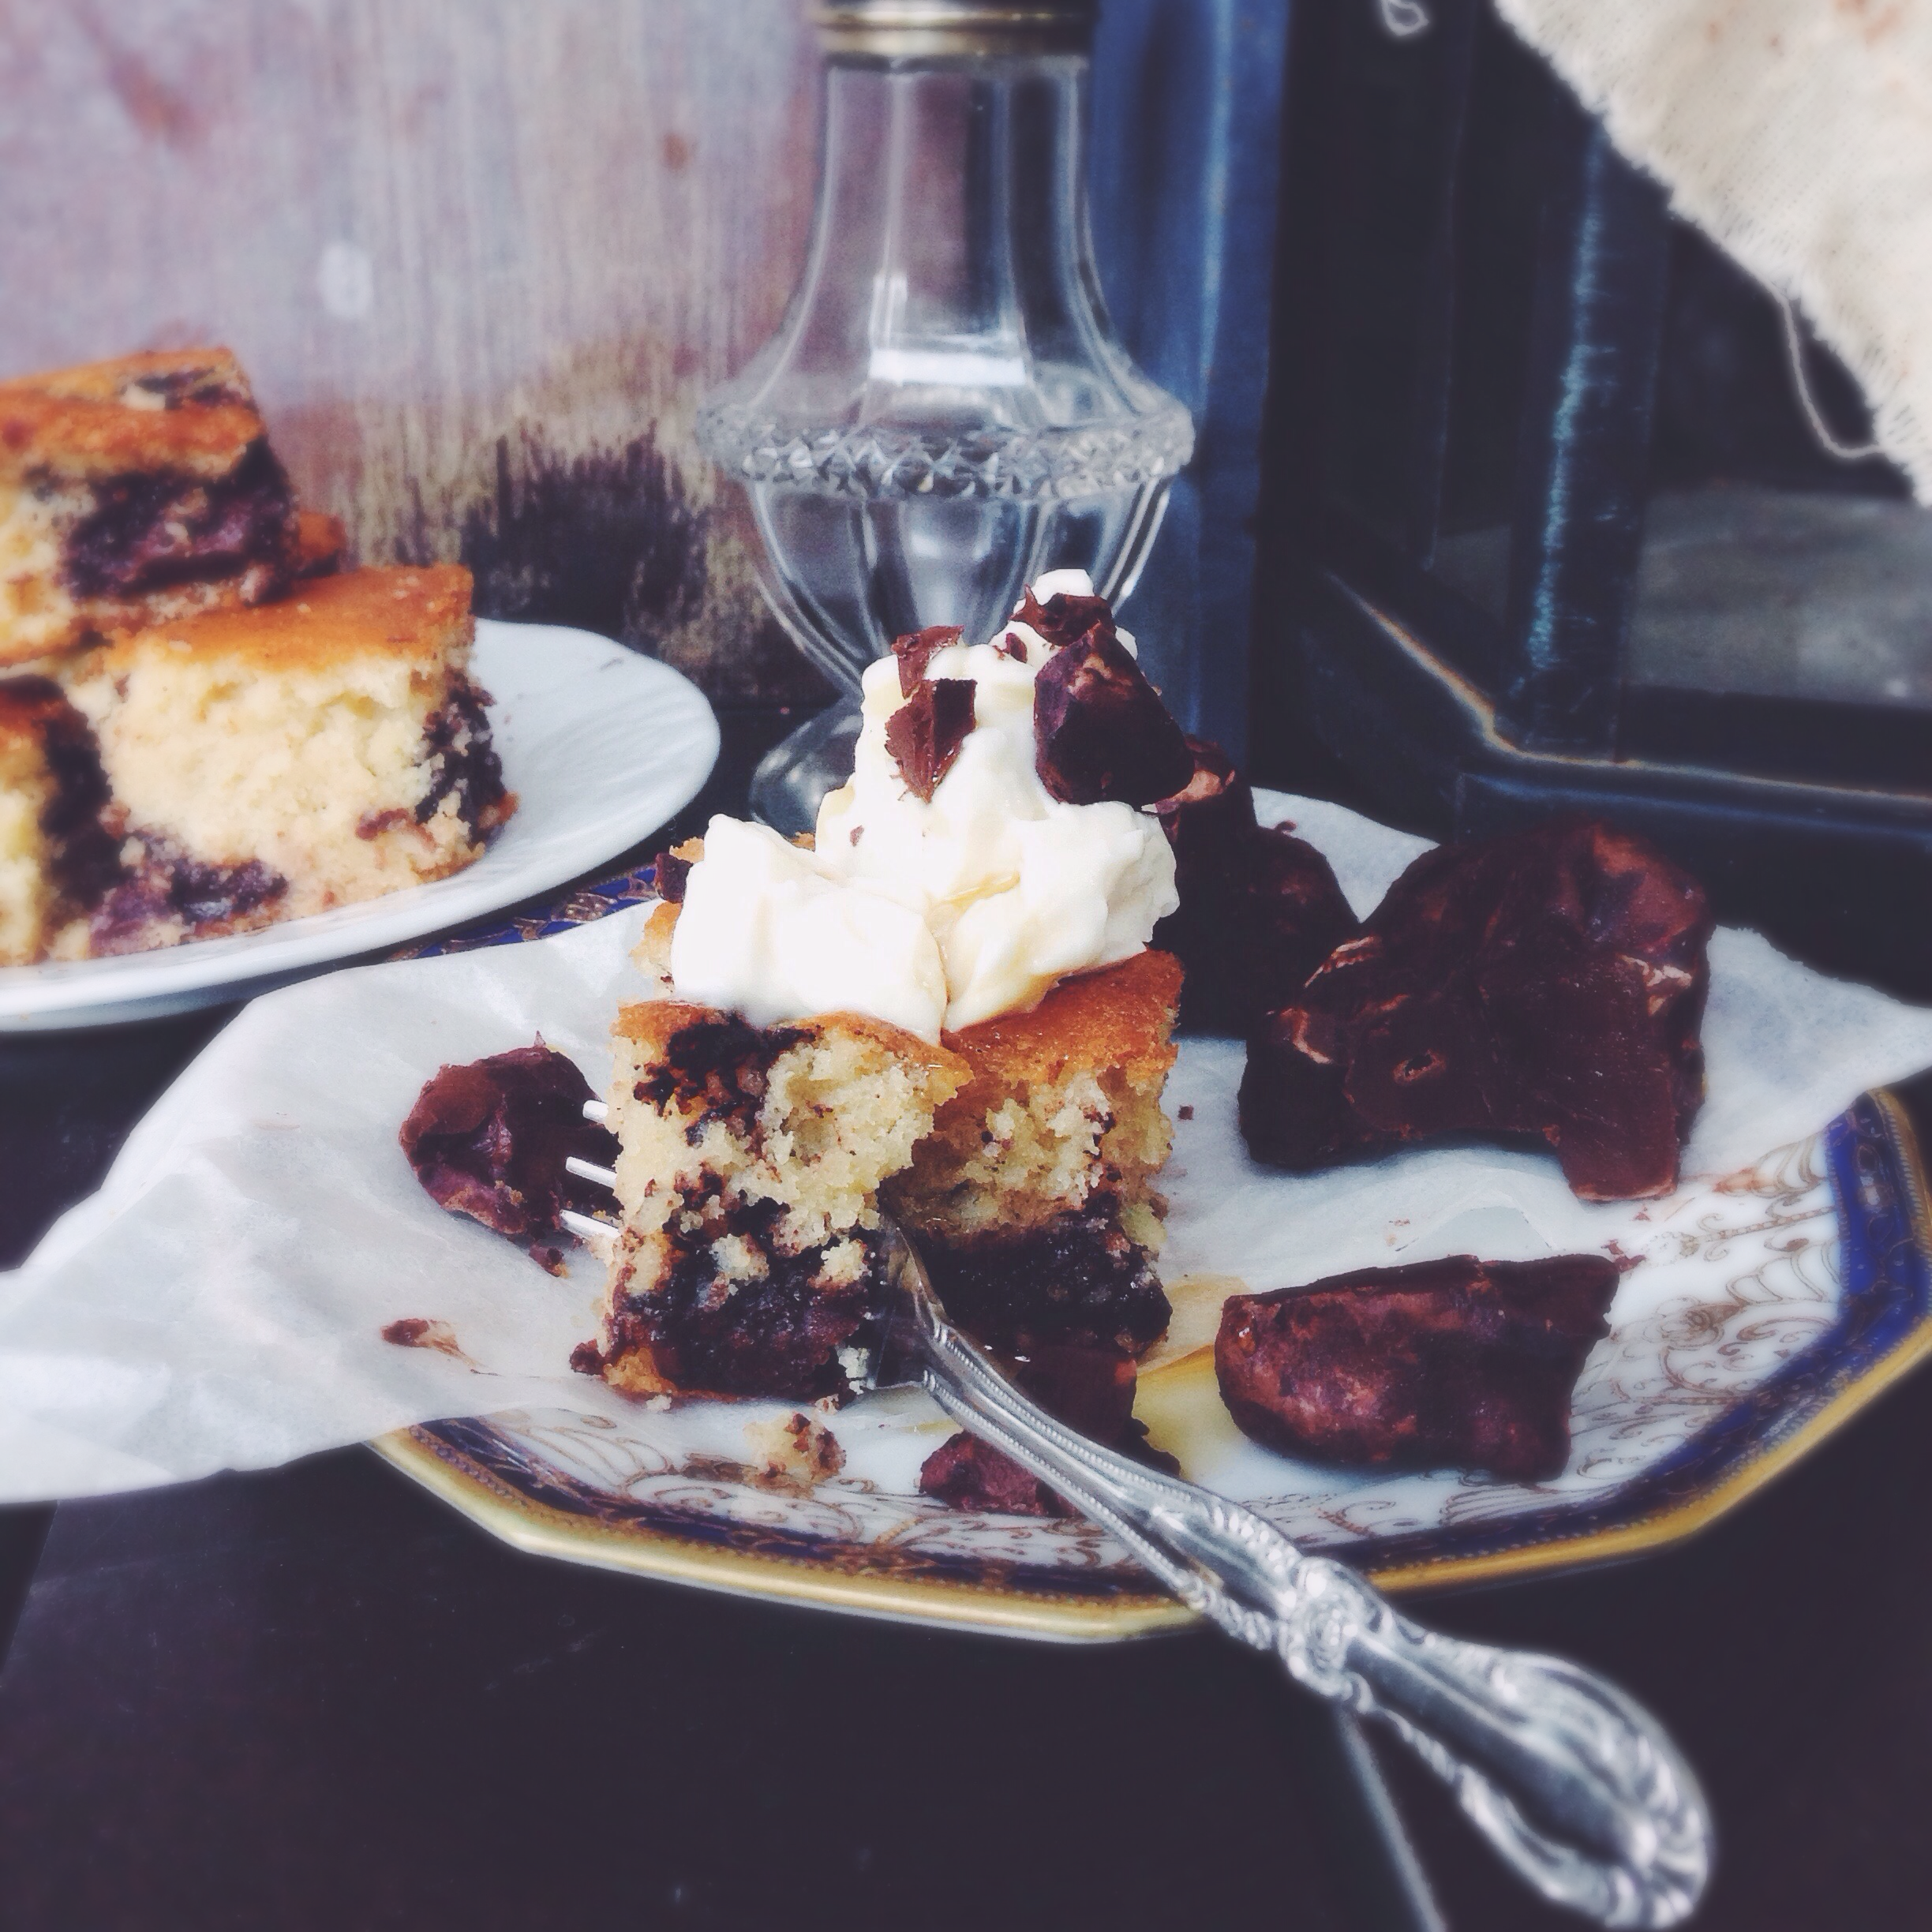
A modification on one of my previous banana bread recipes, this one has a gallant twist with the incorporation of white chocolate and caramel. If ever I do this again, I’ll be sure to add in a nuttier texture or more earthy flavour component to up the ante of everything else going on in the picture. It’s the sweetest pick-me-up, and a one-bowl wonder. Don’t you love the easy stuff? Remember: I’m all about simple. Sometimes. Ok, most of the time. With college matters whirling around my head, this loaf was a nice and easy break, which took no time at all to put together and bake. Feels good to get into mixing, picking ingredients and experimenting again in the kitchen. Made it with one of the sweetest people I’ve met here, and everyone loved (and then attacked) it. Crowd-pleaser. Bananas. White chocolate. Caramel. Good play.

Now, it feels like home.

White Chocolate Caramel Banana Bread (makes 1 loaf)

Ingredients

3 ripe bananas, mashed

1 1/2 cups (190g) plain white flour

2 1/2 tsp baking powder

1/2 tsp ground cinnamon

1/2 tsp salt

1 egg

1 tsp vanilla extract

1/3 cup (76g) melted unsalted butter

2 tbsp milk

2 heaping tbsp caramel sauce

1/3 cup (68g) white sugar

3/4 cup white chocolate chips (I cut up a good bar)

Directions

Preheat your oven to 180C (350F). In a large bowl, mix together the mashed bananas, milk, sugar, melted butter, egg, salt and vanilla. Then add in the flour, baking powder, cinnamon, milk, caramel sauce. Finally, gently stir in the white chocolate chips. Pour into a greased loaf and bake for 50-55 minutes. This one was ready by 53 minutes.

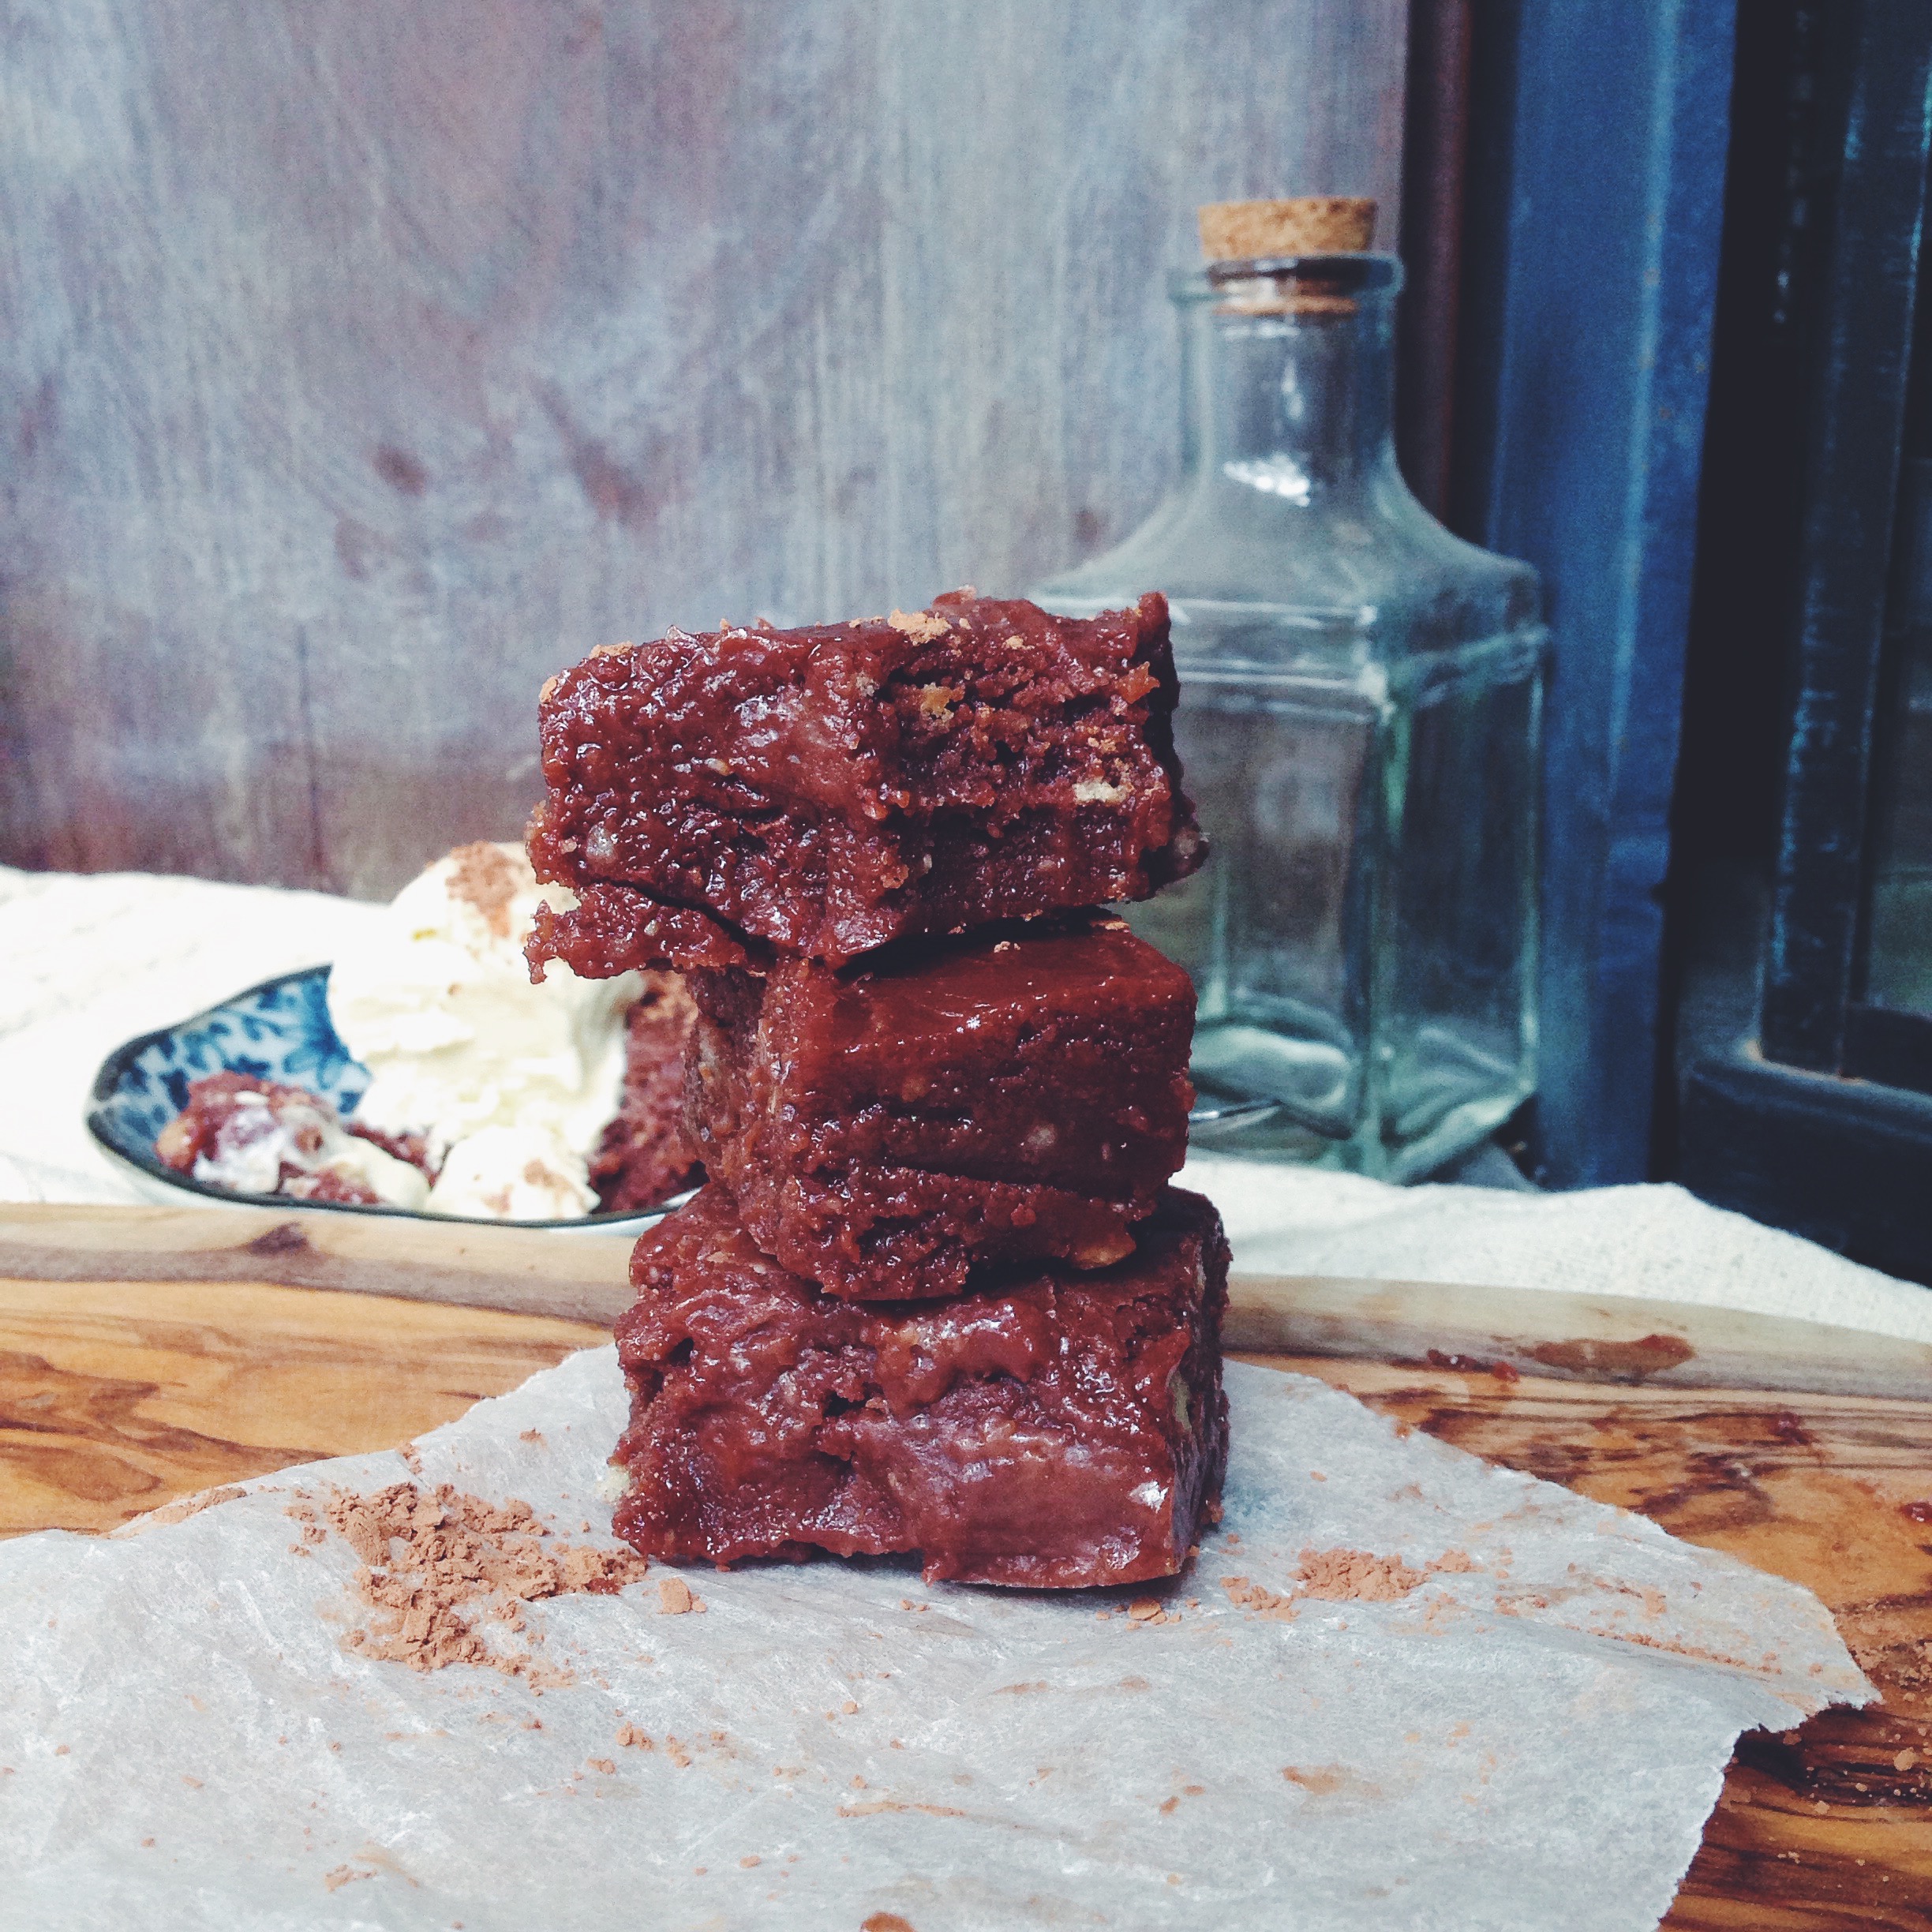
To serve, slice up and serve with more caramel, marmalade (a touch I personally adore) and more chopped chocolate. I’m guessing whipped cream or ice cream would sort out any lonely evening, too.

No-Bake Fridge Brownies with No-Churn Three-Ingredient Vanilla Ice Cream

Proud (me), happy (my stomach), sublime (everything about this).

If you’re in dire need of a some sin in your life, then I implore you to make these

no-bake, chocolatey, fudgy fridge brownies with no-churn vanilla bean ice cream.

AKA the epitome of i-am-lazy-and-my-oven-is-sometimes-incompetent type of baking. I have those days too.

When I’m all about easy, I mean it. This pairing of deep chocolate and smooth vanilla is irresistible. Classic. The best part is that you unload an inappropriate whopping of ice cream on a piece of brownie and nothing becomes goo for quite a while. I’m the sort who loves a beautiful melting mess, but the time delay prolongs the sensory pleasure of digging into the harmony of sweetness come together by the distinct separation of flavour. Then everything melds together, and the symphony is complete.

These brownies are fudgy, but still retain the texture of a brownie more so than plain old fudge. The addition of crushed biscuits gives it both sweetness and stability. An important point to note in this recipe is that the milk, cream and sugar should be boiled for at least 5 minutes so most of the water content has evaporated, before the other things are mixed in. This will yield the best fudgy texture after less time in the fridge. And the ice cream? It just couldn’t be more straightforward.

Ingredients

For the fridge brownies:

280g (1 1/4 cups) white sugar

120g unsalted butter

90g (less than 3/4 cup) plain flour

240ml evaporated milk/ whole milk/ light whipping cream/ coconut cream

1 cup crushed biscuits (I used Nice coocnut biscuits, but you can use anything you have in the pantry, such as crushed cereal or oreos!)

175g (1 cup) chocolate chips or chunks

pinch of salt

optional add-ins: more chopped nuts/ chocolate chips

For the no-churn ice cream:

600ml whipping cream

450ml (1 can) sweetened condensed milk

1 tbsp vanilla extract/ 1 tbsp vanilla bean paste/ the insides of one vanilla bean

Directions

Pour the milk, butter and sugar into a large saucepan and heat on medium heat until everything comes to a boil. The mixture will froth and seem to double in volume so it’s important to have a large, not small saucepan here. Let the mixture boil for 5 minutes, then take it off the heat and stir in the flour, salt, crushed biscuits and chocolate. The chocolate will melt and turn everything a rich brown colour. Pour this mixture into a greased 8×8 or 9×9-inch baking pan and place in the fridge to set for 3 hours, or overnight.

In a large bowl and with an electrical whisk, pour in the can of condensed milk, whipping cream and vanilla. Beat until you have soft peaks, then pour into a freezer-safe container (I just used a plastic tupperware box), cover and place in the freezer for at least 4-5 hours, or overnight.

And that’s it! Since these components are meant to be left in a cold environment, they last for ages in the freezer (or just leave the brownies in the fridge), and they can be taken out at any one point in time to enjoy together.

Chocolate Chip Buttermilk Pancakes

In other words, sin.

Pockets of sweet fudge, buttery, mildly sweet batter, the familiar mosaic on each side of a perfectly cooked, risen pancake.

Each forkful is effortless, tender.

Can’t wait any more. I know I have a well-stashed ‘Babbles’ category, but sometimes there’s no time for babbling. Especially with as straightforward and delicious a recipe like this. Stocked the praise in the main post which you can find in the directions below, but I felt the need to dedicate a separate post to this chocolate version. Ugh, stuffed silly with chocolate. You can’t not like chocolate. Or these. On a Sunday, with the birds chirping and the world is glistening.

Directions

Make the pancakes according to the instructions in my previous post for my favourite buttermilk pancakes herebut add 85g (a large handful) of chocolate chips (I love Ghirardelli’s or Nestle’s mini milk or semi-sweet chips for this, which make for the perfect little pockets of goo) to the dry mix before adding the wet mix.

And that’s it! Top with maple syrup or whatever you want. I added tahini for a slight savoury, creamy punch. You don’t need much when chocolate’s in the picture.

Make This Oatmeal Now (updated recipe with a twist)

I thought I had it all figured out, given the number of times I’ve made oatmeal in my life. Overnight, hot, cold, lukewarm (ew), apple-pied, black sesame-ed, peanut buttered, I’ve done it all. I even wrote a post about it here exactly a year ago, yet I only just discovered what I think is the perfect method for making the thickest, creamiest oatmeal ever. Trial and error does pay off sometimes. It’s more reliable, oats coming out perfect every time. Mind you, this method is preferable is you like the super thick and gloopy sort, but even if you don’t, you just have to take your oats out of the microwave a little earlier.

Catch– it involves the microwave. I can hear the disappointed sighs. They’re boring into the screen already, reaching me, slaps in the making.

I get it, I do. I used to think the only way to achieve the perfect, creamy consistency for oats is to do it the proper and old-fashioned stovetop way. The whole process just makes more sense, it wants you to feel like you’re doing it the better way, doesn’t it?

Funnily enough, this microwave method not only yielded the most desirable consistency, it also seemed to enhanced the flavour of mashed banana, the one ingredient I always put in before cooking my oats for added sweetness and creaminess.

No wait. Just do.

Directions 

The night before, mix together a half cup of rolled oats, half cup of water, half a mashed banana, and a half cup of milk of choice (I always use a mix of whole and almond) in a relatively large, microwave-safe bowl (because this mixture will se. Leave this in the fridge overnight.

The next morning, put your bowl in the microwave and microwave on high for 2 minutes. Take a spoon and mix, then put in the microwave for another minute. At this point, your oatmeal should be noticeably more voluminous and thickened, depending on the power setting of your microwave. Microwave in 30-second increments until you have oatmeal that seems to have more than doubled in volume. Just check your oatmeal every 30 seconds, mixing well between each spurt of heating. Err on the side of caution here.

And you’re done! At this point, you can add whatever you want. My standard toppings are more banana, a heaping tablespoon of almond butter (cashew/peanut/almond), blueberries for a nice tang to cut through the sweet goop, and plenty of honey or maple syrup. Once the oatmeal is a little cooler, I also add a dash of cold, whole milk.

BUT. In this case, I highly recommend trying out this kaya and coconut twist. It’s the sort of combination I’ll be coming back to again and again, for the flavours are close to my heart and it’s a nice break from your typical snack of kaya and butter toast!

The Twist

You should now have a thick, creamy, voluminous mass in your hands. Take the other half or a whole banana and slice it down the middle. Butter a hot pan and fry the banana on both sides. Place the caramelised banana on top of the oats, then add a heaping tablespoon each of almond butter and kaya (I love Breadtalk or Yakun, and my grandma makes a mean one too), a generous drizzle of maple syrup, coconut flakes and a dash of whole milk. Mix everything together, admire the glorious mess, then tuck in happily.

Chocolate Truffle Maple Syrup Cake

IMG_4776

Describe the taste of maple syrup.

Research informed me that it depends on the degree of roasting flavour. Typical notes are coffee, chocolate and chicory, and for the strong roasting flavour, you get hints of burnt sugar and smoke. Whatever the degree, there’s something incredibly enticing about this ingredient in particular. I use it several times a week without fail, almost always on toast and always on the occasional Sunday pancake session, yet it only recently occurred to me how deeply embedded it is in my kitchen system. It sits there day after day, use after use, so giving, so heartwarming. I love maple syrup, and there are few things I like more than chocolate and maple syrup. The sophistication of a rich, dark truffle stuck in honey-coloured, maple-flavoured fluffy cake is a welcome picture.

With so many truffles lying around the house, I thought I might as well put them to good use. The sort I use here are 60% cocoa; your standard, powdered, melt-at-room-temperature truffles. My hands were an absolute mess working with them, but the mess only enhanced the pleasure of the whole process, even as I witnessed some smaller bits melt a little into the batter before anything even hit the heat of the oven.

Your fork dives in. Zero resistance as it goes right through the pale, tender, moist body, and then maybe just a little once you hit a pocket of slightly stiffened chocolate goo. Break the cake apart. It’s a mess of black and white, a welcome juxtaposition of soft, fluffy crumbs and dangerous dark hotpockets. Sin trapped in something all too normal, all done before. No truffles? That’s ok, just use broken up bits of your dark chocolate bar. The effect won’t quite be the same with the whimsical shape irregularities and molten middles, but I would think it would be almost as delicious.

IMG_4782

Chocolate Truffle Maple Syrup Cake (makes 16 squares, heavily adapted from my cinnamon coffee cake)

Ingredients

165g all-purpose flour

1 tsp baking powder

1/4 tsp baking soda

1/2 tsp salt

55g (less than 1/4 cup) white sugar

115g unsalted butter at room temperature (or microwave cold butter in 15-second increments until it’s a little warmer and soft to touch)

120ml (1/2 cup) buttermilk, or make your own by putting half a tablespoon of distilled white vinegar into your measuring cup or jug and filling it up to the mark with whole milk (let this mix sit for 5 minutes at room temperature before using).

1 tsp vanilla extract

1 egg

100ml (1/4 cup and 1 tablespoon) maple syrup, and more for drizzling

9-11 medium-sized (around 2 inches wide) chocolate truffles, a few broken up into smaller pieces, or if you don’t have truffles, just broken up bits of a good quality dark chocolate bar.

Directions

Preheat your oven to 177C (350F), and butter and line an 8×8-inch square baking pan. What I like to do is butter the pan liberally, before placing down a piece of parchment that has 2 sides which are 8 inches, and the other 2 slightly longer so that it’s easy to pull out the bars once cool. Whisk together the dry ingredients (flour, baking powder, baking soda and salt) except for the sugar in a medium bowl.

Beat together the butter, maple syrup and sugar in a separate bowl. In a smaller bowl (yes there are 3 bowls here, but the washing up is not much pain, promise), whisk or beat together the egg, buttermilk and vanilla extract. Add half of the dry ingredient mix and half of the egg-buttermilk mix to the butter and maple syrup mix, and then beat to mix. Then add the rest and gently mix everything together, starting with a wooden spoon, and then switching to a rubber spatula to make the job easier.

Into your buttered and lined pan, add half of the batter, which should be smooth and slightly thick, and then dot the batter with chocolate truffles. Add the rest of the batter on top and smooth it out. Bake in the preheated oven for 33-35 minutes, or until a wooden skewer inserted into the centre emerges clean. The top should be slightly darker than when you first put it in, and brown around the edges. Enjoy this with vanilla ice cream or whipped and sweetened mascarpone (as in the pictures above) and a drizzle more of pure maple syrup.