Honey Balsamic-Roasted Rhubarb Coconut French Toast

DSC_4056

A change has occurred, indeed.

But it’s ok– the change shall be regnant, sustained. What exactly is it?

It’s been a full half a year since I’ve been without my other half- much has happened that has caused it to wane in importance in my life.. or so I thought. NOW I am reunited with my Nikon, complete and happy with old-fashioned clicking, rotating, manual correction, an old bit of Alex has been brought to life.

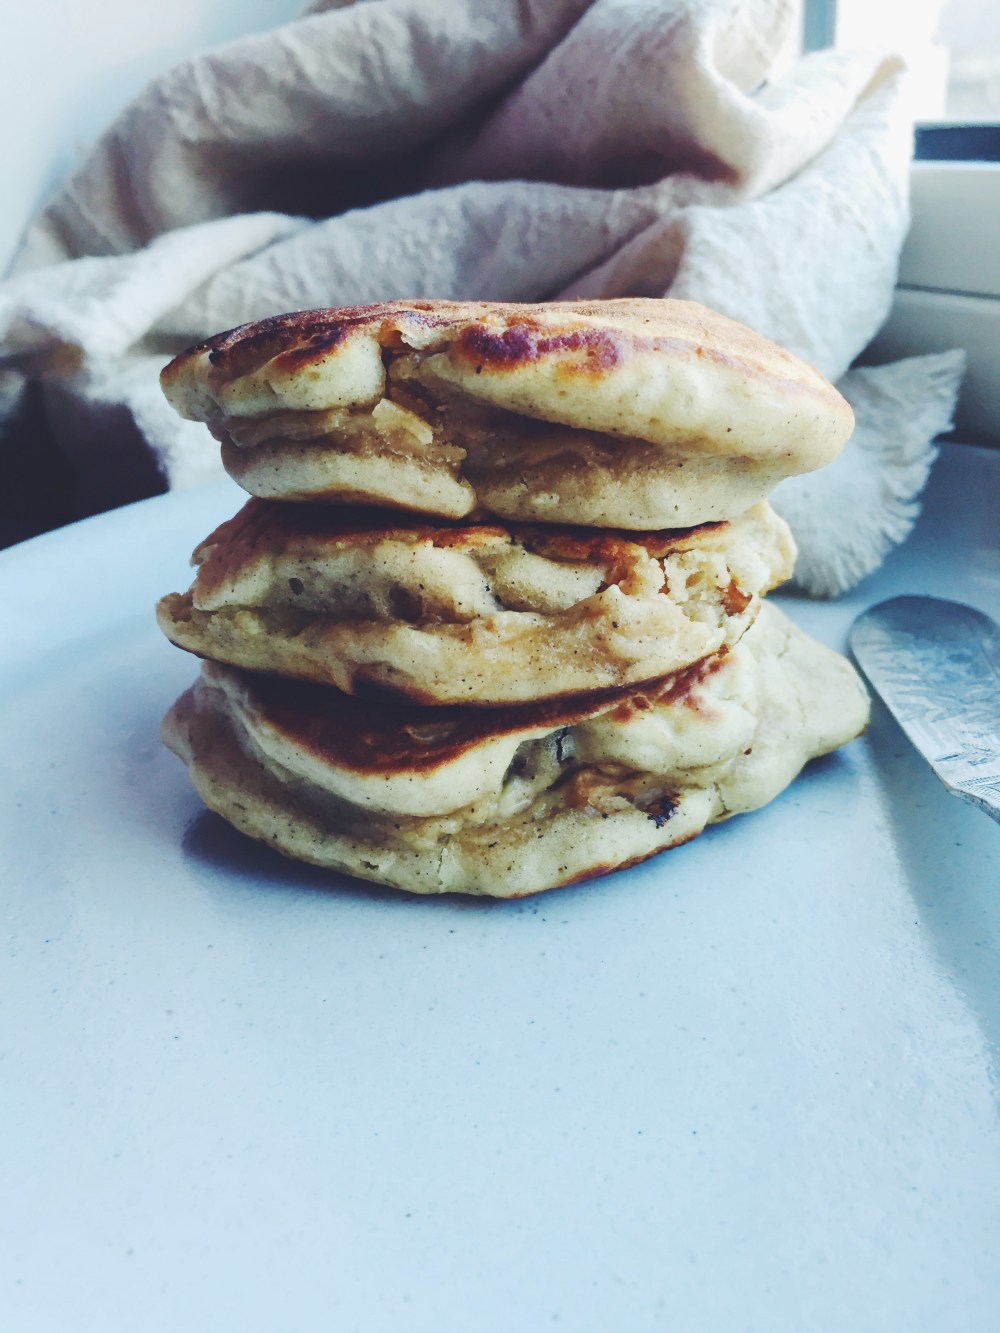
With the first set of exams over, what better way to celebrate than with a french toast, aka my favourite breakfast thing in the world ever?

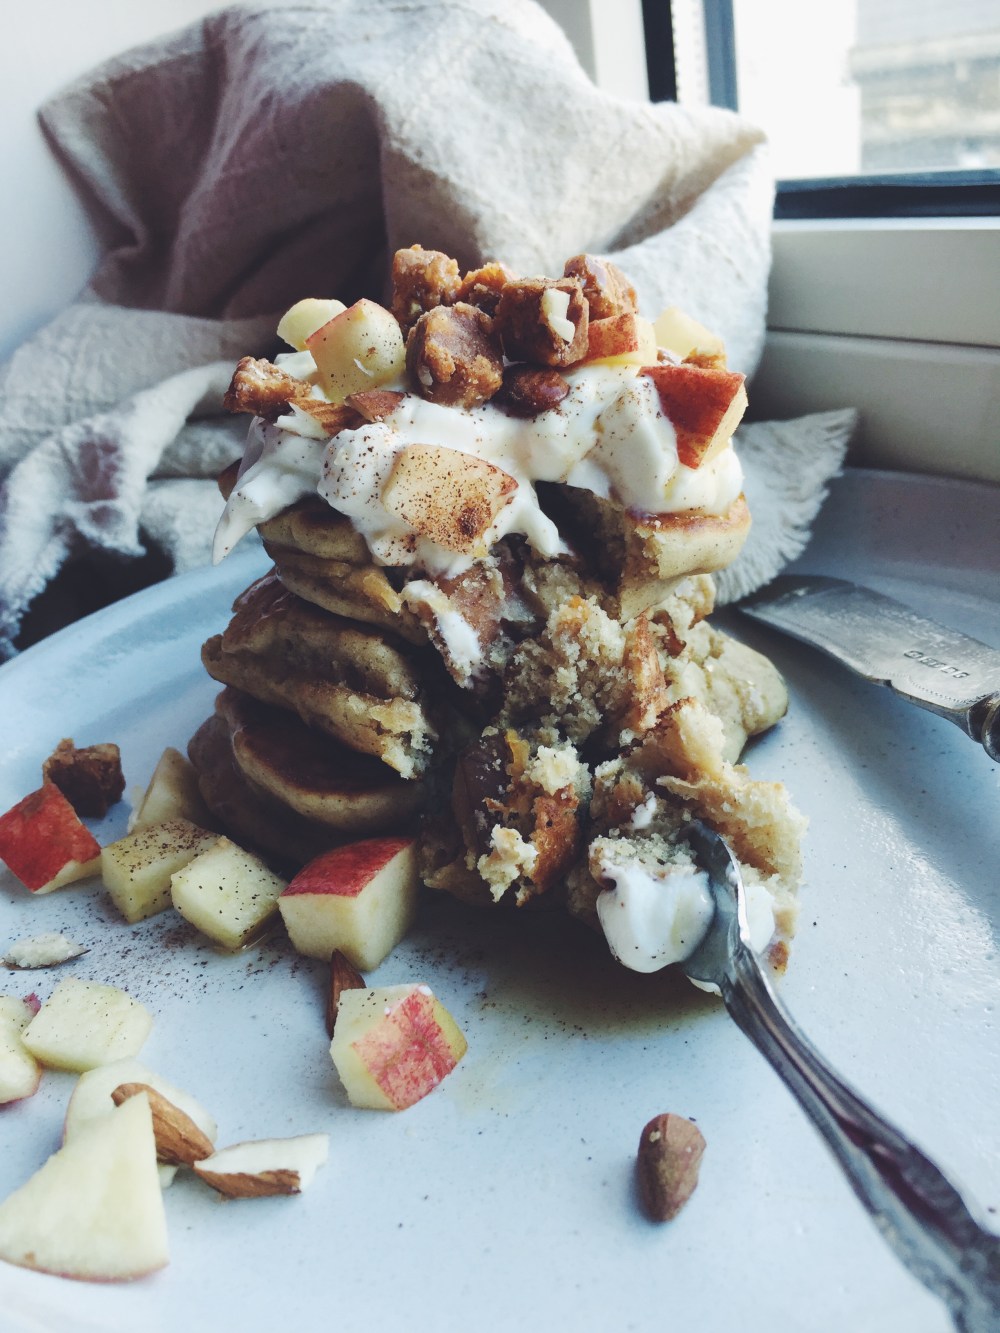
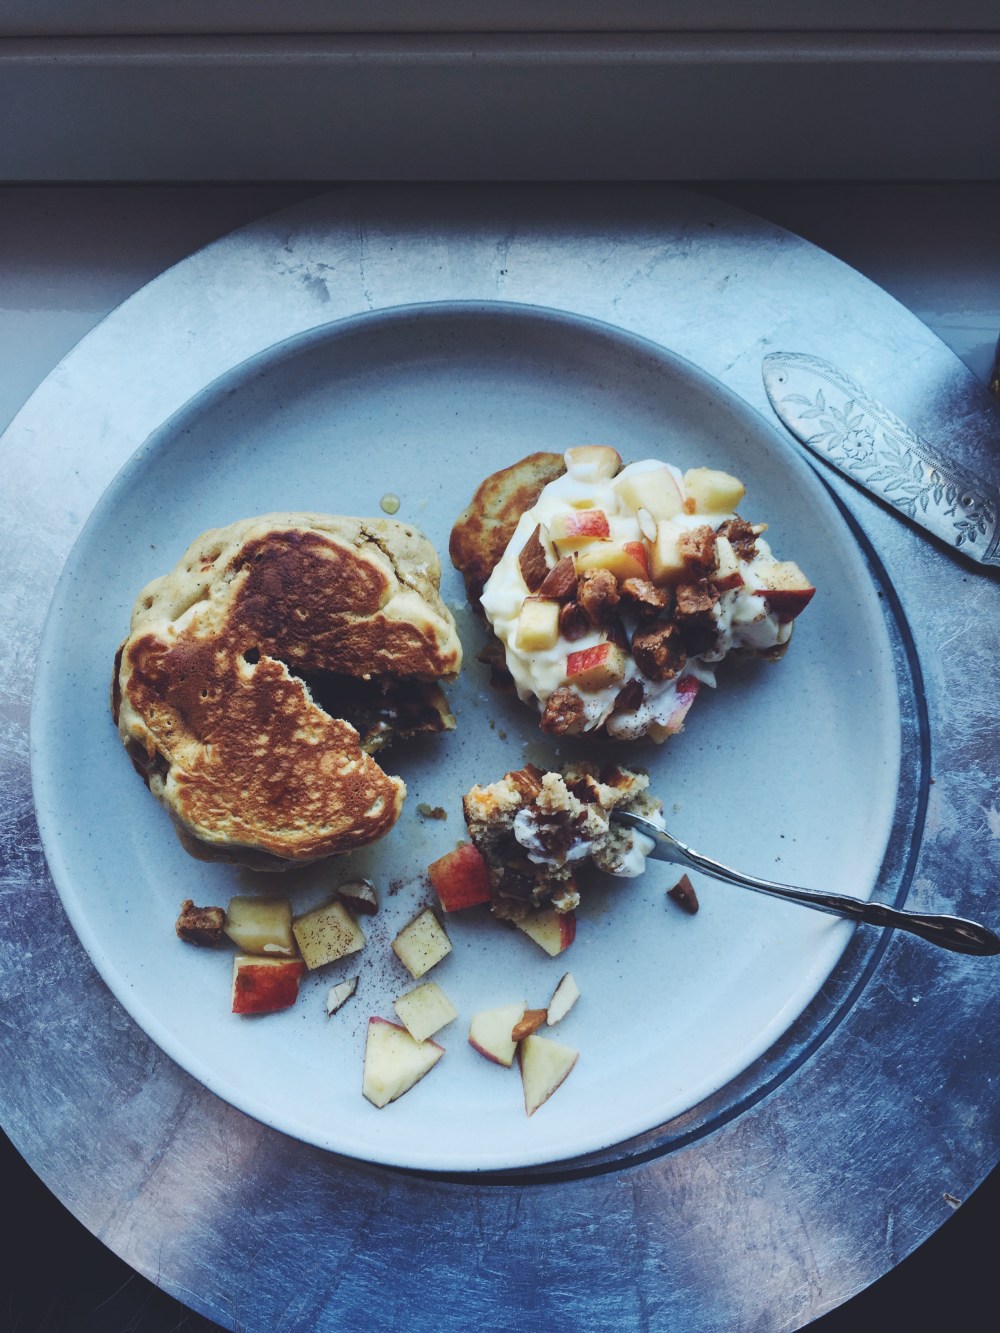
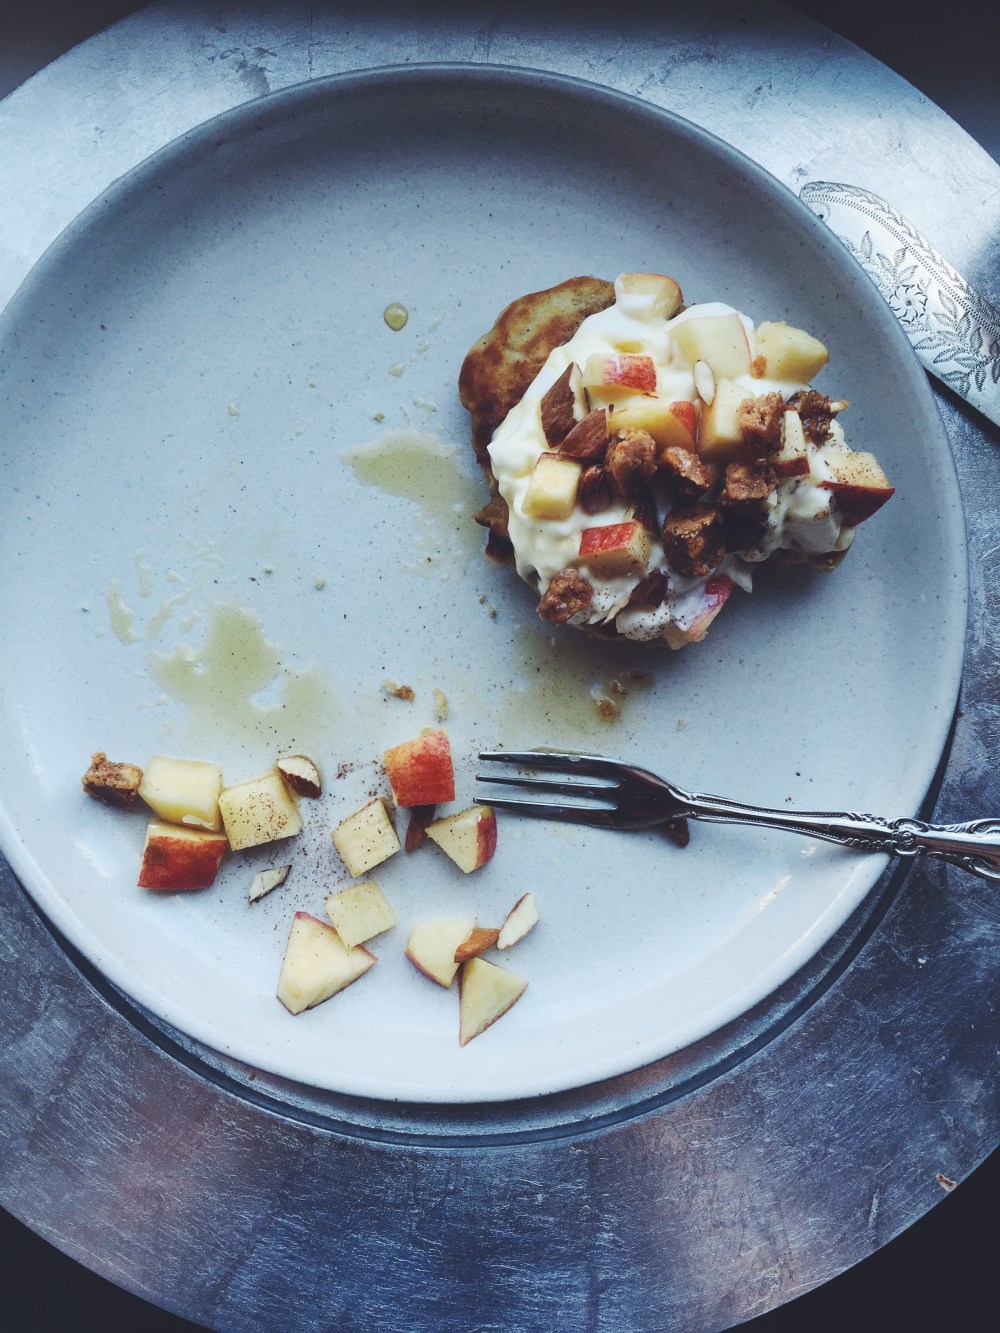
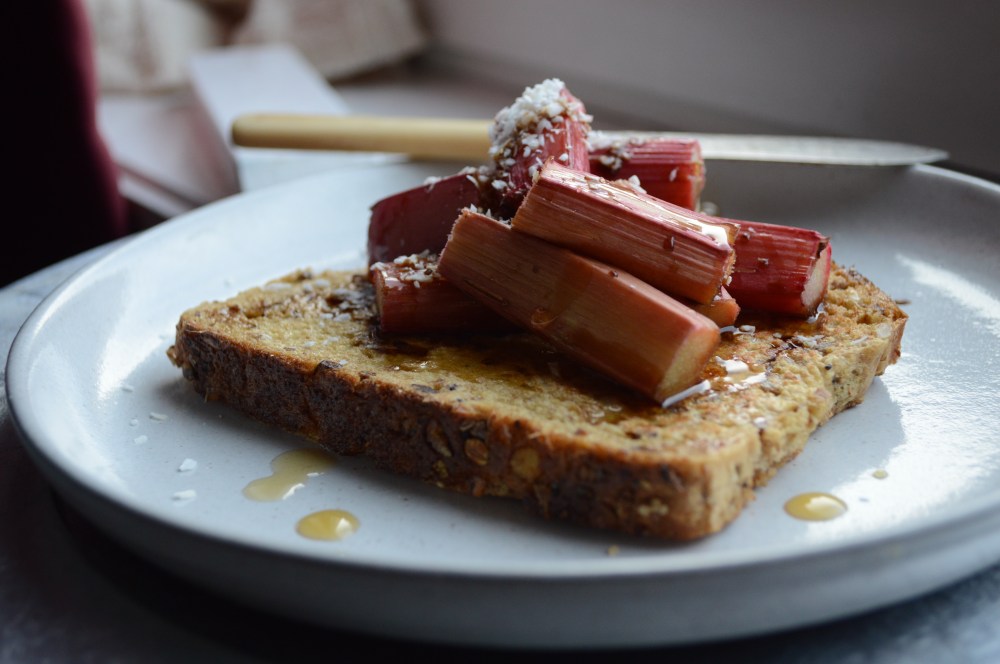
A simple plate of french toast infused with coconut extract, topped with rhubarb roasted with honey and 12 year-old balsamic vinegar, topped with coconut extract, sweet, thick balsamic and maple syrup.

DSC_4049

Rhubarb is in season and it was that fateful Thursday morning I decided to make the most of it. It’s simple but lush; the honey balsamic pairing adds succulence without being overly sour, the sweetness balanced by the almost sophisticated yet playful addition of coconut extract in the french toast batter.

OH. It’s the roasting with aged balsamic vinegar that truly makes all the difference. Best bit is that it takes no longer than 12-15 minutes, so all you have to do is chuck the chopped rhubarb on your pan, chuck that in the oven, then make your french toast. It all fits into a decent timeframe, saving you from excess mental exhaustion, even if it is meant to be a relaxing morning for creative expertise to take hold of the system. Sometimes one just can’t think straight in the mornings. This is one of those recipes that cooperates a bit with an occasional blur streak.

Just make sure you buy the aged stuff, vinegar-wise, for the ultimate sweet and sticky rhubarb experience. The rhubarb soaks up the tangy glisten of deep golden-black, the rest lingers in a finger-thick puddle for you to lick up a little later (oops).

DSC_4052

Honey Balsamic-Roasted Rhubarb Coconut French Toast (serves 1 but may be scaled up)

Ingredients 

1 slice bread of choice– soft whole wheat (I took a frozen homemade slice and microwaved it so it was the right texture for dipping into french toast batter) was used here, but so can brioche/ challah/ classic white bloomer

1 egg

splash of milk

1/2 tsp coconut extract

2 tbsp honey (though there is no need to measure, simply drizzle as much as you want before roasting)

2 tbsp aged balsamic vinegar

1/2-1 stalk rhubarb

Toppings: maple syrup, more balsamic and coconut flakes

Directions

Preheat your oven to 180C (350F). Chop up your rhubarb into pieces 1.5-2cm long and lay them on your oven pan (won’t take up lots of space). Drizzle on the honey and balsamic vinegar, then chuck in the oven and let roast for 12-15 minutes– they should be done by 15 maximum.

Preheat your pan on medium heat and ready some butter. In a bowl, whisk together the egg, milk and coconut extract. Once the pan is hot, add a knob of butter to the pan and let sizzle– it should not burn and turn brown; if that’s the case, turn down the heat a little and wait for that to settle. Dip both sides of bread into the batter, 5-10 seconds on each side, then lay one side into the pan. Flip after half a minute and cook the other side.

Serve the french toast with the cooked rhubarb, bubbling, sweet and tangy, and any extra juices left from the roasting. Add maple syrup, coconut flakes and more balsamic vinegar if you wish. I had this the other day with some almond butter and blueberries, and that was pretty darn magnificent too.

Apple Pie Pillow Pancakes

Processed with VSCO with f2 preset Processed with VSCO with f2 preset

My pillow pancake series is getting a tad out of hand.

No actually I take it back. Would take too much for me to quit this. What morning comfort.

Introducing the newest little baby to the family: thick and fluffy pillow pancakes, based off my original recipe for outrageously thick, tender and fluffy pancakes, this time stuffed with apple, custard, topped with yoghurt and a nutty ‘crumble’.

This also features a delicious dessert bar, one of the many I received yesterday morning from the lovely guys of rhythm108. All cut up and used as part of the ‘crumble’ bit. Seeing they actually had an apple pie flavour, I just couldn’t not use it as part of this getup. Crowning glory. They remind me a little of Naked bars, but at least 2.5x better, because you pop them in the microwave for 10-20 seconds, and lo and behold, you have the perfect little melt-in your-mouth dessert bar. Gooey, warm and sweet. How easy is that? Delicious, naturally sweetened (oh what a change for Alex), mini delicious morsels. And in a wide array of flavours- think apple pie, coconut macaroon (ok I have yet to try this one but I’m bubbling with excitement), banana muffin. I think the concept makes for such convenience. Check them out!

Processed with VSCO with f2 presetProcessed with VSCO with f2 presetProcessed with VSCO with f2 preset

The recipe follows my standard pillow pancake recipe, but with a few modifications which I shall detail down below. Namely a load of apple, cinnamon and custard, of course.

Mix together the wet, mix together the dry, plop one into the other, mix, apple chopping and tossing, fry on a pan on medium heat. Watch them rise, then settle. A brown glisten on both sides.

Processed with VSCO with f2 preset Processed with VSCO with f2 presetProcessed with VSCO with f2 preset Processed with VSCO with f2 presetProcessed with VSCO with f2 presetProcessed with VSCO with f2 preset

Yes!! Soft, warm, fluffy.

Things I love about this variation:

  • the half-made custard which makes up most of the wet mix injects a mellow sweetness and silky smoothness to the final batter
  • warm, cooked apple on the inside and freshly cut apple on top makes for wonderful textural contrast
  • and just like all the other pillow variations, this is so, so versatile. Dress it up or down, top with whatever you like (ok but please include the maple syrup, no arguments there)

Processed with VSCO with f2 presetProcessed with VSCO with f2 presetProcessed with VSCO with f2 presetProcessed with VSCO with f2 preset

Directions (makes 6-8 medium pancakes)

Make the pillow pancakes as how I state for the original recipe, but before you do that, have these ingredients on hand:

1 apple, chopped

1 tbsp ground cinnamon

1 tbsp custard powder+ 3 tbsp white sugar

3 tbsp butter, instead of the 5 tbsp stated in the original recipe

Topping (optional): yoghurt, maple syrup (not optional), more chopped apple, handful of chopped almonds and granola for the crumble part of this whole recipe

Whisk together the dry ingredients as stated in the linked recipe, but add the 1 tbsp of ground cinnamon as well before whisking. Then when putting together your wet mix, add the 1 tbsp of custard powder and 3 tbsp of white sugar into the one cup of milk or buttermilk, and microwave this on high for 3 minutes. After microwaving, add the 3 tbsp butter and let it melt. Then mix in the rest of the wet ingredients, and pour into dry mix.

Add the chopped apple to the final batter, then cook as stated in the recipe.


Gin-roasted stuffed pears with yoghurt

Processed with VSCO with f2 preset Processed with VSCO with f2 preset

I call it a grand break. A super grand one. I don’t want to sound hubristic, but damn this was one irresistible breakfast.

I like sticking with familiarity on most days– oats, toast, my beloved french toast. The classic stuff. But sometimes change awakens and broadens your horizons, and what oftentimes seems like an alarming shock to the system turns out to be inspiriting.

Processed with VSCO with f2 presetProcessed with VSCO with f2 presetProcessed with VSCO with f2 preset

So you buy a pear. That’s the first step. The first step in this magical process.

Take a knife, cut it in half. Then take a melon baller and core it, or be like Alex and not actually have one of those, and use a knife instead to cut out little half=spheres from each half. Chop up some almonds and dark chocolate (because chocolate and pears! Unfortunately the picture above was before the chocolate stuffing bit), then stuff the middles with the mix.

Then you roast it with gin, cinnamon and honey. After some research, I found that roasting something for 15 minutes retains the most (around 40% of whatever you’re using) alcohol, so I tested it, and it turned out sublime.

Processed with VSCO with f2 presetProcessed with VSCO with f2 preset

Then you eat this lump of caramelised, tender deliciousness with thick Greek yoghurt, drizzled with whatever you want. That day in particular necessitated honey, a little almond butter and this divine mango chutney that a friend recently purchased for me (hi Claire!!).

The warm, firm yet soft pear complements the creaminess and sourness of the yoghurt just perfectly. Nuts provide crunch, the cocoa and cinnamon add a sultry dimension, one of apt luxury.

Processed with VSCO with f2 preset

Gin-roasted stuffed pears with yoghurt (serves 1, but can be scaled up or down)

Ingredients

1 firm pear (Bartlett/ Concorde)

4 tbsp unflavoured or flavoured gin (I used gooseberry which is sweeter, so you might need less with something unflavoured/stronger)

small handful (around 1 oz or 28g in total) of chopped almonds and dark chocolate

1 tsp ground cinnamon

1 tbsp honey

80-100g yoghurt (of course this bit is completely up to you, but this ratio works well)

topping options: honey, maple syrup, berries, more nuts


Directions

Preheat your oven to 180C (350F). Cut and core your pear (or, as I said earlier, be like me and forgo the melon baller, instead using the same knife to just cut half-spheres in each pear half).

Add one tablespoon of gin to each ‘hole’, and leave for around 30 seconds to let the pear soak it up. Then add your mix of chopped almonds and chocolate to each half. After filling, add one tablespoon of gin to each half again, drizzling all over the pear. Sprinkle on the cinnamon and drizzle the pear with honey.

Place in the preheated oven and roast for 15 minutes, no more and no less. If your pears don’t lie flat, use a knife to cut a little bit off the backs of the pear halves so that they do.

Remove from oven and serve with yoghurt, together with whatever toppings you want!


Marmalade White Chocolate Breakfast Pudding (for one)

Processed with VSCO with f2 preset

Books and (hopefully efficient) memory work make up the corpus of my life right now, but that won’t stop these mini experiments.

The classic milk/dark chocolate and orange combination has been done countless times before, so I thought, why not give the slightly neglected white stuff a chance? Stuck my hand far at the back of my cupboard and broke a bar into chunks. Threw it into the mix. It did just the trick.

Ah, that char? Yeah, the oven wasn’t being a very agreeable host that morning. I made a few recipe modifications after taking all necessary photos, and am pleased to say that the final product, the second shot, went into the hoop. Pretty darn delicious. Spongy and fluffy in the middle, sweet like dessert, but the orange peel almost makes it wholesome. Firm, caramelised top and bottom crust. And of course, like pretty much most of my recipes, this is easy easy easy. 5 minutes tops for everything.

Before I leave you to it, check out these links:

Make these cookies. The only minor change I made was substituting half of the milk chocolate with white chocolate (can you tell I’m on a bit of a white kick?), but the results were glorious. The resting method that relaxes the gluten and lets the flour absorb as much of the liquid as possible yields teh chewiest, gooiest, YUMMIEST cookie.

‘Large claims and scant evidence’ indeed

Brings me to tears. Perhaps it’s all the minor keys and tinkling notes, but listening to this particular composer has a serious emotional effect on me.

Processed with VSCO with f2 presetProcessed with VSCO with f2 preset Processed with VSCO with f2 preset

Marmalade White Chocolate Breakfast Pudding (serves 1)

In a small bowl, whisk together one egg yolk, a splash of vanilla extract and 3 tbsp sugar until mixture goes slightly pale.

Add a pinch of salt, a half tsp of baking powder, 2 tbsp flour, 1.5 tbsp marmalade (I like thick chunks of rind in mine, but do so with whatever sort you prefer), and 2 tsp whole milk.

Add a handful of white chocolate chunks (around 15-20g) and mix. Pour everything into a microwave-safe mug or ramekin, and microwave for 1.5 minutes (90 seconds) on high. Check after 1 minute- it might be done by then. A wooden skewer inserted in the middle should come out clean.

My first spontaneous pairing with thick greek yoghurt convinced me that that, together with more marmalade and white chocolate, make for the best toppings to eat with this pudding.

Double Marzipan (simnel-style) Cupcakes

Processed with VSCO with f2 preset

A lightly spiced, currant and nut-stuffed fluffy cupcake, with a layer of marzipan on top and in the middle. 

I’ll tell the truth– I had no idea my usual Saturday baking experiment was really of traditional substance. All I knew was that I needed to use the marzipan which called my name out sadly every time I opened the little pantry door, as well as the currants I kept for but never used over the Christmas break. So I diddle-daddled, thumb-twiddled, and decided to make these 2-layer marzipan currant cupcakes, only to realise after a bit of research later that these babies are already a thing, and what adorable, moreish things they looked right there on my screen. And so I made them, with heavy tweaks. And loved them.

Processed with VSCO with f2 presetProcessed with VSCO with f2 presetProcessed with VSCO with f2 presetProcessed with VSCO with f2 preset

This cupcake is truly a thing of beauty– the crumb is of unbeatable lightness, yet the crumbs adhere just the right amount to each other so the cake itself is not too forgiving; the top and bottom bits of the middle layer of marzipan ooze into the adjacent airy crevices a tad, sweet goo cemented to buttery crumb, like little cilia on epithelia (is that too far).

Processed with VSCO with f2 preset

The amount of eggs used in this recipe is almost double what I expected, but all at the right cost, for that volume provided the perfect amount of moisture, lightness and bind. I substituted the oil with melted butter because I didn’t have any oil on hand, and used almonds and yoghurt as extra additions. Another thing I love is that the use of mostly liquid ingredients here lessens the workload and time needed to make these (by the way, the perfect cook time here is ~25 minutes, tried and tested).

Processed with VSCO with f2 preset

Once out of the oven, the flat top so characteristic of cupcakes as well as the sides boast an almost-firm, sugary crust, which is why I highly recommend eating these straightaway or at least the same day, for the following day that outer texture will be much less pronounced.

That belly goo, though.

Double Marzipan (simnel) Cupcakes (makes 12, heavily adapted from BBC Food)

Ingredients

450g marzipan

275g white caster sugar

115g (one stick or a half cup) butter, microwaved until softened (melted is fine too)

4 eggs

3 heaping tbsp (50g) honey

1 tsp vanilla extract

200g plain all-purpose flour, plus some extra for rolling out marzipan.

2 tsp baking powder

1 tbsp cinnamon

1/2 tsp nutmeg

60g (1/4 cup) cream cheese, at room temperature (I microwaved mine to quicken the warming process)

60ml (1/4 cup) yoghurt

150g raisins or currants, or use a mix of both

100g chopped/flaked almonds


Directions

Line your cupcake tin with 12 liners, and preheat your oven to 180C (350F). Roll the marzipan out on a surface lightly floured, or lightly dusted with some icing sugar. Cut out 24 discs– 12 that are 6cm wide, and 12 that are 5cm wide. All should be 3mm thick, as specified in the original recipe (lesson learnt: using an actual ruler beats doing this by eye by a mile).

In a medium bowl, briefly whisk together the flour, baking powder, spices, chopped almonds, and currants/raisins. In another, larger bowl, whisk together the sugar, melted butter, cream cheese, yoghurt, honey, vanilla and eggs.

Tip in the dry mix and mix until everything is well incorporated.

How easy was that.

Spoon a tablespoonful of batter into the first liner. Place a 5cm-wide circle of marzipan on top, then fill the liner with batter until it’s 3/4 full. Bake in the preheated oven for 25 minutes. Check with a skewer to see if it comes out clean.

Once the cupcakes are out, top each with the 6cm-wide marzipan circles. It’s important, as the recipe states, to do this while the cupcakes are still warm, for this helps seal the top bits of marzipans to the cupcakes, forming a nice and even (and aesthetically pleasing) layer.

For reasons mentioned above, try your best to consume these the same day. Nevertheless, these may be stored in an airtight container for 2-3 days.