Mochi Pancakes and a Matcha Ritual

3635451 Processed with VSCO with a5 preset3766293 Processed with VSCO with f2 preset

I meant to be writing this on a train to Durham, best beanie on, heart on my sleeve. Instead, I’m sat snuggled in a jumper at home, hoodie on, tea on my sleeve. The train was cancelled, everything was delayed, and my heart was pumping with an anger and impatience it wasn’t used to. Acceptance is typified as the answer to frustrating situations, which in itself is frustrating once things don’t go as perfectly planned. Acceptance, a lighter heart, and a laugh that starts out as fake to try and persuade yourself,  before reifying the humour of day-to-day disappointments, making it all ok again. Small hiccups in a big world. I had a conversation with a sweet old lady as we sat waiting for the next District Line train, shivering from our covered heads to toes. This is Earth’s payback for what we’re doing to it, she exclaimed. And to an extent, I agree. I smiled in the cold. There’s only so much we can do, but that doesn’t mean there’s nothing we can do.

3172408 Processed with VSCO with f2 preset Processed with VSCO with f2 preset4887363 Processed with VSCO with a5 presetProcessed with VSCO with a5 preset

Exams are done!! On Friday I used up the ink of three pens, and now it’s time to use up all my flour. More time to potter around in the kitchen, experimenting with different sweet and nourishing recipes, putting more time and effort into this blog, my baby, my alter ego. These spurts of creativity, life-giving and soul-satisfying, perfectly balance the head-banging revision one can endure in the space of a couple given days. After my recent trip to Austria, where I was gifted with some gorgeous fresh matcha (Attila Hildmann). And so started my daily matcha ritual, complete with the whisk, bowl, meditation, everything. It has replaced my Nespresso ritual, that crutch, but now I can’t look back. The harder shots of black are welcome once in a while, but the strong emerald brew gives a lasting, strong mental energy which I especially needed the last few weeks. The earthy scent and potency of fresh ground matcha twirling in rich heated almond milk, lightly sweetened with maple syrup, is the best thing to ease yourself into a hardcore (or easycore?) day.

So here’s a recipe for my favourite matcha latte, which may be jazzed up with some froth on top and some smears of hot chocolate, if you please. It goes perfectly with my new pancake recipe– MOCHI PANCAKES. Yes, you read and heard right. Made with rice flour and a good deal of soluble protein for stretch and the perfect balance of light and heartiness. Funny how being in Germany and Austria made me think of Japan so much. The hospitality, cleanliness and attitude in both countries are fairly similar, perhaps. Or maybe it was because I was surrounded by clean, white lines and it all resonated with the minimal simplicity I find so appealing in Japan.

3766293 Processed with VSCO with f2 preset

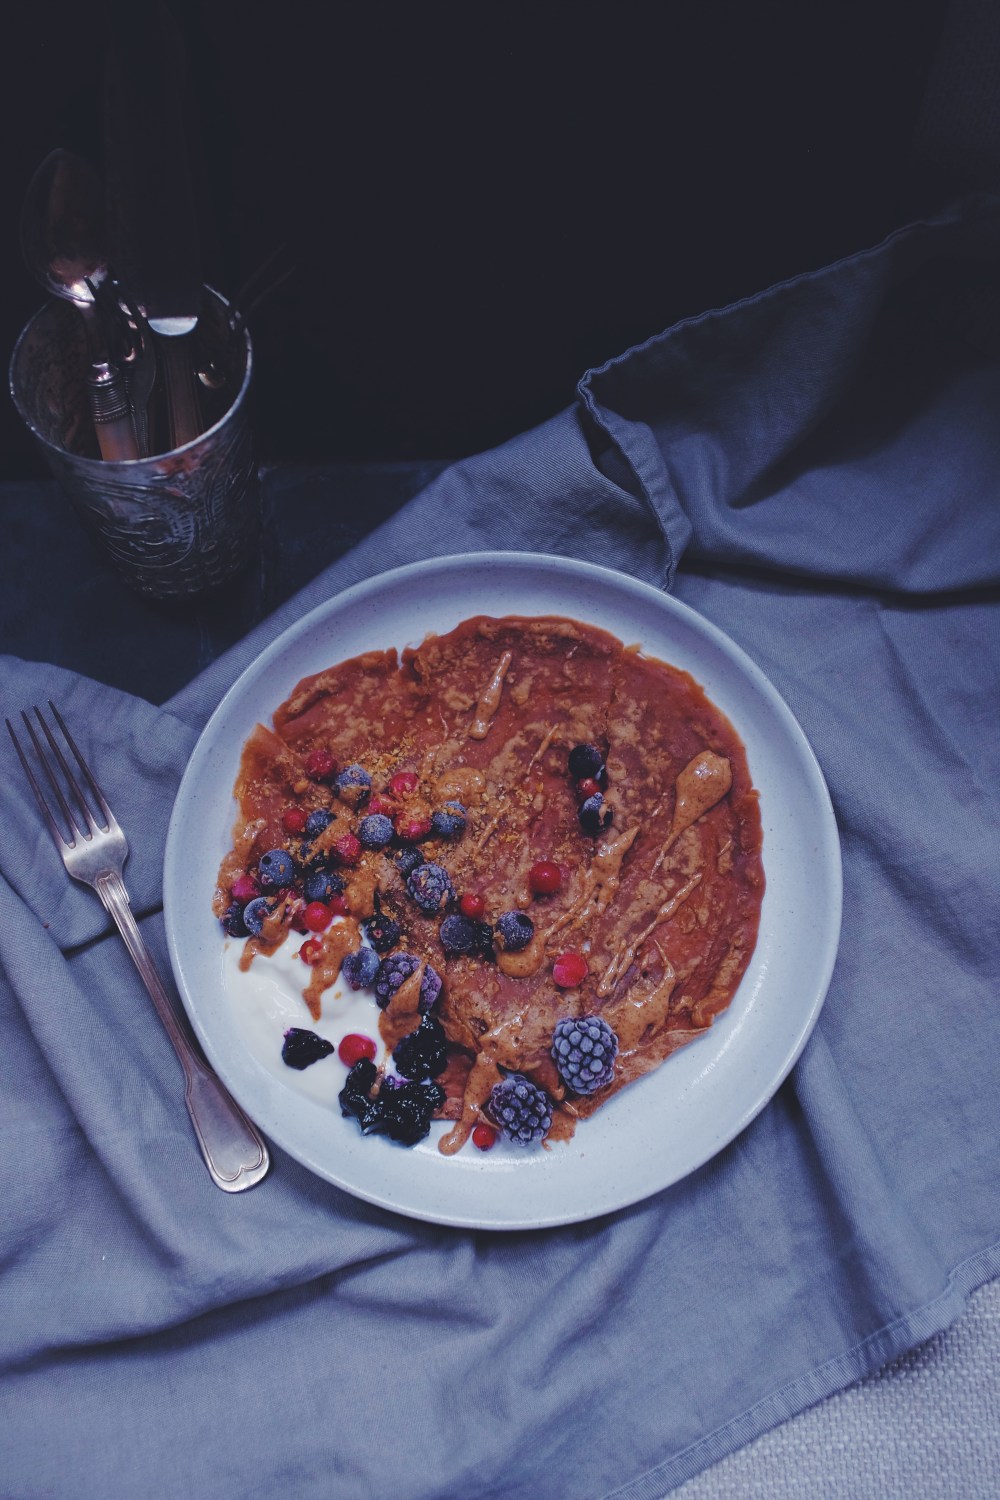
These pancakes are delicate and tender, a far cry from the fluffy ones I’m used to making but nonetheless delicious. Perfect with pear, tahini, a homemade red bean paste (watch this space, might refine that recipe to be posted soon!) and soy yoghurt, as pictured above.


Matcha Latte (serves one)

Ingredients

1 tbsp matcha powder (I use the Attila Hildmann brand)

2 tbsp hot water

240ml (1 cup) plant milk of choice

1 tsp maple syrup

Optional: 2 tbsp hot chocolate powder or chopped dark chocolate, and a scoop of either vegan vanilla ice cream/whipped cream to top.


Directions

Pour the milk into a saucepan and bring it to a boil. While waiting for it to come to a boil, whisk the matcha and water together in a small bowl. I use my cute little matcha whisk from Kanuka Tea for a good, thorough whisk. Pour the matcha mixture into a large mug, add the maple syrup, then pour in the hot milk. Mix everything together with a teaspoon. For some extra fancy schmancy, add the hot chocolate powder or chopped dark chocolate to the bottom of your mug first, before pouring in the matcha mix and milk. Then after pouring in the milk, top with some vanilla ice cream or whipped cream that will melt on top of the hot matcha to create a sweet, frothy top.


Mochi Pancakes (serves 2-3 people)

Ingredients

70g plain flour+50g rice flour

50g porridge oats (or substitute coconut flour/almond flour/any other gluten-free flour)

1 tbsp baking powder

1 tsp baking soda

2 tbsp ground flaxseed

6 tbsp water

5 tbsp melted vegan butter/coconut oil (just melt it by putting the butter in a microwave-safe bowl and nuking it for 30 seconds or until you can see that it’s mostly melted)

pinch of salt

3 tbsp white/brown/coconut sugar

350ml plant milk of choice (I use a mix of rice and soy)


Directions

In a small bowl, make your egg– mix the flax and water and set it aside to thicken. In a large bowl, mix together the dry ingredients– flours, oats, sugar, salt, baking powder and baking soda. Then pour in the milk and butter. Mix briefly, then add the flaxseed mixture, and continue mixing until everything is well combined. It should be quite a wet and drippy mixture. If not, add more milk until it reaches that consistency. Heat a pan on medium pan, add a pat of vegan butter and let melt. Once it is sizzling a little, dollop tablespoonfuls of batter onto the pan (or griddle if you have one) and let the first sides cook. Flip once you see bubbles form on the surfaces. Let the second sides cook for 20-30 seconds before removing and placing on a plate lined with paper towels to absorb the excess moisture, or if you’re making a big batch for guests and you want to keep the pancakes warm ahead of time, in a warm oven until they arrive and you are ready to serve.

Matcha Coconut Adzuki Bean Tart

3385343 Processed with VSCO with f2 preset

The week in a nutshell?

Well.

Perhaps an abundance of small happenings and details that cumulated to form the realisation that the smallest changes can indeed lead to drastic changes. Things like goal setting and reading affirmations out loud (even if just in a whisper) have a tremendous impact on how you start and go through your day. Meditation. Another thing I’ve gotten into again, more recently. So many things which, just 2 years ago, I may have scoffed at, brushed aside as heeby-jeeby, loco, substance-less stuff. An amazing Harry Potter exhibition at the British Library, and finally becoming a member of the Wellcome Library. Delicate, lasting pleasures.

4318271C-9DF8-4D88-A862-E9A1C0F26ABC3240517 Processed with VSCO with f2 preset

I here conclude that centre of mind should be centre of gravity. Slip-ups happen, a day isn’t always that great, and that’s ok. Walk off the woes. Write. It’s about returning to those small, good things, and staying confident in their life-giving properties which may only be discovered upon closer inspection. Like pouring tea into your teacup, or savouring your first bite of dinner, or reading without your phone buzzing. There is a secret bonhomie even in the most inane things, or inanimate objects.

So I made this tart on Monday, and there is one last slice in the fridge. Waiting there for me, as I sit here typing in Waterstones. Stiffened just to the right degree, with a thin blanket of coconut cream gently melted before the drizzle, and lovingly homemade sweet red adzuki beans. Can you tell Japan is still on my mind?

With matcha, coconut, black sesame and adzuki bean, there’s a lot going on, but there’s a lot going on well. Ecstasy possessed me upon my finding these beans in a health shop near where I stay. They take quite a while to cook but the result is so worth it. These rigid, dark beans are harder, darker and smaller than your normal red kidney beans, and add a nice firm texture to any soft, sweet dessert. Dense and more earthy in flavour. In fact, you could throw these guys into your lunchtime salad or pasta and it probably wouldn’t be half bad (here’s to a new idea for tonight). The filling is not too rich, achieved by mixing coconut cream, coconut yoghurt and plant milk in the right ratio. You could do it all just with coconut cream, but that would totally overwhelm the addition of matcha. The light blend ensures all the flavours come through at the same time. As I wrote in my journal that day, it is ‘so sweet, matcha-y and creamy…!!’ Clearly I was too excited to English properly. Also, no baking needed! Just a little fridge hibernation, so make this the night before to enjoy the next day, or in the morning if you’re the sort who has time at home, and enjoy later on.

3342913 Processed with VSCO with a5 preset

A creamy matcha coconut tart with a black sesame crust and sweet adzuki beans (Japanese red bean)

Matcha Adzuki Bean Coconut Tart (makes one 7/8-inch tart)

Ingredients

For the crust:

35g roasted black sesame seeds

2 tbsp (50g) tahini

8 large medjool dates (120g)

100g raw cashews


For the filling:

2 tbsp matcha powder

150g coconut cream, from a package or scoop out the solid bits from a tin of coconut milk, and save some extra to drizzle on top

150g coconut yoghurt or any other plant-based yoghurt of choice, e.g. soy/almond etc

120ml almond milk (or any other plant milk)

50ml (45g or 3-4 tbsp) maple or agave syrup

4.5g (about 1 tbsp) agar powder or vegan gelatin

half a teaspoon of fine salt


For the bean topping:

100g adzuki beans (pre-soaked for 2-3 hours, or you can soak them while your tart is setting in the fridge)

5 tbsp granulated/coconut sugar

water

Directions

Using sesame oil or any other oil/margarine (sesame works well here because it matches the flavour of the crust but you don’t have to, really), liberally brush the base and all corners and crevices of your tart tin. Your tin should have a removable bottom. The liberal oiling is important because it’s easy for the sticky crust to stick to the sides! Now in a food processor, blend together all the ingredients for the crust. Wet your hands to stop so much of the batter sticking to them, and press the mixture evenly into your tart tin. Use the bottom of a glass to help, if you want. Set aside for now.

In a saucepan, whisk together the ingredients for the filling. Place on high heat and bring to boil. Once it is boiling, immediately reduce heat to low, let the mixture simmer for 30 seconds, then take off the heat. Pour this on top of the prepared black sesame crust and spread evenly. Place the tart into the fridge to set nicely.

Meanwhile, make the adzuki beans. Wash your saucepan. Take your pre-soaked beans and place them in the saucepan. Fill with water until the beans are just covered, then cook on medium-high heat for an hour. Now go read something, chat with your mum or watch an episode of Friends. When you come back, the beans should be relatively soft. If not, cook for another 10 minutes. There should still be a little resistance when you use a wooden spoon to break a few beans. Now add the sugar and stir until everything is dissolved. Take off the heat and set aside.

Finally, drizzle some extra coconut cream on the tart, then top with the cooked beans. Et voila! Serve cold from the fridge and enjoy with some green tea or coffee.

And to end on an inspirational quote…

‘Consistency is the playground of dull minds’

Black Sesame Waffles and Lemon Curd

3351853 Processed with VSCO with f2 preset

Do you feel the same emotional high as I after creating a meaningful breakfast? Such that it ceases to be a shallow acquaintance in the morning, disappearing as fast as it appeared– head to table, then head to door. It’s so much more than that. It’s a tuning into the senses, savouring a myriad of plant-based foods that nourish and lighten the soul, the abundance of classic and sometimes unexpected flavours colouring the rest of your day with creativity and comfort.

Just as how some people have shaped and supplied your existence over x number of years, food too mirrors this truth. In clashing flavours, harmony is found.

IMG_05673844823 Processed with VSCO with a5 preset Processed with VSCO with f2 preset

There’s no ‘right’ time to treat yourself. Lately I’ve been re-focussing once more on the importance of routine, which really does free up a lot of creative head space during the day. Suffice to say that, upon the first moments of rising, after a cleansing elixir of which recipe I modified from various parts of the Internet  (1 tablespoon apple cider vinegar, juice of half a lemon, top up the rest of my 750ml glass with filtered water, mix mix mix), meditation, a short workout and mini journalling session, a generous, flavourful, exotic breakfast is always welcome.

Black sesame, matcha, red bean. These are the flavours which still call to be delivered on an almost-daily basis. The magical trip to Japan was bookmarked with earthy flavour, soil and icy freedom etched in the wintery grey skies. These waffles are a throwback to some charcoal waffles I used to travel far for back in Singapore, though are richer in traditional goma flavour instead of being just, well, black. The use of activated charcoal here helps the colour, though that is optional. What makes it special is a black sesame paste made of finely ground black sesame, maple syrup and sesame oil. The ratio of the paste is much more coarse than that for the actual waffles, but as long as you get a relatively coarse, all-black paste then you’re set and ready to go.

And this lemon curd! Ah lemon curd, something I have unconsciously craved for so long and have failed to substitute with various tangy yoghurts and the morning lemon wash, has finally made a sturdy comeback. All vegan, all delicious, creamy and silky. I used agar powder since I did not have vegan gelatin on hand, but use the latter if you do have it. The agar promotes a more jelly-like flavour so use much less of it. Another great thing is that you can make both waffles and curd at the same time, and not waste time making one thing after the other. If lemon curd isn’t really your thing, these waffles would pair well with most anything else– this morning I coupled a toasted one with tahini, frozen fruit and maple syrup, the white pasty sesame-y tahini (yeah, to think I speak and type English) amping the roasted, toasted flavour of the black sesame paste in the waffles. The lemony curd cuts through this pastiness, a sunny break.

3365253 Processed with VSCO with a5 preset

3678953 Processed with VSCO with f2 preset

Crispy, chewy black sesame waffles with lemon curd (makes 6 medium, or 5×6-inch waffles)

Ingredients

90g all-purpose flour

90g oat flour (store-bought or process 90g oats in a food processor; alternatively substitute with another flour of choice, be it plain, spelt, or perhaps a gluten-free option)

35g cornstarch

1 tbsp baking powder

1 tsp baking soda

1/2 tsp salt

2 tbsp sugar of choice– I used coconut, you can use plain/brown/maple/golden caster

Optional: 1 tbsp activated charcoal powder (you can get this in powder form, or cut open the capsules to release the powder inside)

1 tsp vanilla extract

For the black sesame paste: 65g roasted black sesame seeds+ 2 tbsp each of maple syrup and sesame or vegetable oil

2 tbsp vinegar or lemon juice

1 tbsp melted vegan butter

350ml plant milk of choice (I used almond; you could use soy/cashew/oat)

For the lemon curd:

The juice of 1 lemon

3 tbsp cornstarch

1 tbsp agar powder, or 2 tbsp gelatin powder

a light pinch of turmeric, for colour (literally just the tiniest smidgen)

a pinch of salt

3 tbsp maple syrup (or agave nectar)

3-4 tbsp plant-based yoghurt (I used soy)

240ml plant milk of choice (I used almond)


Directions

First, make the black sesame paste. In a food processor, process the black sesame seeds until fine. This will take quite a while, perhaps at least a couple of minutes (well it took a while for me, at least). Once they look quite fine, add the maple syrup and oil and pulse again until everything is well combined. The paste should be dark and sticky.

In a separate bowl, weigh out all your dry ingredients and mix together well. Add the charcoal powder, then all the wet ingredients. Mix everything together until just combined. The mixture should be moderately thick, dark, and have speckles of the black sesame paste. Heat up your waffle iron according to its instructions and ladle in your glossy, dark batter. Do not put too much or the batter could seep over the sides once you close the lid. Wait for at least 3-4 minutes before opening the lid and checking. Mine does not need flipping over so I only had to close the lid for a couple more minutes again.

While the waffles are cooking, you can combine the ingredients for the lemon curd except for the yoghurt in a small saucepan. Mix everything together well then bring the contents to a boil. Once boiling, take the pan off the heat. This part is important! It may look as though the mixture is still very liquidy, but that’s how it should be. Leave it to cool while you deal with the waffles. After half an hour, take a spoon and mix the curd. It should be a little jelly-like, or at least thick. Add the yoghurt and mix to lighten the colour and smooth the flavour (otherwise its a little too intense).

The waffles and curd will keep for up to a week in your fridge, or you can freeze both and heat up either whenever you want. Serve with each other, with maple syrup and fresh fruit. Bliss, at its true finest.

Coffee Crepes ft. A Better Florist (Singapore)

3832462 Processed with VSCO with f2 preset Processed with VSCO with a5 preset

This post is an unexpected collaboration, one which I nevertheless believe thoughtful. Lately I’ve been feeling a little out of my element, such as every other human being once in a while. But there are the everyday things that remind me to love not just myself, but all the things and people around me. These nuances of everyday life are worthy encapsulations of hope and happiness. A few words before I get on with my favourite recipe for delicious vegan crepes.

I usually review cafés and restaurants, but I thought I’d make an exception just this once. Today I kinda want to talk about flowers.

OK, hear me out. My mum also recently got a huge bouquet of flowers, which she describes as a make-or-break element of any room. There’s something incredibly emotive and symbolic about a single bouquet. This is the sort of underrated everyday life thing I was talking about earlier.

I’ve been on both sides of the flower-giving tradition—the recipient and the presenter—so I’ve been acquainted with a fair share of florists and flower delivery in Singapore. One particular flower delivery in Singapore which stands out from all the other florists is A Better Florist. Unlike what you would expect from usual flower shops, they do have a better sense of their target market’s taste, and yes, I am part of their target market. I imagine they conceptualised their rustic yet stylishly-packaged flower arrangements with young and social media-savvy customers in mind because these bouquets are quite the eye-catchers. Although this post is in collaboration with them, I am a genuine fan.

If you follow me, you’ll know that my posts are mostly centred on food. However, I do appreciate the fresh fragrance of lush blooms mingling with the aroma of a cup of strong black coffee and French toast in the morning. That, to me, is the best way to start any day.

A Better Florist, also known as the best florist in Singapore, is relatively young when compared to other flower industry players in Singapore, but their determination to “Bloom Better” with great quality flowers and lightning-fast delivery has caught the attention of flower aficionados in my little red dot. They’ve gotten quite a lot of media attention and have been dubbed best florist in Singapore and best flower delivery in Singapore on several review sites. I’ve only really purchased their hand bouquets and so far they have not disappointed at all. The flowers were fresh, delivered on time, and I adored the detail of their packaging—from the burlap wrap to the carefully tied ribbon and the flower care instructions. Once, I ordered from their signature blooms collection and it came with this lovely twine-wrapped container which I used to display the flowers. Props all around for their excellent service. If you’re looking for something other than flowers, they do have gift baskets and hampers as well as fruit baskets. I might avail their fruit basket delivery for my pantry just to see the quality of their produce. I’ll let you know how it goes. Meanwhile, they also sell flowers for all events and occasions like grand opening flowers, wreaths, baby gift baskets and “get well soon” bouquets.

The holidays are rolling around pretty soon, so just in case you’re planning on hosting dinner parties, A Better Florist 100% has my vote for the freshest, fastest and cheapest flower delivery in Singapore.

4199481 Processed with VSCO with f2 preset


NOW. Crepes!

These are:

slightly chewy

crispy all round the edges

subtly flavoured with coffee

Just a little fun. And, like everything else I make, so easy. My favourite part is seeing the little holes pop out in clusters (slightly aggravating the little trypophobic me but hey), mini astroblemes produced by the impact of some cosmic body. I love mushing these into spoonfuls of thick, creamy soy yoghurt and frozen berries. Darn, I might have one soon because there are a few left over waiting in the fridge.

Coffee Crepes (makes 13-15 crepes, adapted from this lovely recipe)

Ingredients

200g (1 1/2 cups) plain flour, or use half plain and half whole wheat

3 tbsp coconut or brown sugar

1 tsp baking powder

360ml (1 1/2 cups) plant milk of choice, I used almond

one shot espresso

1 tbsp olive or sunflower oil

Directions

Preheat your large pan (use a crepe pan if you’re fancy and feelin’ it) on medium-high heat and drizzle on some olive or coconut oil. In a large bowl, whisk together the dry ingredients, then add the espresso, oil, and finally the milk. You can do this the night before to save yourself some 30 seconds in the morning, if you wish. Simply whisk it all together and cover with cling film before putting it in the fridge.

When you can see the oil sizzle a little, add 3-4 tbsp of batter and swirl around to coat the bottom of the pan thinly. Watch the batter go a little darker and firm around the edges. Once you see a few bubbles, which will take a minute, use a spatula to flip the crepe and cook the other side for another minute. Rest your cooked crepe on a paper towel to absorb excess moisture. Continue to cook up the rest of the batter, stacking the crepes with paper towels in between.

Enjoy these with thick plant-based yoghurt, fresh or frozen berries, a drizzle of nut butter or tahini, and lashings of maple syrup.


My Favourite Thing This Week x Pumpkin Turmeric Scones

Fall is here and ready to take over. Over my mental and physical worlds and everything in between. The first week of school has come and gone instantly, as if the mind-bending philosophies we were taught and lengthy pauses of appreciation they induced, workshops and field trips were as transient as my last 5 inhalations and next few exhalations. Earlier this week we went on a tour of the beautiful Chelsea Physic Gardens in the heart of London, which showcased most magnificently the vast and (if I do say so myself) underrated variety of medicinal herbs, spices and other botanical wonders. No skipping the Asian and other ethnic varieties either, which was what impressed me most. Rice? Sake? They had it all. This is a gem of a place and do encourage anyone in London to give the place a visit.

This ‘favourite thing’ should be more of a thing. Weekly, perhaps? Favouritism aside, it allows for reflection on a lot of things that have happened the past week, letting this physical reality overlap with hardcore introspection.

I want to talk about Paperless Post, which represents everything I adore. The bibliophile and letter fiend that I am always hesitates to replace technology with traditional scrawling (I am still that one in lectures with a pad and pen, struggling to match speed of brain with that of the lecturer’s tongue) in any case, especially for the sake of convenience. But Paperless proves to intensify one’s creative streak with its thousands of templates and quotes, designed by world-famous artists and graphic designers.

I gave it a shot by sending a few trial birthday invitations to my family and a few friends over the weekend… even though my birthday is in November! Here’s the silly one I designed. The site essentially lets you choose and design your own virtual postcards, invitations and birthday cards for those closest to you. It’s so easy– just set up an account using your email address, then choose your design, customise it by adding different fonts, colours and backdrops, and use their smart online tools like RSVP tracking and guest messaging to ice the cake. Ok, how cool is that… Forget any other platform, this is all you need. Why use Facebook when you can send beautiful, personalised invitations to the lucky select few? Birthday or barbecue, the extra 5 minutes choosing a deliciously good-looking template that represents you and what your event is all about, is worth it.

I spent a good few guiltless hours on the weekend playing around with templates, and was thoroughly impressed with all the designs on offer. It saves time, effort and a little sanity. To cut it short, Paperless is stressless. Everyone who received my card was touched by the design and caption of the card, and all it took was 5-10 minutes! I personally love how you can add whatever pictures or photos you may already have on your computer to your invitation. To be clear, this post is published in partnership with them and Anagram Interactive, but I will continue using this platform to send thoughtful, meaningful cards and invitations to those nearest and dearest. Whatever your creative or aesthetic style, there is something for you. Click here if you’re interested!

Now. Second favourite thing the past week?

3260014 Processed with VSCO with f2 preset


I’d say ‘today it’s turmeric’, but really it should be an almost-everyday thing. Pumpkin is everywhere and in everyone every fall, so for tradition and comfort I incorporated it too, but turmeric is the real showgirl here. The impressive little kicker has proven anti-cancer and anti-inflammatory properties, all thanks to its main component curcumin. I’ll be honest, I wasn’t the biggest fan of its pungent, gingery flavour upon first trying it, but I’ve grown to love its warmth and pepper. It’s pretty simple to incorporate turmeric into anything, be it scones, or porridge, or a savoury curry, its grounding aroma doing much to calm all the senses. Just this time last week I thought scones would be the most welcoming fall treat, something ultra buttery, flaky and hearty. Simple, sleek, marginally sexy.

4607823 Processed with VSCO with f2 preset Processed with VSCO with a5 preset3278423 Processed with VSCO with f2 preset Processed with VSCO with a5 preset

With a special double glaze– plain classic and fiery turmeric. It’s this turmeric glaze that is worth the hype. The intense spicy drizzle carves dimension and excitement into the buttery formula of the plain, spiced scone. Any worry about the foreign and disconcerting pairing of this exotic spice with the traditional breakfast item will be alleviated. Just you try, and see.


Pumpkin Turmeric Scones (makes 8 medium-sized scones)

Ingredients 

240g (1 1/2 cups) plain flour

150g (1 cup) rye flour

35g (1/4 cup+ 2 tbsp) sugar (white or coconut)

2 tsp baking powder

1/2 tsp baking soda

2 tbsp turmeric latte mix or 1tbsp turmeric+1/2 tsp cinnamon+1/2 tsp cardamom

100g (1/2 cup+2 tbsp) vegan butter (cold)

60ml (1/4 cup) soy or any other plant-based yoghurt. Alternatively, you could use applesauce

3 tbsp pumpkin purée

100ml (a little under a 1/2 cup) plant milk (I used almond)

1/2 tsp vinegar

For the turmeric glaze:

100g icing sugar

2 tsp turmeric latte mix, or just 1 tsp or ground turmeric

1.5 tbsp almond milk

For the plain glaze:

100g icing sugar

1 tbsp almond milk


Directions

Preheat your oven to 180C (350F). Mix the milk and vinegar in a bowl and set it aside to let curdle a little. Meanwhile, combine all the other ingredients except the yoghurt and pumpkin purée in a bowl. Use your hands to mush the butter into the flour, which is actually very easy if you use vegan butter (yay!). Then add the milk mix and yoghurt. The final mixture should be moist but firm.

Tip the mix onto a liberally floured surface and shape into a disc. Place on a lined baking sheet and cut into 8 equal pieces, as can be seen in the picture above. Brush the top with almond/any other plant-based milk and bake in your preheated oven for 25 minutes. How easy was that?

Whilst it is baking, make the two glazes in separate bowls using a small fork as a whisk. Once the scones have finished baking, let them sit on the counter to cool for at least 10 minutes before drizzling with both glazes. Bon appetit, my fall friends!