Apple Pie Pillow Pancakes

Processed with VSCO with f2 preset Processed with VSCO with f2 preset

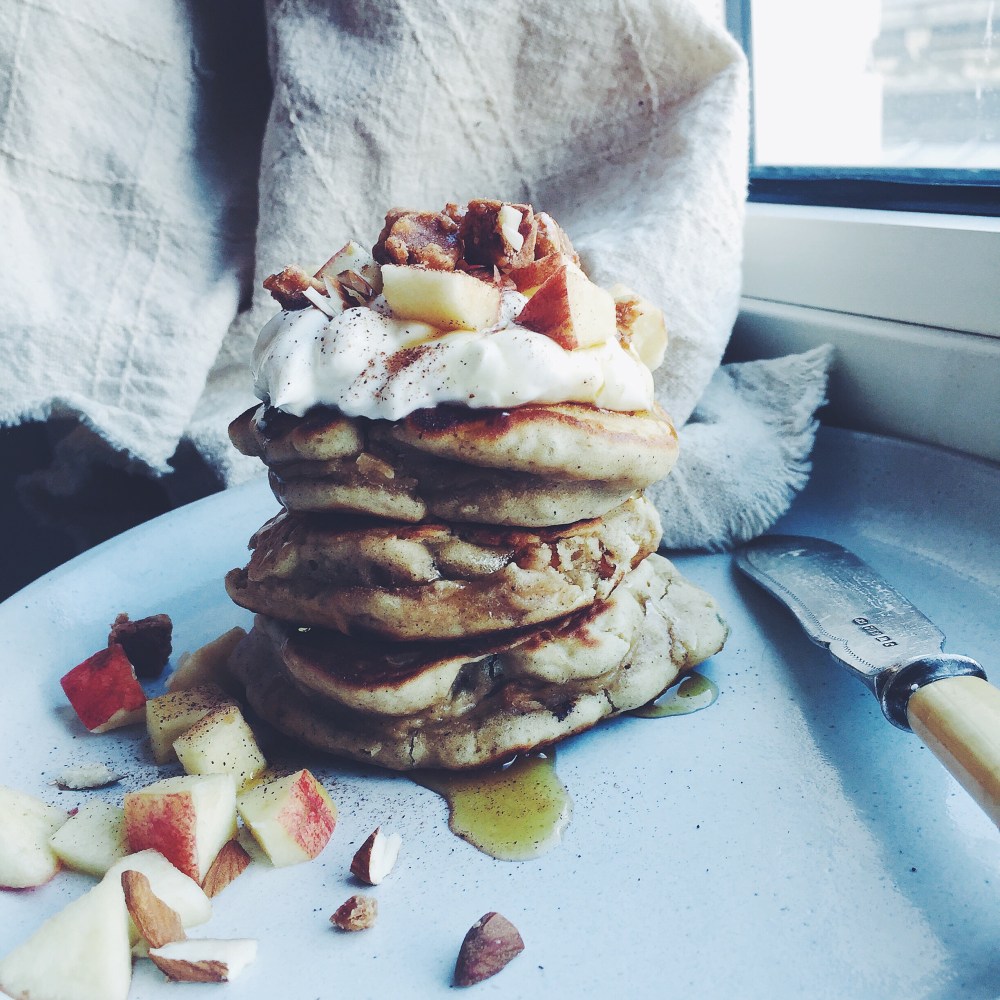
My pillow pancake series is getting a tad out of hand.

No actually I take it back. Would take too much for me to quit this. What morning comfort.

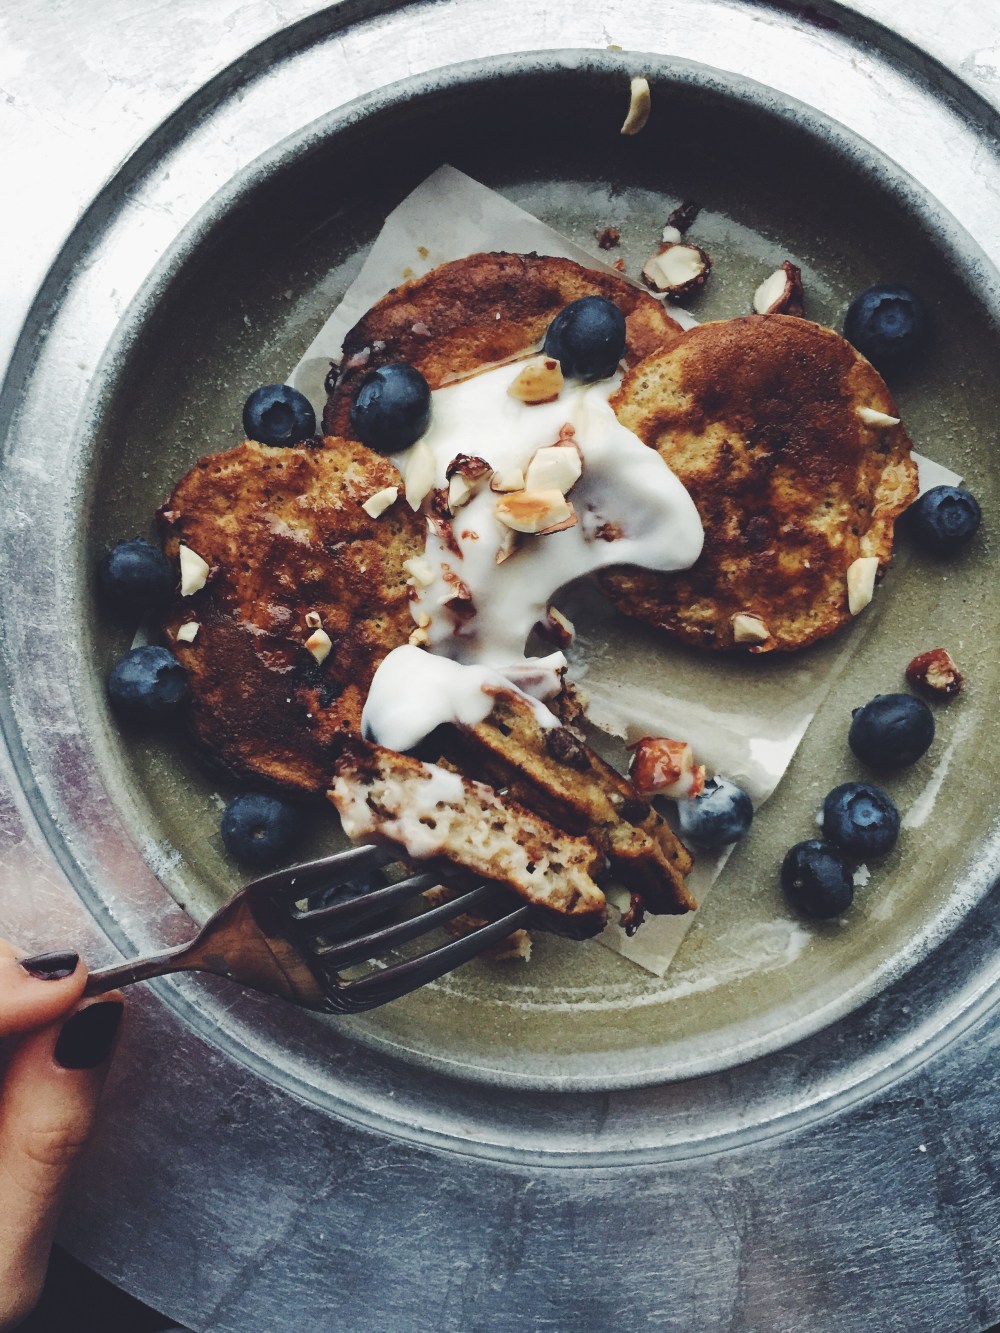
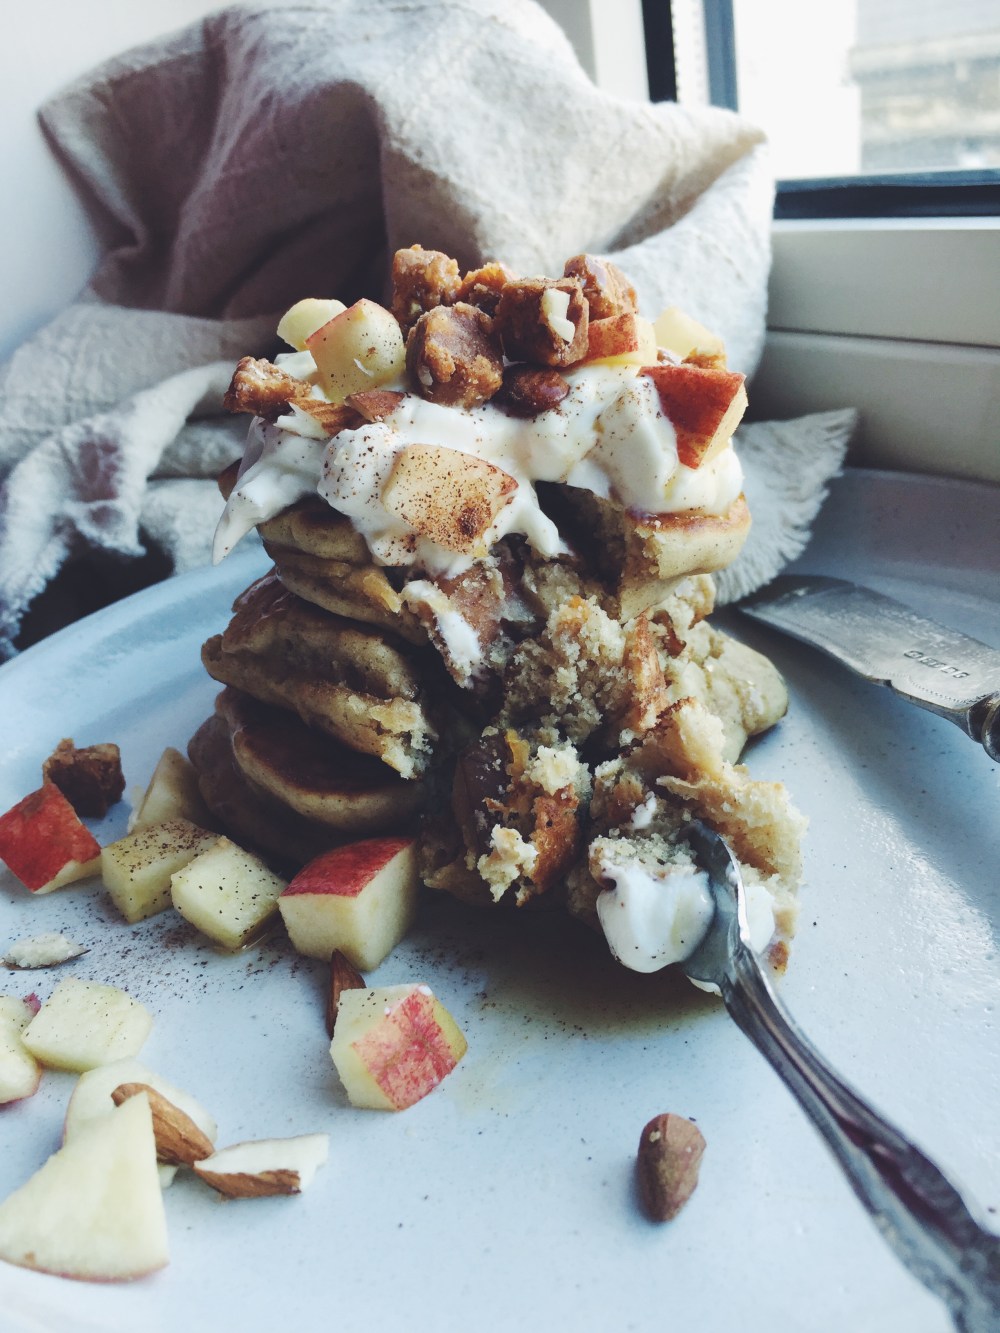
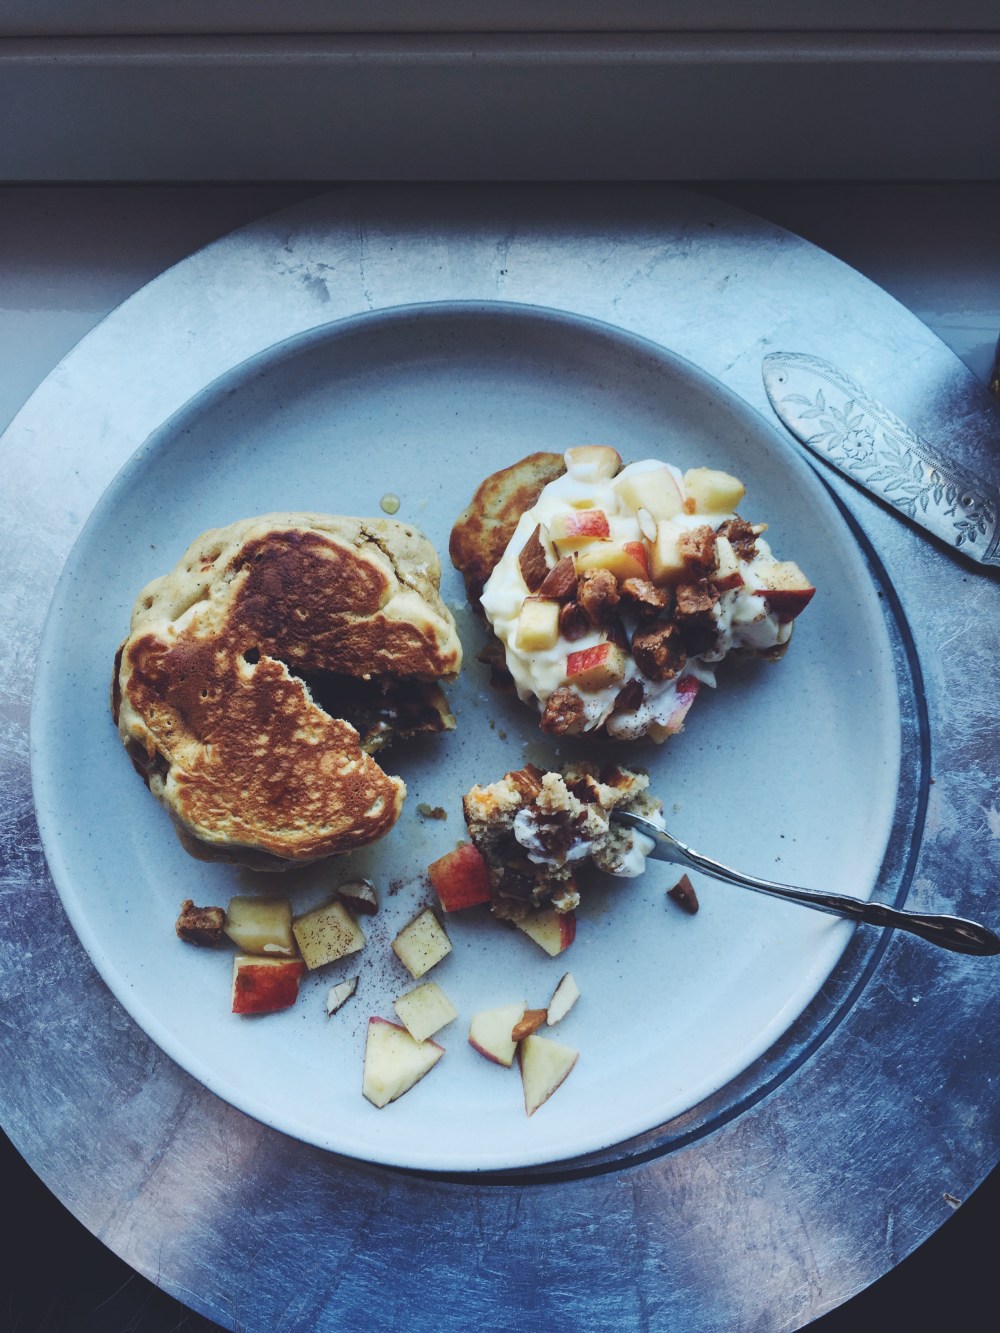
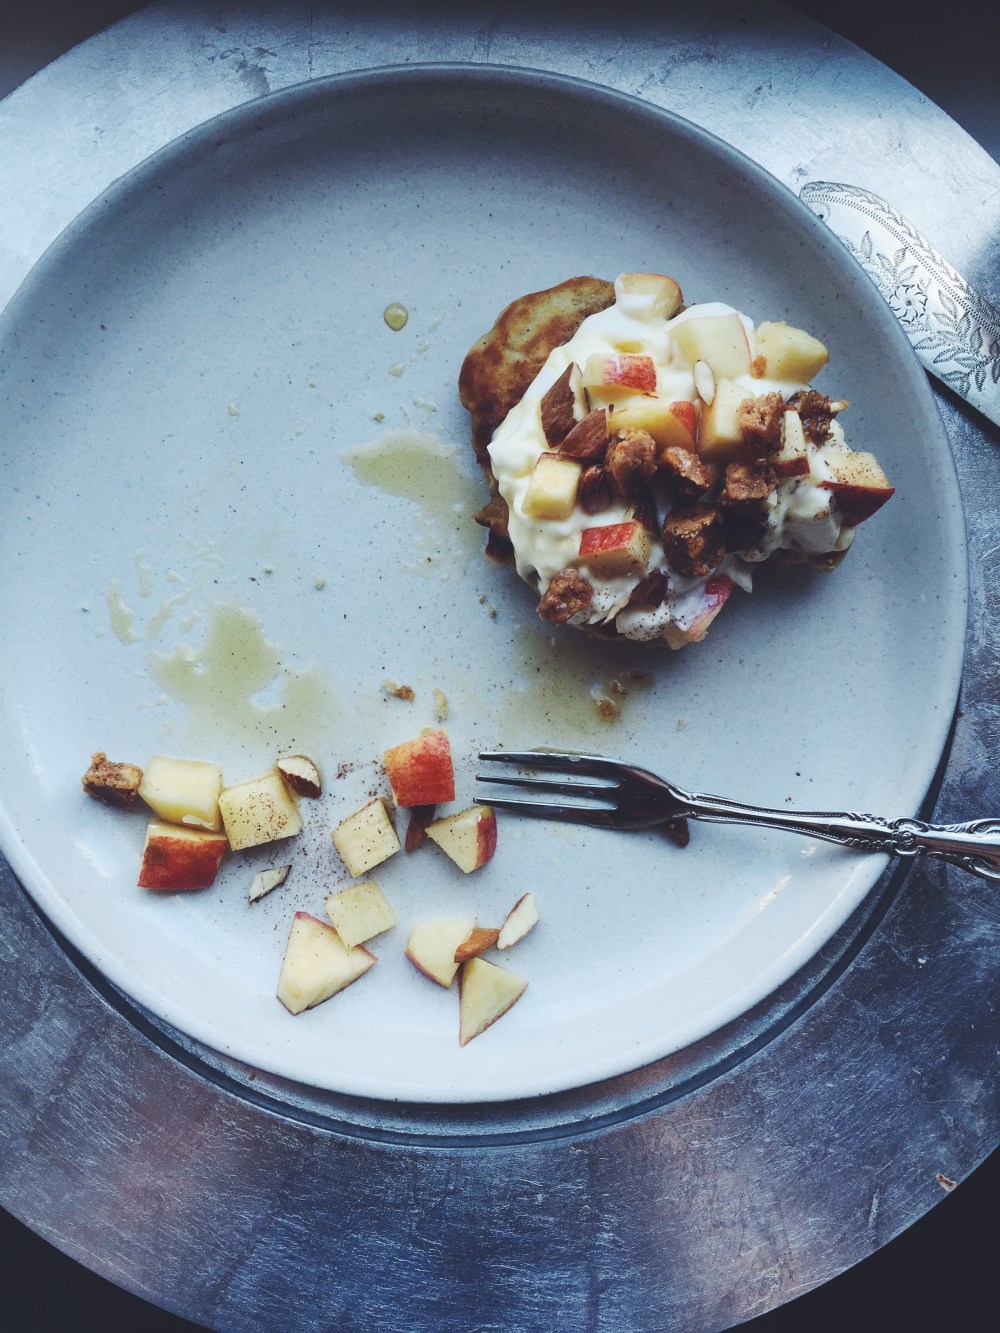
Introducing the newest little baby to the family: thick and fluffy pillow pancakes, based off my original recipe for outrageously thick, tender and fluffy pancakes, this time stuffed with apple, custard, topped with yoghurt and a nutty ‘crumble’.

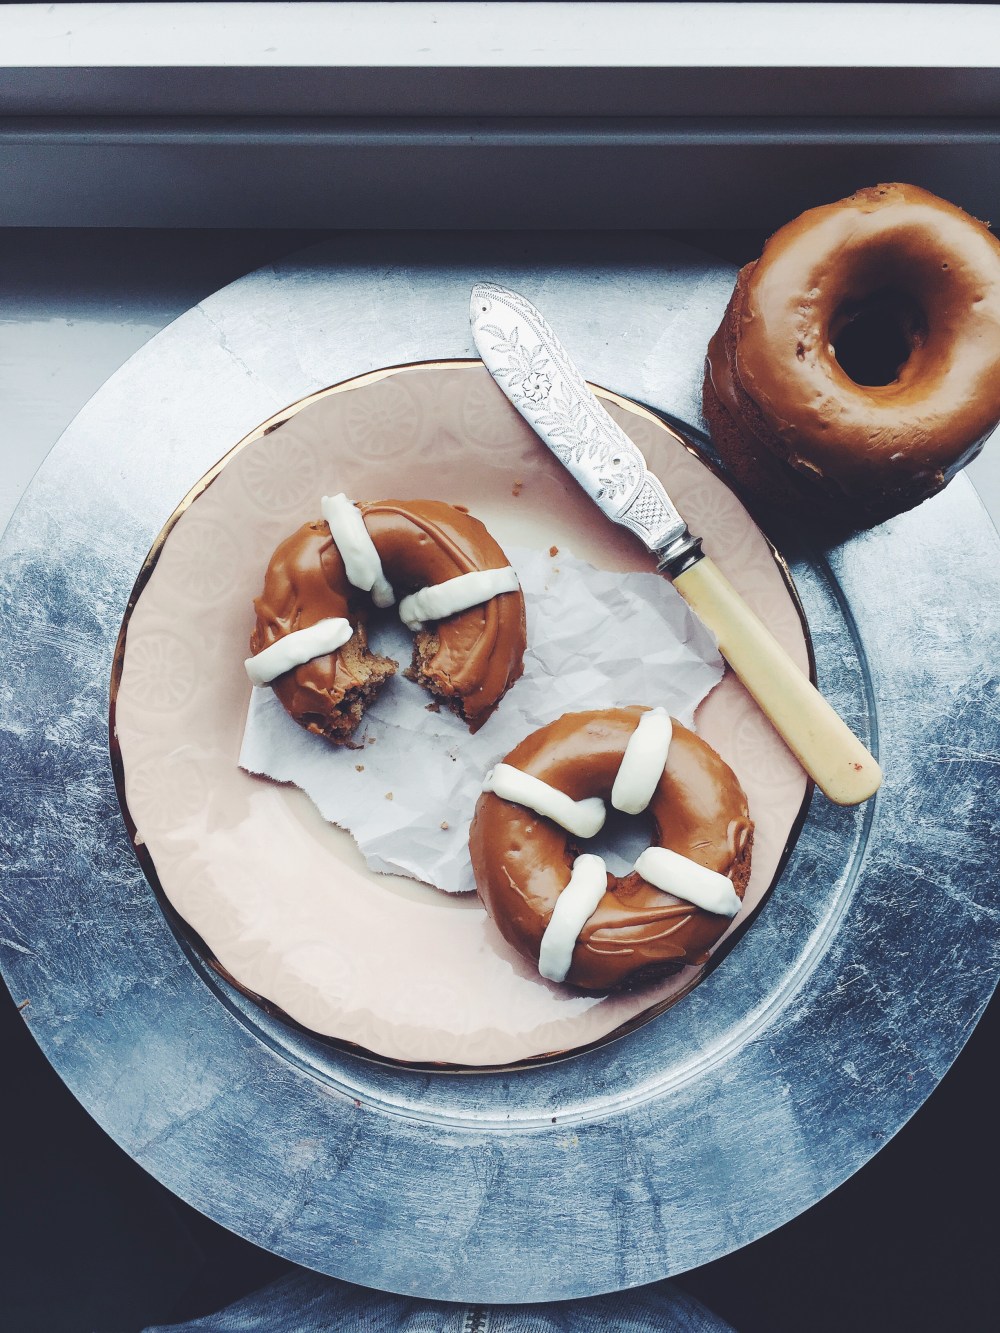
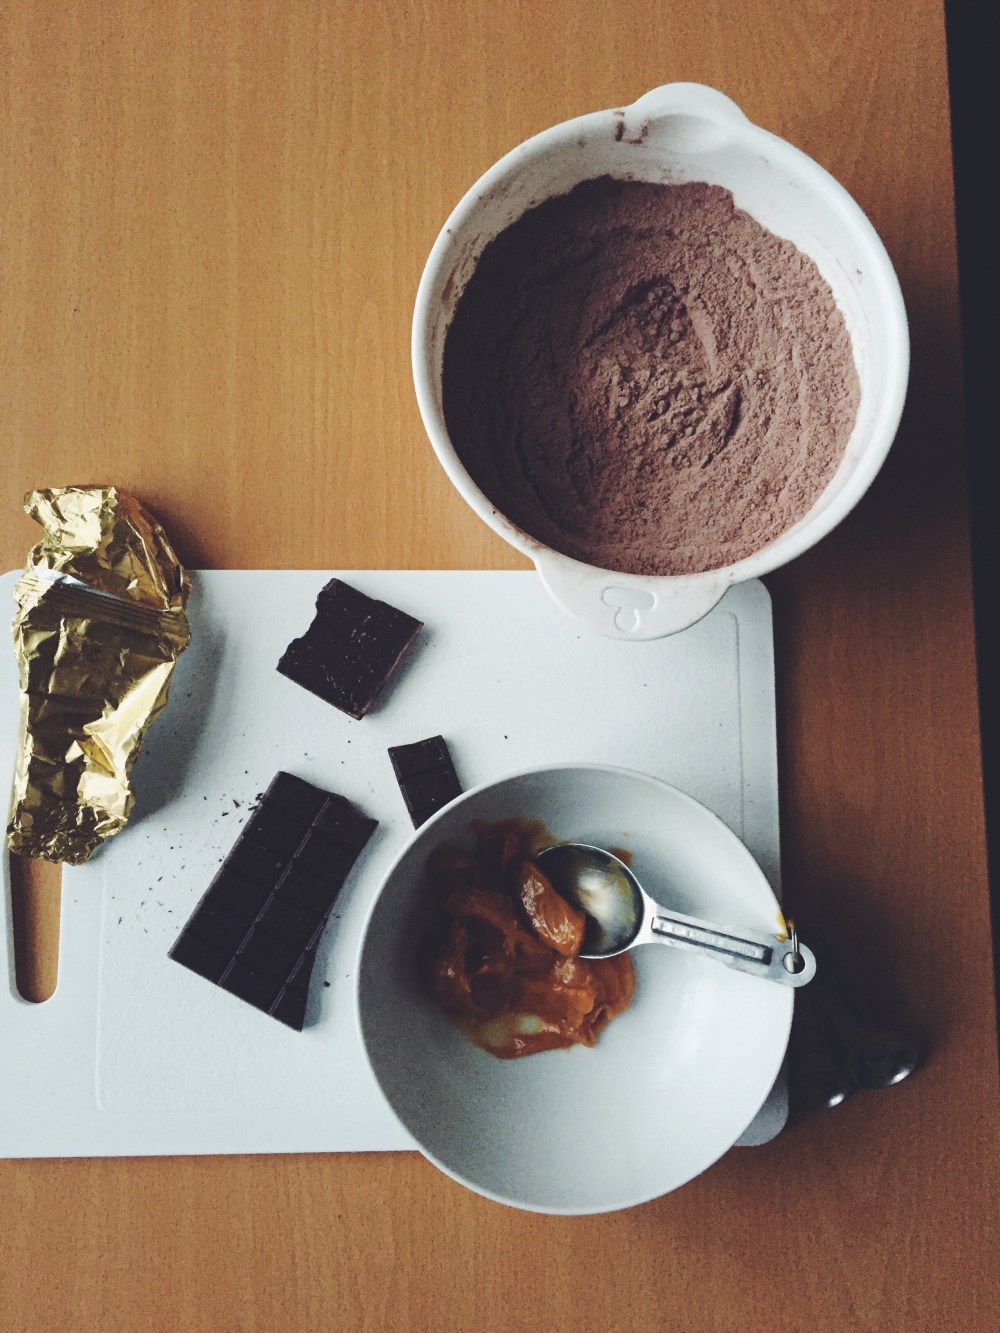
This also features a delicious dessert bar, one of the many I received yesterday morning from the lovely guys of rhythm108. All cut up and used as part of the ‘crumble’ bit. Seeing they actually had an apple pie flavour, I just couldn’t not use it as part of this getup. Crowning glory. They remind me a little of Naked bars, but at least 2.5x better, because you pop them in the microwave for 10-20 seconds, and lo and behold, you have the perfect little melt-in your-mouth dessert bar. Gooey, warm and sweet. How easy is that? Delicious, naturally sweetened (oh what a change for Alex), mini delicious morsels. And in a wide array of flavours- think apple pie, coconut macaroon (ok I have yet to try this one but I’m bubbling with excitement), banana muffin. I think the concept makes for such convenience. Check them out!

Processed with VSCO with f2 presetProcessed with VSCO with f2 presetProcessed with VSCO with f2 preset

The recipe follows my standard pillow pancake recipe, but with a few modifications which I shall detail down below. Namely a load of apple, cinnamon and custard, of course.

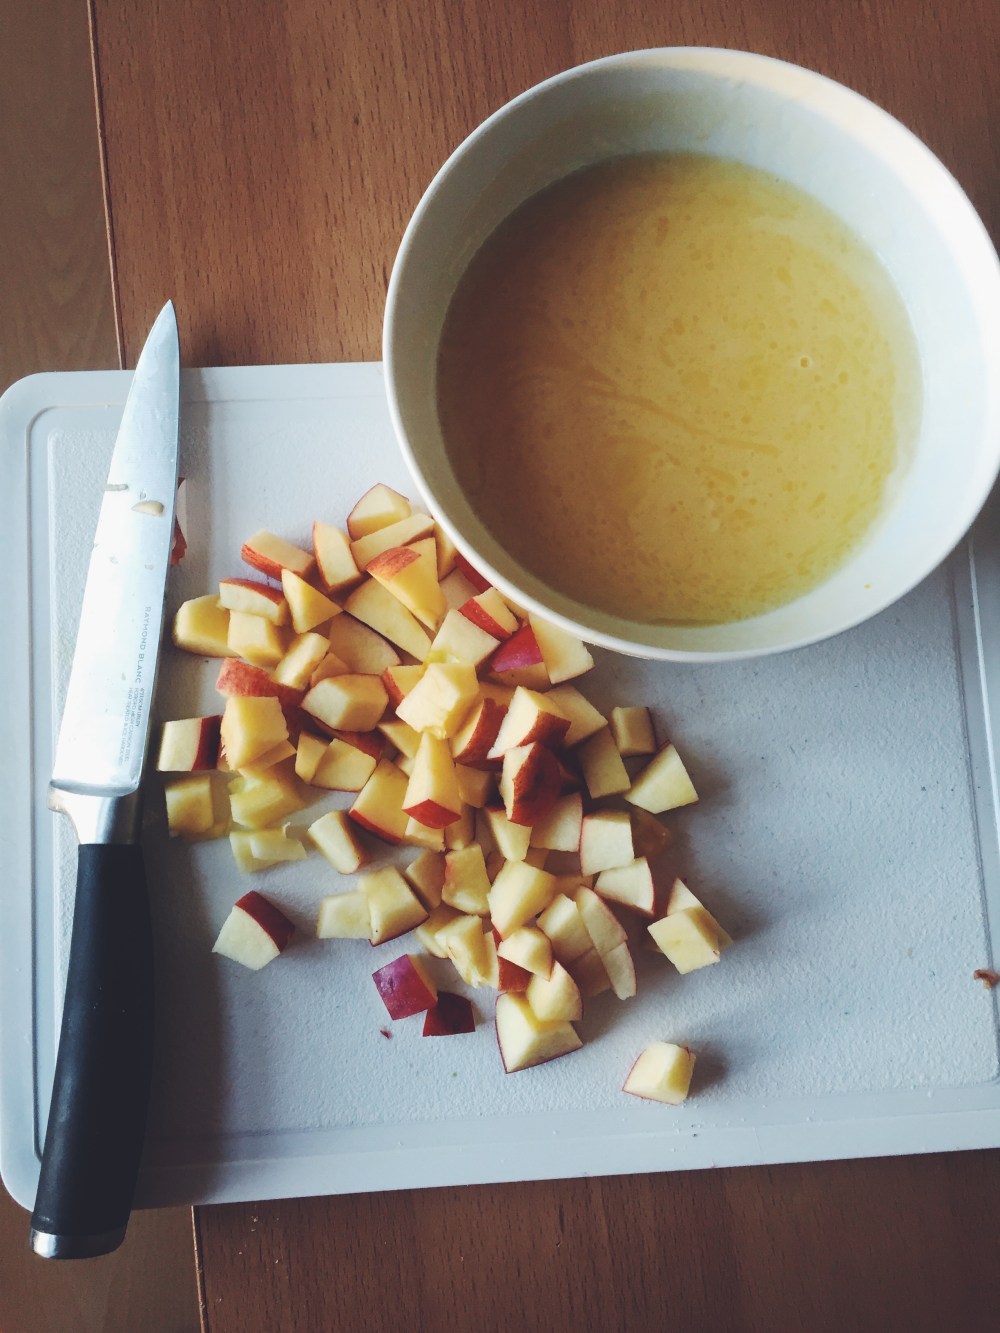
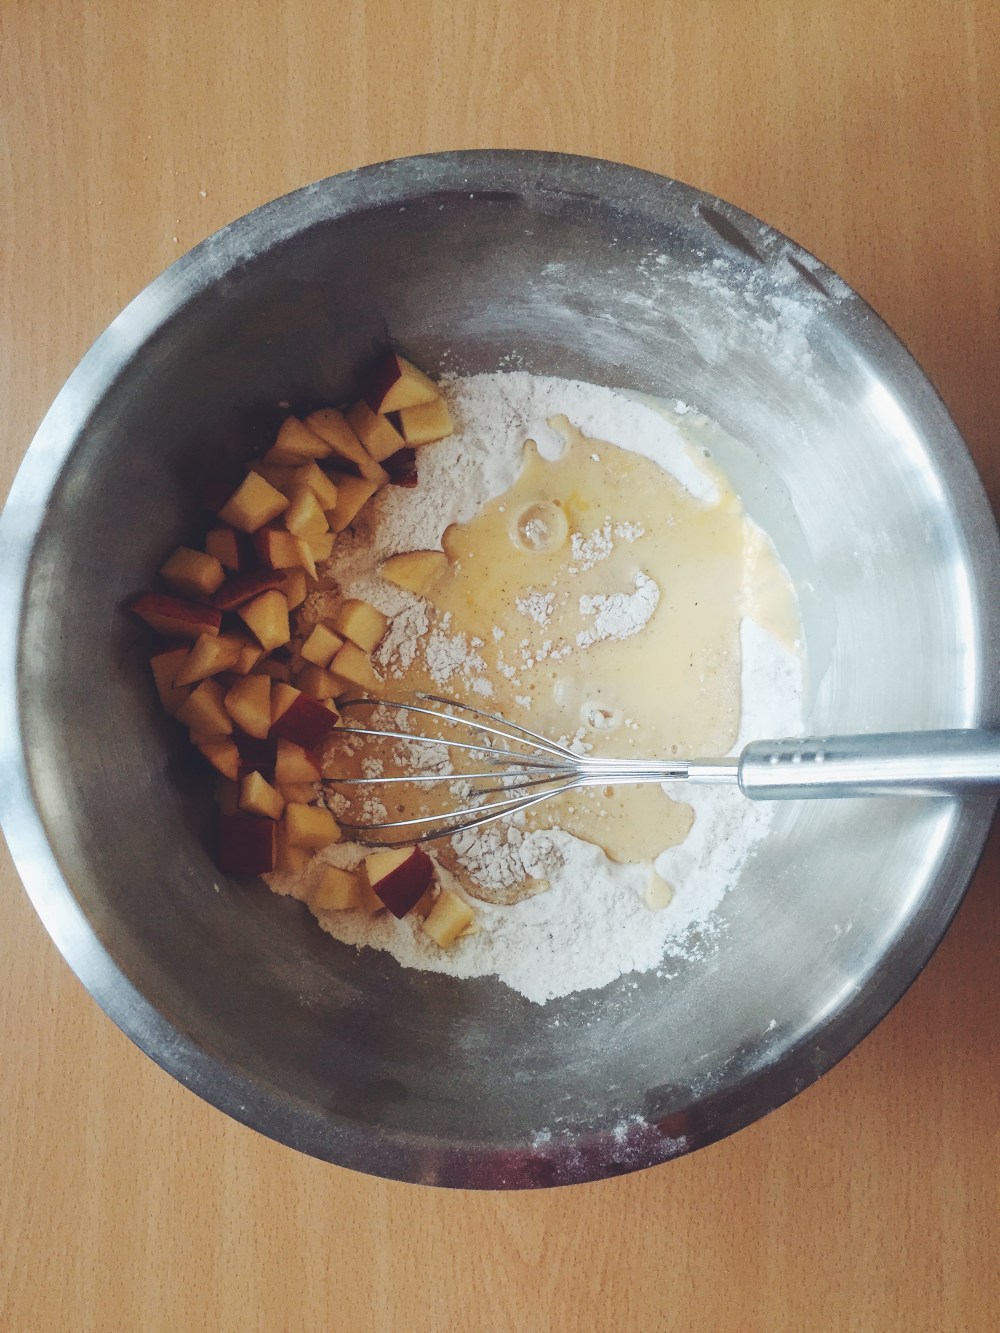
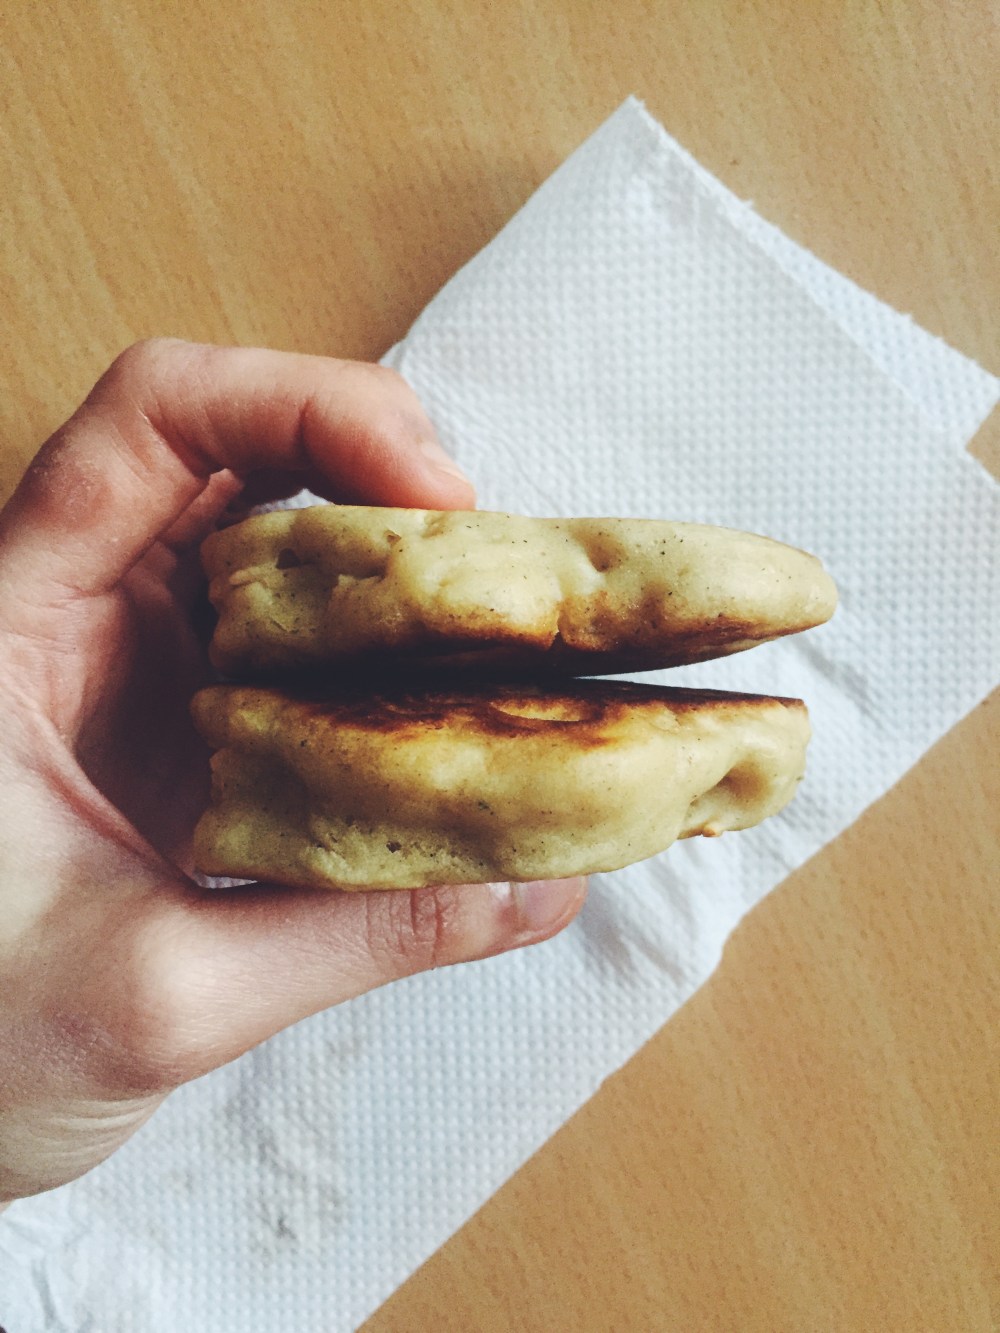
Mix together the wet, mix together the dry, plop one into the other, mix, apple chopping and tossing, fry on a pan on medium heat. Watch them rise, then settle. A brown glisten on both sides.

Processed with VSCO with f2 preset Processed with VSCO with f2 presetProcessed with VSCO with f2 preset Processed with VSCO with f2 presetProcessed with VSCO with f2 presetProcessed with VSCO with f2 preset

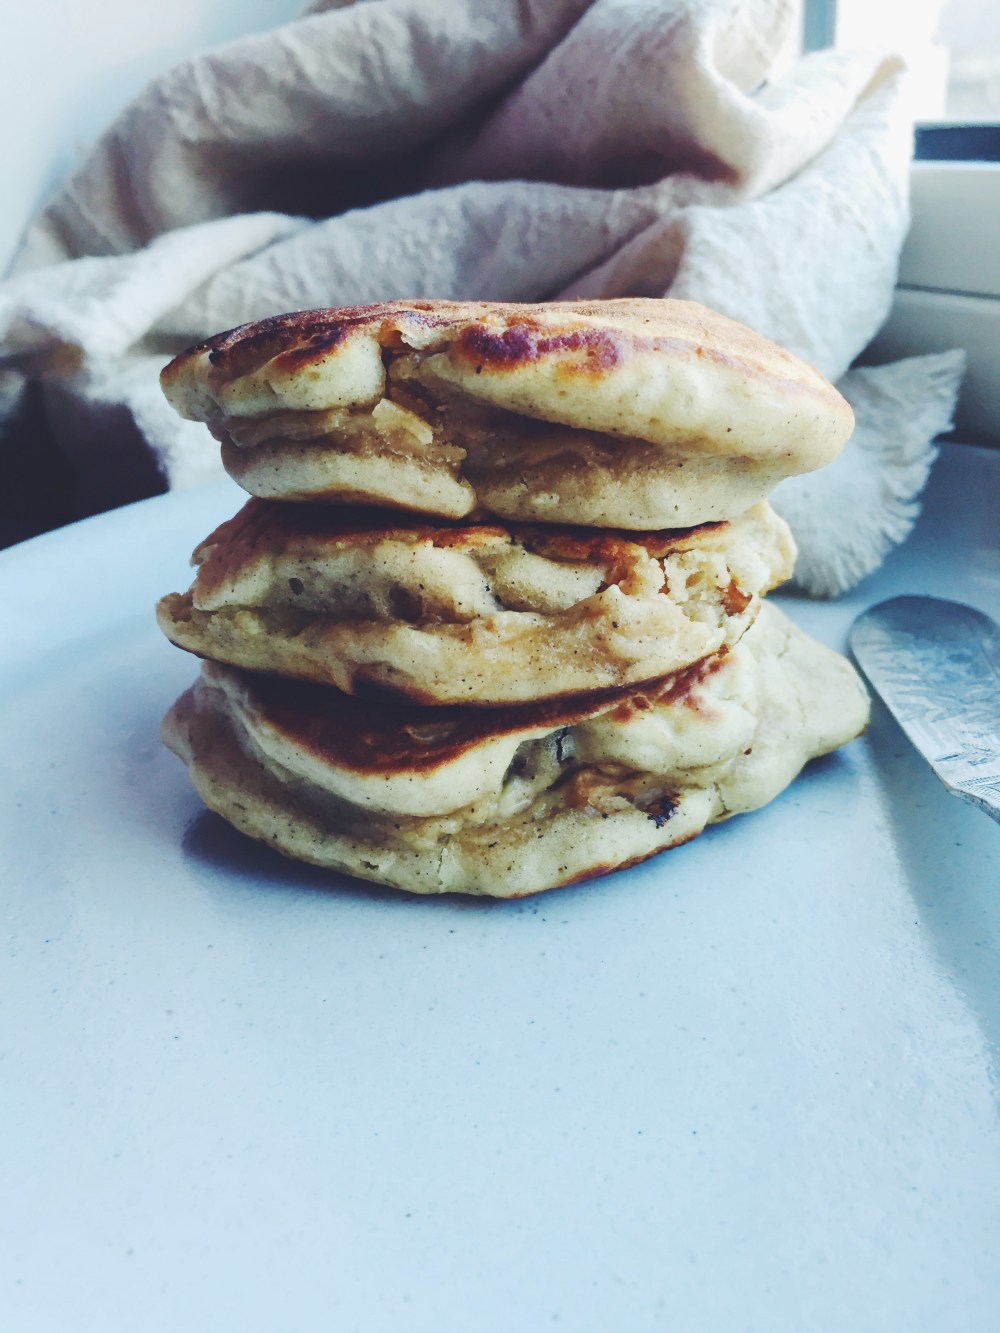
Yes!! Soft, warm, fluffy.

Things I love about this variation:

  • the half-made custard which makes up most of the wet mix injects a mellow sweetness and silky smoothness to the final batter
  • warm, cooked apple on the inside and freshly cut apple on top makes for wonderful textural contrast
  • and just like all the other pillow variations, this is so, so versatile. Dress it up or down, top with whatever you like (ok but please include the maple syrup, no arguments there)

Processed with VSCO with f2 presetProcessed with VSCO with f2 presetProcessed with VSCO with f2 presetProcessed with VSCO with f2 preset

Directions (makes 6-8 medium pancakes)

Make the pillow pancakes as how I state for the original recipe, but before you do that, have these ingredients on hand:

1 apple, chopped

1 tbsp ground cinnamon

1 tbsp custard powder+ 3 tbsp white sugar

3 tbsp butter, instead of the 5 tbsp stated in the original recipe

Topping (optional): yoghurt, maple syrup (not optional), more chopped apple, handful of chopped almonds and granola for the crumble part of this whole recipe

Whisk together the dry ingredients as stated in the linked recipe, but add the 1 tbsp of ground cinnamon as well before whisking. Then when putting together your wet mix, add the 1 tbsp of custard powder and 3 tbsp of white sugar into the one cup of milk or buttermilk, and microwave this on high for 3 minutes. After microwaving, add the 3 tbsp butter and let it melt. Then mix in the rest of the wet ingredients, and pour into dry mix.

Add the chopped apple to the final batter, then cook as stated in the recipe.


Hot Cross Cookie Butter Baked Doughnuts

Processed with VSCO with f2 preset

No, it’s not a traditional hot cross bun, even though it should be, even though most of you probably think I should stop taking shortcuts…? Yeah, something labelled ‘hot cross’ should be in line with tradition, but I don’t think the 1916 Easter uprising in Ireland, or the fact that speculoos biscuits are traditionally eaten in the Netherlands before St. Nicholas’ feast, affected my decision to make something easy, fun, and absolutely yum.

It was solid instinct, in the light of a recent family reunion, that drove me in this direction. Finally getting to see family after what seemed to be forever was enticing, and with my doughnut pan hauled all the way from Singapore just for me, memories of the first time I made baked doughnuts triggered the oven fun.

Speculoos (cookie butter) chocolate-filled baked doughnuts with a speculoos frosting and cream cheese ‘cross’. Lezzgo.

Processed with VSCO with f2 presetProcessed with VSCO with f2 presetProcessed with VSCO with f2 preset

The best bit of the recipe? Chucking the cookie butter into the microwave, then oohing at the melted, gooey mess before you. This is the gold of the recipe, what will send you over the edge as you mix the wet into the dry mix and bring everything together into the second round of fun gloopy mess.

So you make these doughnuts, then pour more gold on top. Golden, sweet and glistening. You get the rich, chimerical flavour of cookie butter inside and on the outside.

Processed with VSCO with f2 presetProcessed with VSCO with f2 presetProcessed with VSCO with f2 preset

Processed with VSCO with f2 presetProcessed with VSCO with f2 preset

There wasn’t a fluffier, more tender belly. There is some chopped chocolate in there because I thought why the hell not, but that’s optional, and if you wish you could chuck in some nuts and raisins (I didn’t because I was giving quite a few of these to some people who didn’t like either). So customise it, love it, make it again.

Speculoos is made with cinnamon and nutmeg, so the additional incorporation of those components in this recipe really enhances that natural flavour, and it does make me think of Easter. Full of spice and lots of warmth.

Processed with VSCO with f2 preset Processed with VSCO with f2 preset

Hot Cross Cookie Butter Baked Doughnuts (makes 8 doughnuts, adapted from here)

Ingredients

For the doughnuts:

158g (slightly more than 1 1/4 cups) all purpose flour

pinch of salt

1 tsp baking powder

1/4 tsp baking soda

2 tbsp ground cinnamon

1 tsp ground nutmeg

50g chopped chocolate (optional)

75g (1/3 cup) white sugar

1 egg

15g (1 tbsp) butter

1 tsp vanilla extract

120ml (1/2 cup) whole milk

3tbsp + 8 tbsp (1/2 cup) speculoos cookie butter spread (3 tbsp for the doughnuts, 1/2 cup for the top


For the cream cheese cross:

5 tbsp cream cheese spread (or take some off a block, that works fine too), microwaved until softened

1 tbsp milk

3 tbsp icing sugar


Directions

Butter or grease a 6 or 8-doughnut pan (use the 6-doughnut one twice for this batch, of course) and set aside. Preheat your oven to 177C (350F).

In a large bowl, whisk together all the dry ingredients, including the chocolate.

In another microwave-safe bowl, add the one tablespoon of butter, half cup milk and 3 tbsp of speculoos spread, and microwave on high for 20 seconds, just until butter has melted. Leave to cool for a minute, then whisk in the egg and vanilla extract.

Pour the wet into the dry ingredients, and mix until everything is just combined. Pipe batter, or use two tablespoon measurements, into your greased doughnut pan. Bake for 8-9 minutes, no more no less. A wooden skewer inserted into the middle of one should emerge clean, but the doughnut should still feel soft and bouncy to touch.

While they’re baking, melt the rest of the speculoos spread in one bowl, and mix the ingredients for the cream cheese crosses in another. Put the cream cheese mix into a ziploc bag and snip off the end, in such a way that piping the cream cheese would have a flat ribbon effect, not a tube. I find it gives a more aesthetically pleasing result.

Once baked, remove doughnuts from the oven, let cool for a while and then dip into freshly melted speculoos spread. Don’t melt the spread too far ahead, else it will harden and it will be more difficult to dip into. Tip: dip the bottom of the doughnuts, not the top (the side you see when you open the oven), for the little airy pockets on the underside will absorb more of the spread when still a bit warm. Pipe the cream cheese crosses on your doughnuts.

These can be kept for 2-3 days at room temperature, but of course they’re best eaten immediately. Enjoy with a hot cuppa.

Kaya Maple Loaf Cake

Processed with VSCOcam with f2 preset

If I had to choose the one local breakfast item I miss most from Singapore, it would have have have to be good, buttered kaya toast. Made complete with a steaming, frothy cup of teh tarik and half-boiled eggs. Thinking about it is already making me salivate.

Kaya toast to me is the epitome of simplicity done right– warm, charred white toast, the crusts traditionally, almost clinically removed with a sharp serrated knife, slathered thickly and unevenly with unsalted butter and a thick layer of homemade kaya. For those of you who do not know, kaya is basically coconut jam. A creamy, sweet, thick curd made from coconut milk, eggs and sugar. Some days I want butter and marmalade on my toast, others warrant almond butter, honey and banana, and sometimes it’s all about good old butter and kaya. The latter occasion has greatly increased in frequency.

This kaya loaf cake made with olive oil and maple syrup is your favourite local breakfast in one big warm hug of a loaf. It’s :

  • sweet, earthy, tender
  • such a breeze to make!!
  • got the most amazing sweet and crusty top
  • heaven in the morning
  • actually your new wake-up call

Processed with VSCOcam with f2 preset

It’s one of the most moist, dense (in a good way) and tender loaf cakes I’ve baked in a while, undoubtedly due to the texture of kaya itself, as well as the addition of olive oil, dark brown sugar and maple syrup.

The components all possess deep, earthy, sensual undertones which complement each other fantastically, the dark brown sugar providing a hint of molasses, the kaya’s almost-fluffy consistency offering milky sweetness and volume. I used nyonya kaya (couldn’t find the traditional brand on Amazon; the link I provide is the closest I could find but you should be able to find it at any oriental supermarket), but Hainanese kaya, which uses caramelised sugar and sometimes honey and is brown instead of green, would work perfectly too.

Processed with VSCOcam with f2 preset

Processed with VSCOcam with f2 preset

Kaya Maple Loaf Cake (makes one standard 9×5-inch loaf), based loosely off my banana bread recipe

Ingredients

190g (1 1/2 cups) all-purpose flour

one generous pinch salt

1 1/2 tsp ground cinnamon

1 tsp baking soda

60ml (1/4 cup) maple syrup

1 cup kaya (no metric measurement eek– you should be fine!)

2 eggs

120g (1/2 cup, packed) dark brown sugar

2 tbsp plain yoghurt (I used coconut yoghurt for extra pizzaz, but you don’t have to go that far)

120ml (1/2 cup) olive oil

1 tsp vanilla extract

For the crusty top: 2 tbsp dark brown sugar+ 1 tsp ground cinnamon


Directions

Preheat your oven to 180C (350F) and grease (line as well if you wish) a 9×5-inch loaf pan.

In a medium bowl, whisk together the flour, salt, baking soda and cinnamon.

In a large bowl, whisk together everything else except the ingredients for the crusty top. Pour the dry mix into this wet mix and stir everything together well with a whisk or wooden spoon. Pour the thick, green-tinged mix into your greased loaf tin– the batter should appear quite wet and not very lumpy (like a typical banana bread batter). Mix the topping ingredients briefly with a fork in a small saucer and sprinkle evenly on top.

Bake in your preheated oven for 50 minutes, then remove and let cool for at least a half hour before slicing. Any leftovers can be stored at room temperature for 3-5 days, or kept in the fridge for a week. It’s wonderful toasted on its own, with a smear of salted butter and hot coffee.


Classic Pancakes

Currently (sadly) alternating between periods of intense revision and:

  • wondering what Leonardo da Vinci’s Snapchats would be like
  • researching the nutrition of scallops and uni, in other words my two current favourite types of seafood
  • embarking on The Kitchn’s baking school program, which is definitely one of the most interesting and exciting things I’ve started in a long time.

Busyness aside, there will always be time for a good settle-down in the kitchen. Like a good breakfast. Something like this:

Processed with VSCOcam with f2 preset

thin, tender, lacey (English) pancakes (here topped with fresh ripe banana, drizzled with almond butter and salted caramel walnuts+melted matcha chocolate I saved all the way from Japan)

For creativity and mood’s sake, I gave in to the whole almond-matcha theme the first time round. It’s one of those things I’ve done before, loved, and you can check it out right here. Admittedly, the day after, I reheated a couple of extra pancakes and went for the classic, ever-loved combo of freshly-squeezed lemon juice and sugar. Deliciousness= lemon and sugar soaking into thin pancake flesh, into every crevice of the crumpled carpet. That being said, there’s also something magical about the combination of a fresh, warm pancake with a creamy slather of almond butter. The melted matcha chocolate hits everything with a sweet and slightly bitter kick.

Processed with VSCOcam with f2 presetProcessed with VSCOcam with f2 preset

Sorry– trypophobics beware.

Having made plenty of American pancakes, the sort which fluff up and bounce and you top with butter and maple syrup, I thought it fitting to try something else. That’s when I came across Nigella Lawson’s recipe for classic crepes. And so another question popped up:

  • what’s the difference between a crepe and a pancake?

After trying out the recipe and doing the research, I had a hard time deliberating whether the final result was more akin to one or the other. The nuances of the recipe made this more a pancake than crepe, so pancakes it was. The main difference lies in waiting time, so calling it a crepe wouldn’t be sacrilege.

These pancakes are a real treat any morning. Very thin, lacey, and have a light brown, crispy underside. The great bit? You can put them together in a pinch and any leftovers can be chucked in the fridge and reheated the next morning/ whenever you want.

Took a while for me to get these pancakes as thin and lacey as possible, but a few good tricks to have up your sleeve are:

  • when putting melted butter into the pan before ladling of the pancake batter, do not use a paper towel to remove excess butter– add a generous amount of butter, let melt and swirl around. This will promote excellent browning and crispiness at the edges.
  • I repeat– generous amount of butter.
  • use medium-high heat– should hear a mild sizzle when batter hits the pan and a heavier-bodies sizzle when batter is ladled into pan.
  • After ladling, lift the pan off the heat to swirl it around evenly. This prevents any batter that’s already been ladled from cooking too fast and lets you swirl everything nicely and thinly.

Processed with VSCOcam with f2 preset

Classic pancakes (makes 8–10 medium pancakes; adapted from Nigella’s crepes recipe)

Ingredients

150g plain, all-purpose flour

2 tbsp white sugar

pinch salt

28g (2 tbsp) melted, unsalted butter, plus more for the pan during cooking

1 large egg

340ml milk of choice (I used both whole and almond milk on 2 occasions and both worked perfectly)

Directions

Preheat your pan or crepe pan on medium-high heat and ready some butter for cooking. In a large bowl, tip in the flour, salt, sugar, milk, egg and butter, in that order, and whisk everything together. Continue whisking until no lumps remain, and the batter is pale and silky. Use a small ladle to ladle in a little batter and immediately swirl in a circle formation to spread the batter evenly in the pan. As mentioned earlier in the post, you should hear a heavy-bodied sizzle upon the application of melted butter to the pan, and a mild batter when the batter actually hits the pan and starts cooking.

Your first and second pancakes might be a little dodgy, but it gets better as you go along (promise). Once the edges of the pancakes crisp up and brown, slide your spatula underneath and flip. Cook for up to 45 seconds on this side, then remove from the pan and place on a paper towel. When cooking the pancakes/crepes, layer paper towels between each to absorb the condensation.

Serve warm with more butter and honey/maple syrup, or lemon juice and sugar. Try out the combination in the picture above too– does wonders for your tastebuds, friends.


Peanut Butter Stuffed Salted Brownie Cookies

Processed with VSCOcam with f2 preset

Cancelled morning lectures obviously means whining here about it being the last week of term and waxing lyrical about all things chocolate (once more). A bit on that later. If I start on chocolate now, I’ll probably forget to add other mundane details about my life, and who would want that right? The ‘first day of the last term’ is a funny thing to say; it really didn’t feel all that long ago when I was panicking to my mother about basic things I might or might not be able to do, like laundry, bedsheets and having enough Asian fare in uni to keep me sane, because the impulsive decision to buy Tesco meal deals doesn’t quite cut it most of the time. It’s all just whizzed by much too fast. The Friday flight home is both an ecstatic and nauseating thought to me.

Despite my pension for café fare, I’m embarrassed to say that not once have I had my favourite alone-time at any one café, though I’ve definitely had the chance to visit some must-see places on my list. I should do a write-up about one of them soon, before I forget and the tides of life push me far ahead, me in blissful oblivion, once more.

Processed with VSCOcam with f2 preset Processed with VSCOcam with f2 presetProcessed with VSCOcam with f2 presetProcessed with VSCOcam with f2 preset Processed with VSCOcam with f2 preset

The other day I bought the loveliest little tub of peanut-speckles cashew butter, and just knew I had to use it another mind get-up. It’s practically peanut butter because of all those peanut bits, and since not everyone likes cashew butter and peanut butter is easier to find in stores, I decided to put peanut butter in the recipe title instead of what it really is. It’s not even the processed sort, which some recipes insist on for better results, but really you get a perfect peanut-buttery flavour upon first bite even with the natural unprocessed stuff.

The densest, fudgiest brownie cookie with white chocolate and dark chocolate bits, filled with peanut butter (and in this case, for the sake of aesthetic and flavourful pleasure, salted caramel spread on top). 

I like food hybrids like cruffins and cronuts and whathaveyous. Brownie cookies are on the list. The shape and form resembles that of a cookie, but the texture is all of what you want in a good fudgy brownie– this is not quite the chewy sort, but more dense and fudge-like. Definitely more than what you would guess the texture is akin to in the first picture above. The middle is soft, the edges still squishable. Best part? Adjacency of salt and sweet. Nothing beats it. Yes, my description vocabulary needs a bit of a boost, but squishable is still a word. And an accurate one here, at that.

Processed with VSCOcam with f2 presetProcessed with VSCOcam with f2 presetProcessed with VSCOcam with f2 preset Processed with VSCOcam with f2 preset

Peanut Butter Stuffed Salted Brownie Cookies (makes 18-20 medium-sized cookies)

Ingredients

125g (half cup) creamy/chunky peanut butter (natural or processed; either works fine)

30g (1/4 cup) powdered sugar (doesn’t need sifting)

large pinch salt

1/2 tsp vanilla extract

210g (slightly less than 1 3/4 cups) all-purpose flour

35g (1/2 cup+couple of tablespoons) cocoa powder, doesn’t need sifting (I suggest Green and Black’s here)

1/2 tsp baking powder

1/2 tsp salt

115g (1/2 cup or 1 stick) salted butter (unsalted works too, but flavour is enhanced with salted)

230g (1 packed cup) dark brown sugar

60g (a heaping 1/3 cup white sugar

2 eggs

1/2 tsp vanilla extract

110g (one heaping half cup) of dark chocolate chips or chopped chocolate

*optional: an extra handful of white chocolate chunks/chips (30g) and one heaping tablespoon of salted caramel sauce


Directions

Preheat your oven to 180C (350F) and grease (line if you want) 2 baking trays. In a medium bowl, mix together the first 4 ingredients to make the peanut butter filling. Roll into small balls; you should have around 20 balls, if not more or less. Place the balls on a small baking tray and place in the freezer while you work on the brownie cookies.

In another bowl, whisk together the flour, cocoa powder, baking powder, chopped chocolate (both white and dark) and salt. In a large bowl, whisk together the butter, eggs, two sugars and vanilla extract (add the heaping tablespoon of salted caramel here, if you wish!). Pour the dry mix into the wet mix and mix until just combined. Take out the frozen balls of filling from the freezer. Scoop a heaped teaspoon of dough onto a baking tray, then place one ball of filling in the centre, press down a little, then take another teaspoonful of dough and place on top, smushing around the sides of the filling ball so it’s nicely covered. Repeat until the balls are all enclosed within the gooey chocolatey dough you made.

Bake in the preheated oven for 10 minutes– resist baking for longer even though the cookies look and feel weak to the touch after such a short baking time. If you happen to have made very large cookies, then bake for 11-12 minutes, but nothing more than 12. Leave to cool for at least half an hour before eating. These cookies will keep in an airtight container for up to 5 days, but they’re best eaten within 2 days, during which they retain the ultimate taste and texture. Eat with coarse salt sprinkled on top or more salted caramel sauce.