Tea Drinker?

Processed with VSCOcam with f2 preset

Tea? Me?

My typical early mornings comprise a bleary-eyed kettle-boiling-plus-toast-making session. In a few minutes I have toast and black coffee. In less than half an hour the sun is way up there and I’m ready to do whatever it is that I have to get on with. Tea rarely makes the cut.

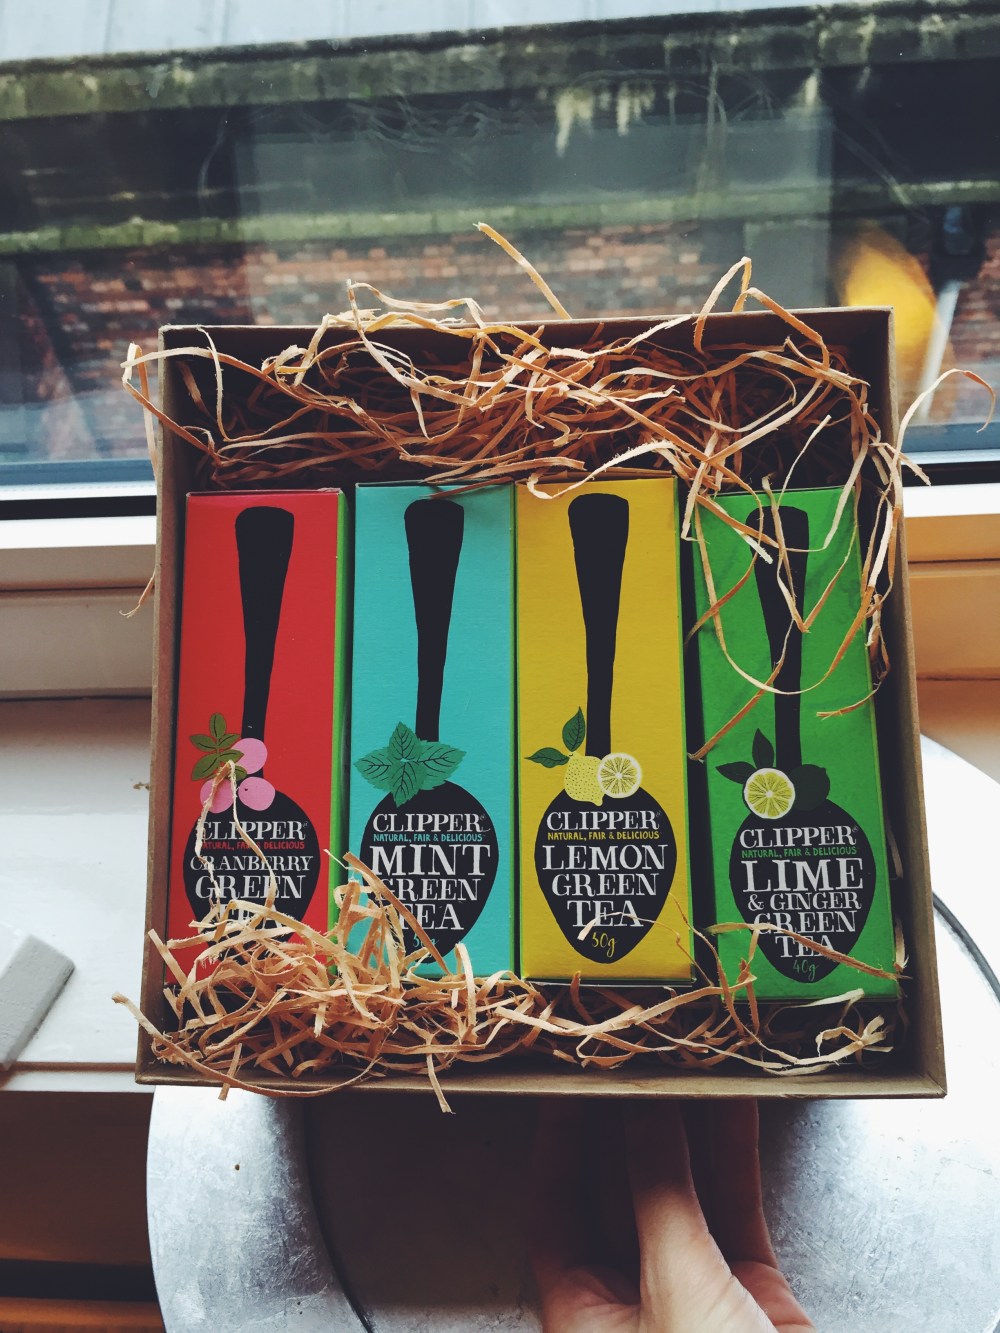
But when I received a lovely assortment of teas from the enthusiastic guys of Clipper Teas, I knew I’d be ready to make a change to this morning agenda. Read: I’m never one for aimless advertising. I have to seriously love a brand’s aesthetic or flavour, or support their cause, or both. So why Clipper?

Before you read any further, please take a minute to click on this link.

Doo doo doo.

Da dum.

Processed with VSCOcam with f2 preset

Done? OK.

Shocked? Disconcerted? Yeah, same here. What it really boils down to is this:

Do you know what’s in your tea?

So many of us buy bags and bags of the stuff each week, not once considering how we’re cheating ourselves. I too was completely unaware of the reality of the industry. Though I’m not the biggest tea drinker, I have friends who drink copious amounts of tea every day, and, if not the usual black, green tea is what accompanies those stressful revision sessions.

With Clipper, which also became the UK’s first Fairtrade tea company in 1984, you can be sure to get every bang for your buck, every brew fresh and free of anything artificial. Their mantra is ‘it’s what’s on the inside that counts’, and I completely agree. No bleaching of tea bags, no quarter-filled bags, no chemicals, nothing. Just pure, unbleached, natural goodness in a cup.

Processed with VSCOcam with f2 preset
A breakfast to complement this hot, flavourful cup of tea. My mother’s amazing homemade pistachio butter, which I here paired with caramelised banana, is one of the best things your lips will touch.

This early morning I enjoyed their lemon green tea, which exudes a bright, true flavour. Knowing the story and aim of Clipper made every sip all the more enjoyable. Here you can find the whole range of their delicious and reasonably priced teas! I’m already planning to smuggle as many flavours as possible back home to Singapore for the family to try.

Next time you think of having a cuppa (tea) or need something to accompany that slice of cake, just remember:

It’s what’s on the inside that counts.


Ricotta Chocolate Chip Pillow Pancakes

I keep finding heaven on pancake mornings. I also keep finding heaven when I realise that certain ingredients are about to expire and whatever I expect to be slipshod turns out marvellous and beyond (you could’ve guessed it was ricotta in this case). From now on, I think every Monday shall be pancake Monday. There will be no regrets.

I didn’t want to stray far from these I wrote about quite a while ago, because they’re still my absolute favourite pancakes. I remember squandering my days trying to perfect them. But with university on my heels, there’s simply no time to faff around with proportions and measurements and whatnot. Yet, I needed a bloody good pancake, and a fluffy, well-risen, tender-stomached one at that. Monday would’ve gone quite badly otherwise. I suspect.

That’s where the ricotta comes in. And the chocolate, because 99% of my recipes are incomplete without chocolate. Chocolate crisping up at the edges, chocolate running down your bottom lip when you take a bite and the pocket bursts slowly, lovingly. The pairing of the mild cheese and dark chocolate chunks is not advanced, but necessary. Ricotta makes the batter creamy and mildly sweet, whilst the chocolate (dark, if I may) adds another lush dimension to the whole thing.

‘Twas a funny story, trying to get these right. My first time using the hob to cook pancakes was almost an ordeal. Burnt the first couple and had to chuck those, but the silver lining came when I found the perfect heating level (3) to allow for a nice golden-brown on both sides, without burning them and being left with uncooked centres. These pancakes seem to be more undercooked after the second sides are done, but that’s mostly because of the ricotta, which makes it denser without having to fully compromise on fluff and the slightest chew in the middle.

You deserve it.

Ricotta Chocolate Chip Pillow Pancakes (serves 2-4, makes 8 medium pancakes)

Ingredients

125g (1/2 cup) whole-milk ricotta (strain if watery)

135g (around 1 cup) all-purpose flour

1 tbsp baking powder

pinch of coarse salt

2 tbsp granulated sugar

1 tsp vanilla extract

1 egg

20g (slightly less than 2 tbsp) melted butter

240ml (1 cup) milk

60g (1/2 cup) chopped dark chocolate

Directions

Preheat your pan or griddle on medium heat, and ready some butter. In a large bowl, whisk together the dry ingredients– flour, sugar, baking powder, chopped chocolate and salt. In a smaller bowl, mix together the ricotta, melted butter, egg, milk and vanilla. Pour the wet into the dry mix and stir until just combined. The batter should be quite thick.

Butter your pan (it should sizzle, but not too strongly), then heap batter onto a tablespoon before laying on 2 or 3 in your pan (you can do more with a griddle of course). Flatten a little with the back of your spatula, then wait 2 minutes before flipping to cook the second side, which will take almost less than half the time it takes to cook the first side. Place cooked pancakes on a paper towel to absorb moisture from the bottom.

Serve with yoghurt, fruit or nuts, and honey or maple syrup.

Eggless Honey Chocolate Oat Cookies

I could drone on about the wonders of a cookie and the definite importance of all the components needed to make it, well, wonderful. But to sum this entire post up: Holy shite, little did I know that miracles are within reach without the use of an imperative baking ingredient– eggs.

It was hard not to panic, because the cookie craving was kicking strong. An impatient unborn child raging in my abdomen. I just wanted a cookie, and no, I didn’t want to walk all the way to Sainsbury’s just to buy more basic life needs. That’s for Saturdays, and I don’t mind waiting.

Took my chances.

I was even lacking on the sugar side, and that’s where the honey stepped in. Oh, the honey. Without much sugar left, this was the main sweetener, and surprisingly the biggest flavourer. I didn’t think the flavour would be so profound in the final result, but the first thing that popped into my head when I took a bite was, heck, this is a honey cookie. Which is why the word honey comes before chocolate in the title, and that’s highly, highly unusual. It’s right there, it says everything. It’s fact.

The first batch was not a total failure, but I didn’t quite get what I was looking for. The flavours were all there, but everything was an absolute mess. The overly spread out cookies ranked 10 on the edibility scale but about a 2 for aesthetics. After tweaking the baking temperature and proportion of flour, things were looking up. It’s a little messy, and you end up needing to wait a little longer than usual for a proper set in the middle before tucking into a thin, soft stomach of chewy batter. I thank all that honey and zero egg. It’s grossly divine when you get a bit of chocolate and a bit of oaty chew. Yes, chewy is a key descriptive word here.

Happy mistakes.

Eggless Honey Chocolate Oat Cookies (makes 10-12 medium cookies)

Ingredients

130g (around 1 cup) all-purpose flour

23g (1/4 cup) whole rolled oats

40g (slightly less than a half cup) white sugar

100g (3/4) cup chopped chocolate

1 tsp vanilla extract

113g (1/2 cup) butter, softened at room temperature

8-ml (1/3 cup) honey

1 tsp baking soda

pinch of coarse salt

Directions

Preheat your oven to 350F (177C) and grease 2 large baking sheets. In a medium bowl, whisk together the dry ingredients– flour, oats, baking soda and chopped chocolate (not the salt!). In a large bowl, whisk together the room temperature butter, white sugar, honey, vanilla and salt. Pour the dry mix into this large bowl and stir together with a spatula or wooden spoon, just until everything comes together. Dollop tablespoonfuls of the mixture on the baking sheets, leaving at least 2 inches in between the cookies. Bake for 15-18 minutes in the preheated oven. Once done, leave to cool for at least half an hour.

White Chocolate Caramel Banana Bread

Because we all know banana bread is actually cake.

Side note: I’m back!!

An apology is necessary and expected. The past few weeks have been an absolute blast, busy busy busy, what with moving to London to embark on a very science-y and exciting adventure. Early lectures, lots of note-taking, and the constant fear that I’ve done nothing to deserve a place in this wonderful university. The people are amazing, the work intriguing, and nothing beats the nighttime kitchen adventures, midnight study sessions and later-night parties. Nothing I say here could ever fully justify the experiences that have been thrown at me as well as those which I have yet to encounter. It’s still incredibly surreal; like a dream come true, yet somehow better.

IMG_0719

A modification on one of my previous banana bread recipes, this one has a gallant twist with the incorporation of white chocolate and caramel. If ever I do this again, I’ll be sure to add in a nuttier texture or more earthy flavour component to up the ante of everything else going on in the picture. It’s the sweetest pick-me-up, and a one-bowl wonder. Don’t you love the easy stuff? Remember: I’m all about simple. Sometimes. Ok, most of the time. With college matters whirling around my head, this loaf was a nice and easy break, which took no time at all to put together and bake. Feels good to get into mixing, picking ingredients and experimenting again in the kitchen. Made it with one of the sweetest people I’ve met here, and everyone loved (and then attacked) it. Crowd-pleaser. Bananas. White chocolate. Caramel. Good play.

Now, it feels like home.

White Chocolate Caramel Banana Bread (makes 1 loaf)

Ingredients

3 ripe bananas, mashed

1 1/2 cups (190g) plain white flour

2 1/2 tsp baking powder

1/2 tsp ground cinnamon

1/2 tsp salt

1 egg

1 tsp vanilla extract

1/3 cup (76g) melted unsalted butter

2 tbsp milk

2 heaping tbsp caramel sauce

1/3 cup (68g) white sugar

3/4 cup white chocolate chips (I cut up a good bar)

Directions

Preheat your oven to 180C (350F). In a large bowl, mix together the mashed bananas, milk, sugar, melted butter, egg, salt and vanilla. Then add in the flour, baking powder, cinnamon, milk, caramel sauce. Finally, gently stir in the white chocolate chips. Pour into a greased loaf and bake for 50-55 minutes. This one was ready by 53 minutes.

To serve, slice up and serve with more caramel, marmalade (a touch I personally adore) and more chopped chocolate. I’m guessing whipped cream or ice cream would sort out any lonely evening, too.

Make This Oatmeal Now (updated recipe with a twist)

I thought I had it all figured out, given the number of times I’ve made oatmeal in my life. Overnight, hot, cold, lukewarm (ew), apple-pied, black sesame-ed, peanut buttered, I’ve done it all. I even wrote a post about it here exactly a year ago, yet I only just discovered what I think is the perfect method for making the thickest, creamiest oatmeal ever. Trial and error does pay off sometimes. It’s more reliable, oats coming out perfect every time. Mind you, this method is preferable is you like the super thick and gloopy sort, but even if you don’t, you just have to take your oats out of the microwave a little earlier.

Catch– it involves the microwave. I can hear the disappointed sighs. They’re boring into the screen already, reaching me, slaps in the making.

I get it, I do. I used to think the only way to achieve the perfect, creamy consistency for oats is to do it the proper and old-fashioned stovetop way. The whole process just makes more sense, it wants you to feel like you’re doing it the better way, doesn’t it?

Funnily enough, this microwave method not only yielded the most desirable consistency, it also seemed to enhanced the flavour of mashed banana, the one ingredient I always put in before cooking my oats for added sweetness and creaminess.

No wait. Just do.

Directions 

The night before, mix together a half cup of rolled oats, half cup of water, half a mashed banana, and a half cup of milk of choice (I always use a mix of whole and almond) in a relatively large, microwave-safe bowl (because this mixture will se. Leave this in the fridge overnight.

The next morning, put your bowl in the microwave and microwave on high for 2 minutes. Take a spoon and mix, then put in the microwave for another minute. At this point, your oatmeal should be noticeably more voluminous and thickened, depending on the power setting of your microwave. Microwave in 30-second increments until you have oatmeal that seems to have more than doubled in volume. Just check your oatmeal every 30 seconds, mixing well between each spurt of heating. Err on the side of caution here.

And you’re done! At this point, you can add whatever you want. My standard toppings are more banana, a heaping tablespoon of almond butter (cashew/peanut/almond), blueberries for a nice tang to cut through the sweet goop, and plenty of honey or maple syrup. Once the oatmeal is a little cooler, I also add a dash of cold, whole milk.

BUT. In this case, I highly recommend trying out this kaya and coconut twist. It’s the sort of combination I’ll be coming back to again and again, for the flavours are close to my heart and it’s a nice break from your typical snack of kaya and butter toast!

The Twist

You should now have a thick, creamy, voluminous mass in your hands. Take the other half or a whole banana and slice it down the middle. Butter a hot pan and fry the banana on both sides. Place the caramelised banana on top of the oats, then add a heaping tablespoon each of almond butter and kaya (I love Breadtalk or Yakun, and my grandma makes a mean one too), a generous drizzle of maple syrup, coconut flakes and a dash of whole milk. Mix everything together, admire the glorious mess, then tuck in happily.