No-bake Strawberry Cheesecake

FDD9AC97-1DD7-42D3-9403-98D7B2DE68DE

Rain, outside. Currently listening to Millie Vernon’s That Old Feeling, and feeling swingy. I haven’t given enough verbal weight to the importance of smooth jazz to my creations. Its silky notes have a way of churning the cogs up there. The rain is helping, too.

Cheesecake, cheesecake! Inspired by none other than my favourite Ben&Jerry’s ice cream flavour as a child. Am I the only one who thought it was better than every other flavour they had? Phish food was fine, Cherry Garcia was an atrocity only because I had no appetite for cherries in any form at that age, the banana thing was a no. It was a picky phase, I could only stick to solid chocolate and cheese sort of flavours, and anything nutty or fruity was sacrilege. Except for strawberry cheesecake.

I approach most vegan cheesecake recipes with caution. Cashews and coconut? The furthest things from that signature dairy taste? I think not. But this one proved me (and will hopefully do the same to you) wrong. A good soak of your cashews will yield a fine, smooth texture, similar to your typical New York cheesecake, I promise. I kept this one base-less to keep the focus on the pure filling, but you can use this crust if you wish. That crust is also featured in my recipe for a classic vegan cheesecake, if you wish to try a proper baked one instead. It’s good to remind oneself of why it’s important to use more plant-based foods and proteins in anything you cook and bake. Just look at the power of cashews, the main star of this event:

  • They are almost a quarter total protein
  • 62% of its fats are monounsaturated, and have less fat than most other nuts
  • They are brimming with a sort of flavonol that starves cancer tumours
  • They help manufacture enzymes involved in the formation of haemoglobin and collagen, and are therefore key in skin and hair health
  • I keep forgetting that full stops don’t belong in bullet points

So you see, I guess this whole cashews-not-milk-plus-save-cow-exploitation sort of headspace isn’t so bad. The better you blend all this up, the better your result. You really want it to be as smooth and creamy as possible. What’s great about this recipe is also that i’s no-bake, which means it satisfies all you lazy bakers (me included sometimes).

IMG_4316

FDD9AC97-1DD7-42D3-9403-98D7B2DE68DE

Ingredients

250g raw cashews, soaked overnight or for a couple of hours in lukewarm water, and drained. You can leave the cashews in the fridge or on the counter. Alternatively, you can add boiling water to the cashews and let this sit for half an hour before using.

1/2 tsp turmeric

1/2 tsp fine salt

120ml lemon juice, freshly squeezed from about 3-4 lemons

1 tsp vanilla extract or vanilla bean paste

80ml maple syrup

60ml vegetable oil (sub: melted vegan butter/melted coconut oil)

3 heaped tbsp coconut yoghurt or any yoghurt you like (sub: applesauce or milk)

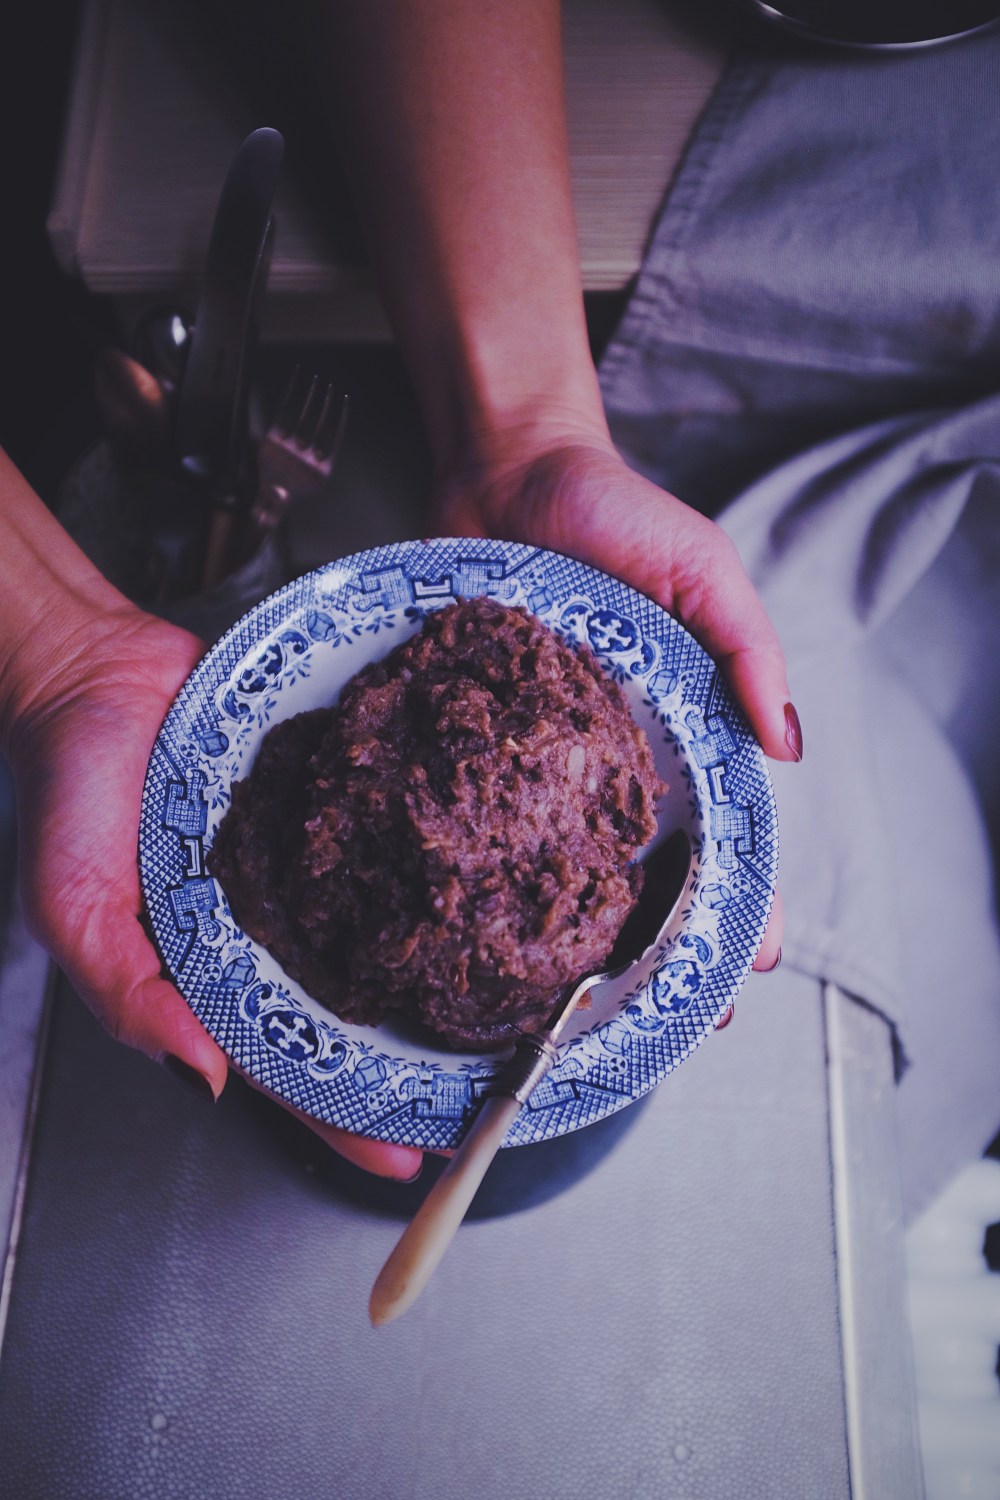
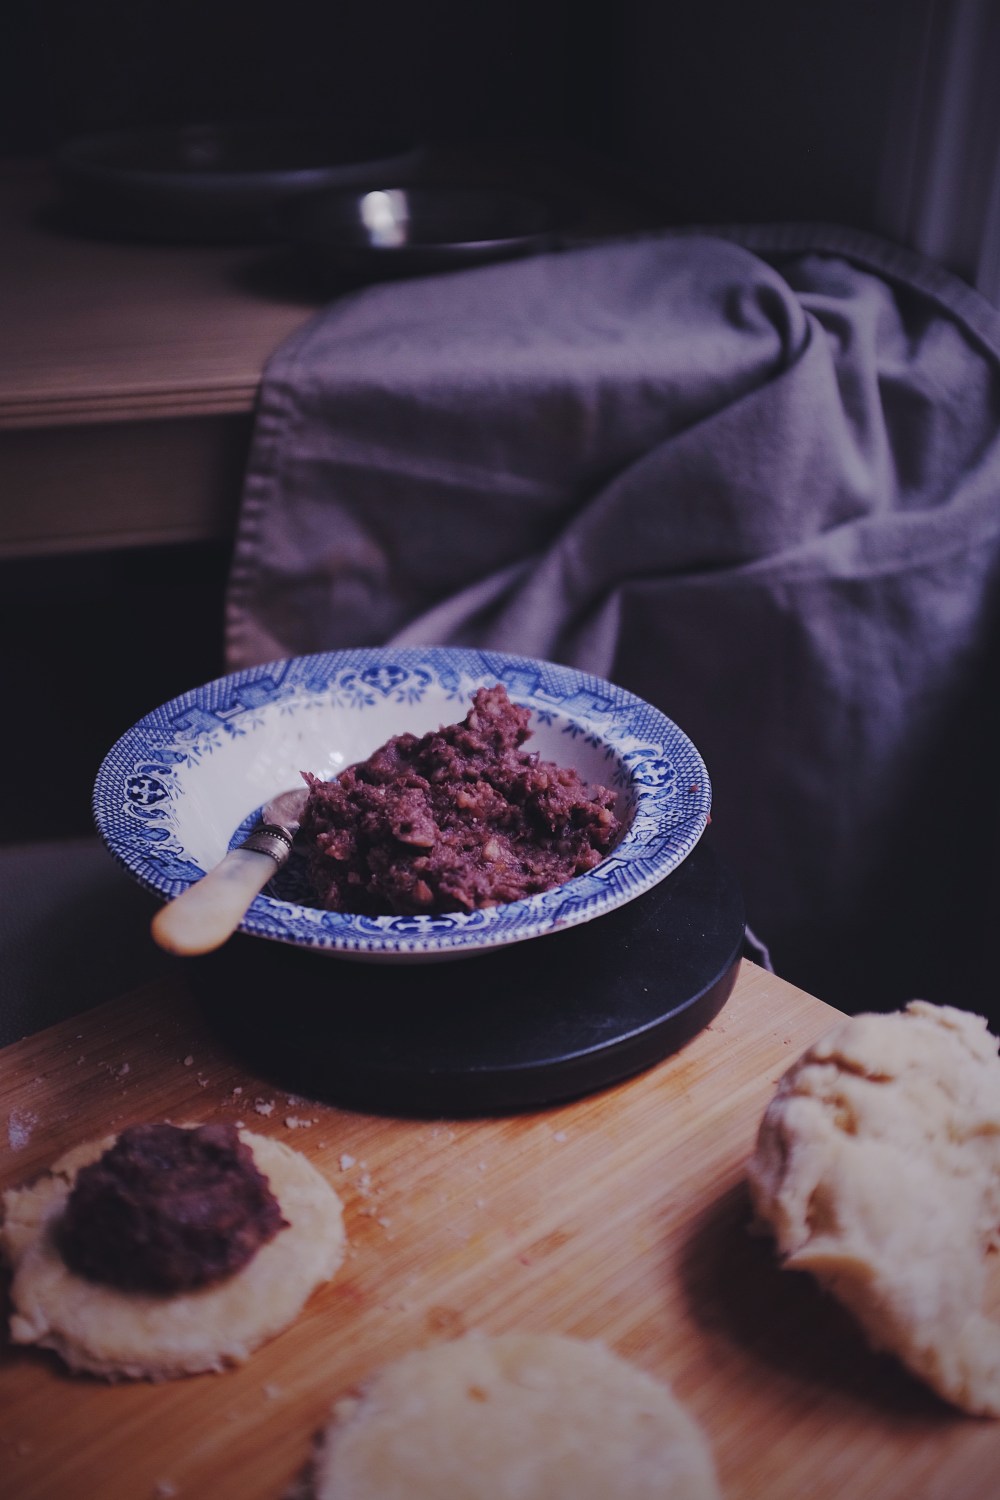
3 heaped tbsp strawberry jam

Directions

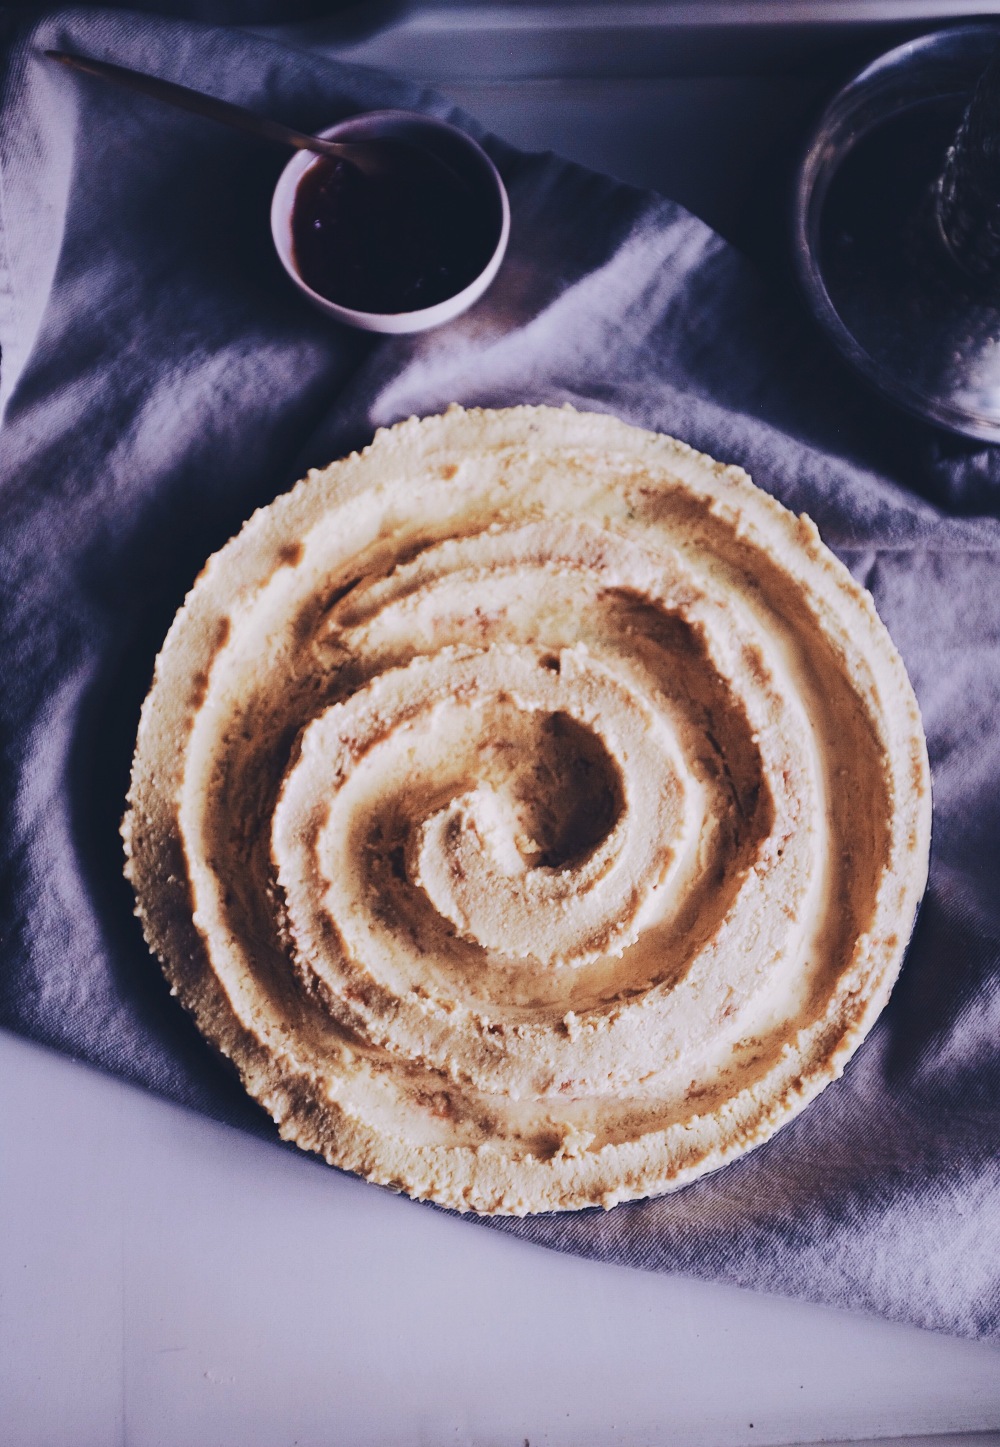
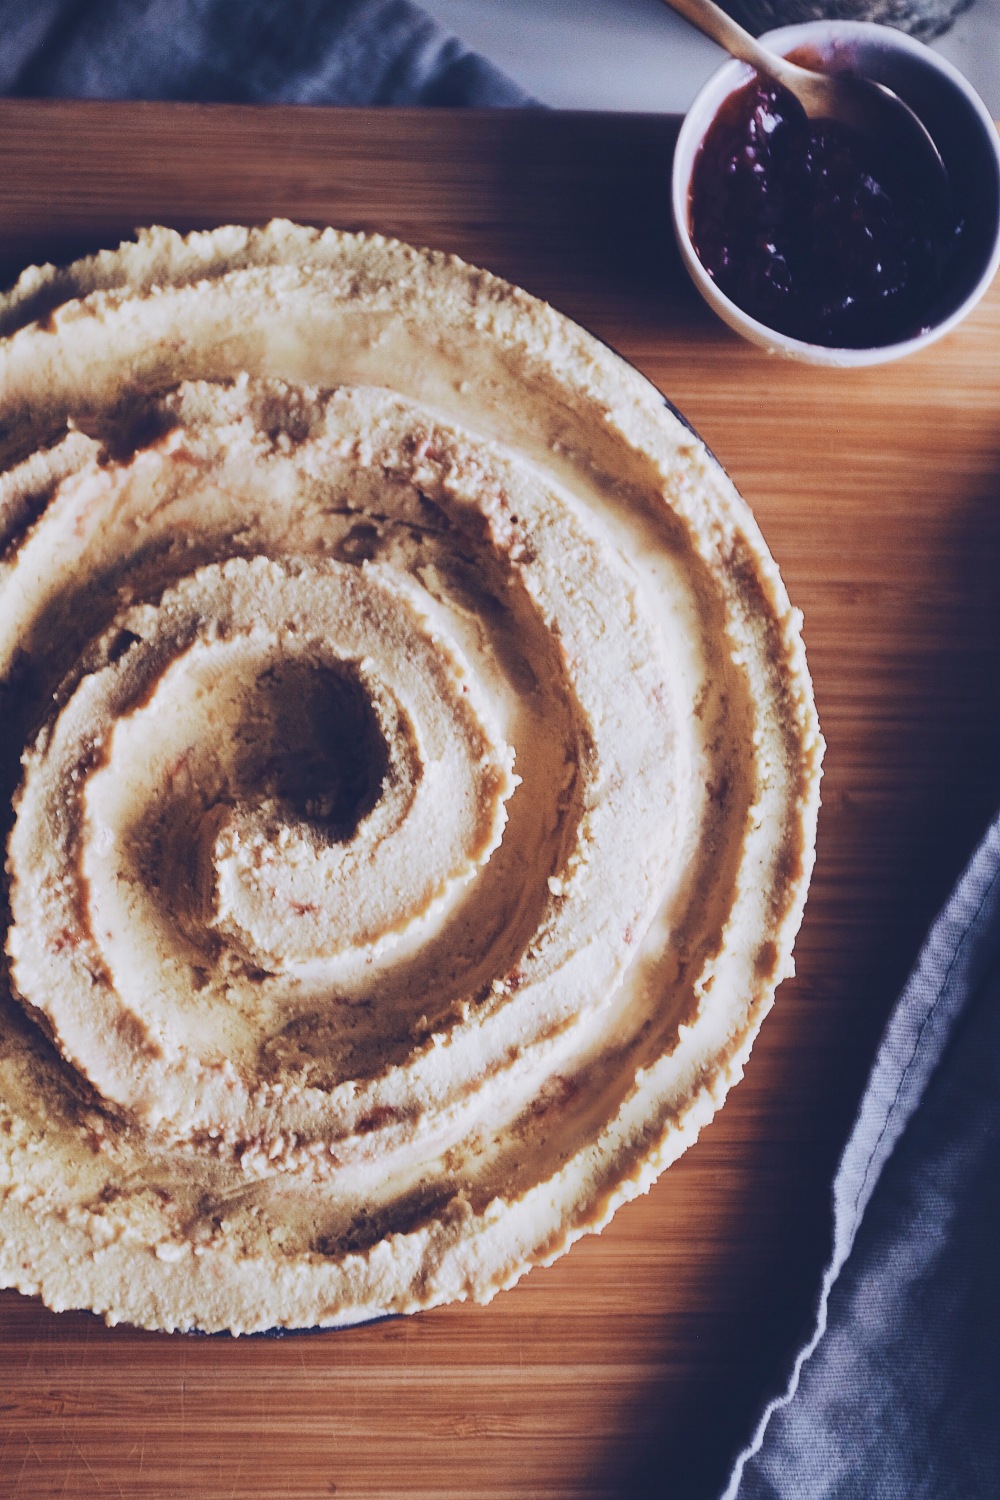
Blend all ingredients except for the jam in a high-speed, powerful blender. Continue to blend until you get a smooth, pale consistency. It should be thick and runny. Pour the filling into a bowl, add the strawberry jam and then use a spatula to fold the jam in, creating a ripple effect. Tip this into a 8 or 9-inch cheesecake pan with a removable bottom and place it into the freezer to set.

*To create the swirly effect as you can see above, take the cheesecake out of the freezer after 30 minutes, and run a small knife or spatula in the formation of a spiral from the outside to the inside. You may get this all messy the first time, especially as the cheesecake starts to thaw, but don’t worry, the fact that the cheesecake thaws easily means it’s also easy to scrap whatever pattern you’ve done and start again. You can also put the cheesecake back in the freezer and take it out 10 minutes later to re-mold whatever pattern you want. Enjoy with coconut yogurt and strawberry jam.

Goreng Pisang on Toast

2910193 Processed with VSCO with f2 preset

There are too many things, upon my arrival in the homeland, this special little red dot, that I was much too eager to get into again (jet lag came, stole all my energy and enthusiasm. But now that that’s gone, each day seems a refreshing beam of light, a hopeful promise). But yes. Café hopping, family and friends aside, it’s all about food. Old flavours, fun memories, revisited. That’s what I missed. There’s always something to be aware of, to be curious and excited about. Right now I’m deeply appreciating, here in Singapore, access to good food at much cheaper prices, and the cool and quirky Asian/pan-Asian delights one can find anywhere, in the basement of any big mall (my favourite is the Takashimaya one, for the record).

9D0A5220-7CEE-47F9-AEBA-5718BB6BF8F5
A recent tea party I had with my dear friend Charlie at an Airbnb café– how cool are these? They specially made vegan chocolate avocado mousse for me, and the accompanying chai tea was sublime. 
3570212 Processed with VSCO with f2 preset
My favourite place for good sourdough– The Bakery by Woodlands Sourdough at Bukit Timah. Thick almond butter and honey on thick, crusty toast. The sort of thing I actually will pay for once in a while, it’s that good.

It’s a time to revisit, guiltlessly, all the sweet flavours I missed. Black sesame, durian, matcha galore. Endless. Gorgeous! One of my favourite food thingys that I used to have on a regular basis, aside from durian puffs and dark chocolate taiyakis, was goring pisang (fried banana). My grandmother still occasionally buys them from the hawker centre, and are too, too perfect with a cold dollop of vanilla bean ice cream, or just on their own as they are.

It feels downright weird to be back. With no dissertation to complete, I am officially a graduate (ok not entirely, the graduation is in October, but still). Now, there’s a space in my head, one that need not necessarily be filled all the time. A space to feel, to think, to scroll through all the emotions that have been mashed together for too long in the days leading up to some exam, or assignment, or thesis. Because sometimes scrolling through emotions means putting rationality on the back-burner. This feels so free. This feels like a good, long, abdominal breath. And true enough, it is important to take time, intentionally, to do this daily, or at least weekly. But it’s also good to get away from it all entirely, take a break even from blogging, as I did the past two weeks. Routine, a good one, is a conscientious way of re-organizing one’s priorities. But sometimes a little break from routine allows for reflection on the meaning of the routine itself, instead of being on autopilot all the time. It’s sort of like atoms in a certain structure. The bits that make up the structure may be strong and sturdy, but breaking away and re-organizing them in a smarter and more efficient manner may leave you with a structure even stronger than before).

Now let’s go bananas. It’s all about the right banana and the right batter. The two must complement each other– too ripe a banana will leave you with mushy bits of nothing, while the batter should comprise ice-cold water, rice flour and corn starch for the perfect degree of crispiness. Then everything is fried, and I don’t think you can go wrong by either shallow or deep-frying, because it’s still a fried banana, and you can’t go wrong with that, can you?

Traditionally, these golden beauties are eaten with ice cream or with a custard, but that Monday I decided to bung it on some toast layered with fresh, thick coconut yoghurt, peanut butter and jam, and my taste buds were on absolute fire. The combination of the creamy yoghurt, tangy and sweet with peanut butter and jam, cradled the crisp, wispy outer layer of goring pisang batter. You think about it, and the whole thing seems or sounds a little silly. I mean, fried anything can’t really go wrong. Or just leave the poor banana alone, for goodness sake. Why coat it, why ruin it? But that’s the fun of experimentation, is it not? I’ll breathe down the back of the traditionalist for as long as I can, challenging the norm. If we can fry bananas, or mars bars, or friggin’ tea bags, then why not put them on something and call it a meal? Like your usual pb&j toast. The coconut yoghurt really is just for fun. The whole thing is just fun and delicious, so let’s just leave it at that.


Ingredients

2-3 ripe (but not too ripe!) bananas, sliced in half (along the breadth, not down the long centre)

40g plain flour

2 tbsp each of rice flour and cornflour

¼ tsp baking powder

pinch of salt

5 tbsp ice-cold water

vegetable oil for deep frying, of which a tablespoon you will mix into the batter

*optional accompaniments: bread slices (use whatever bread you like but whole-wheat or sourdough is preferable), coconut/soy yoghurt, peanut butter, jam


Directions

Mix all batter ingredients (everything listed above except for the bananas) in a shallow bowl. The batter should be smooth, without any lumps. This can be done by adding the water slowly, in thirds, and whisking well in between. The batter should not be all that thick– if it is, add a little more water to thin it out.

Add your cut bananas to the batter and coat them well with the help of a fork or spoon. Meanwhile, heat 1.5-2 inches of vegetable oil in a wok/frying pan. Add enough so that the bananas will be just covered. You can also save some oil by using less oil and turning the bananas halfway through. Once the oil temperature has reached 180C (320F), and you can do this with any candy thermometer, add the coated bananas and fry until they are visibly golden-yellow. 2-3 bananas are perfect for this recipe because too many will make the temperature of the oil drop a little. Once visibly golden and crispy, take the bananas out with a pair of tongs and place them on a paper towel to drain the excess oil. Be careful this whole time, the oil may spit and hurt you. These are best eaten immediately or at least the same day they are made. For this twist, toast your bread slices, then add a tablespoon each of coconut yoghurt, peanut butter, and finally the jam. I like strawberry jam, but that bit’s up to you. Then cut your fried bananas in half lengthwise, then put them on the piece (or pieces) of toast. Take a bite. Savour that. Love that.

Rhubarb Phyllo Galette

4288212 Processed with VSCO with a5 preset
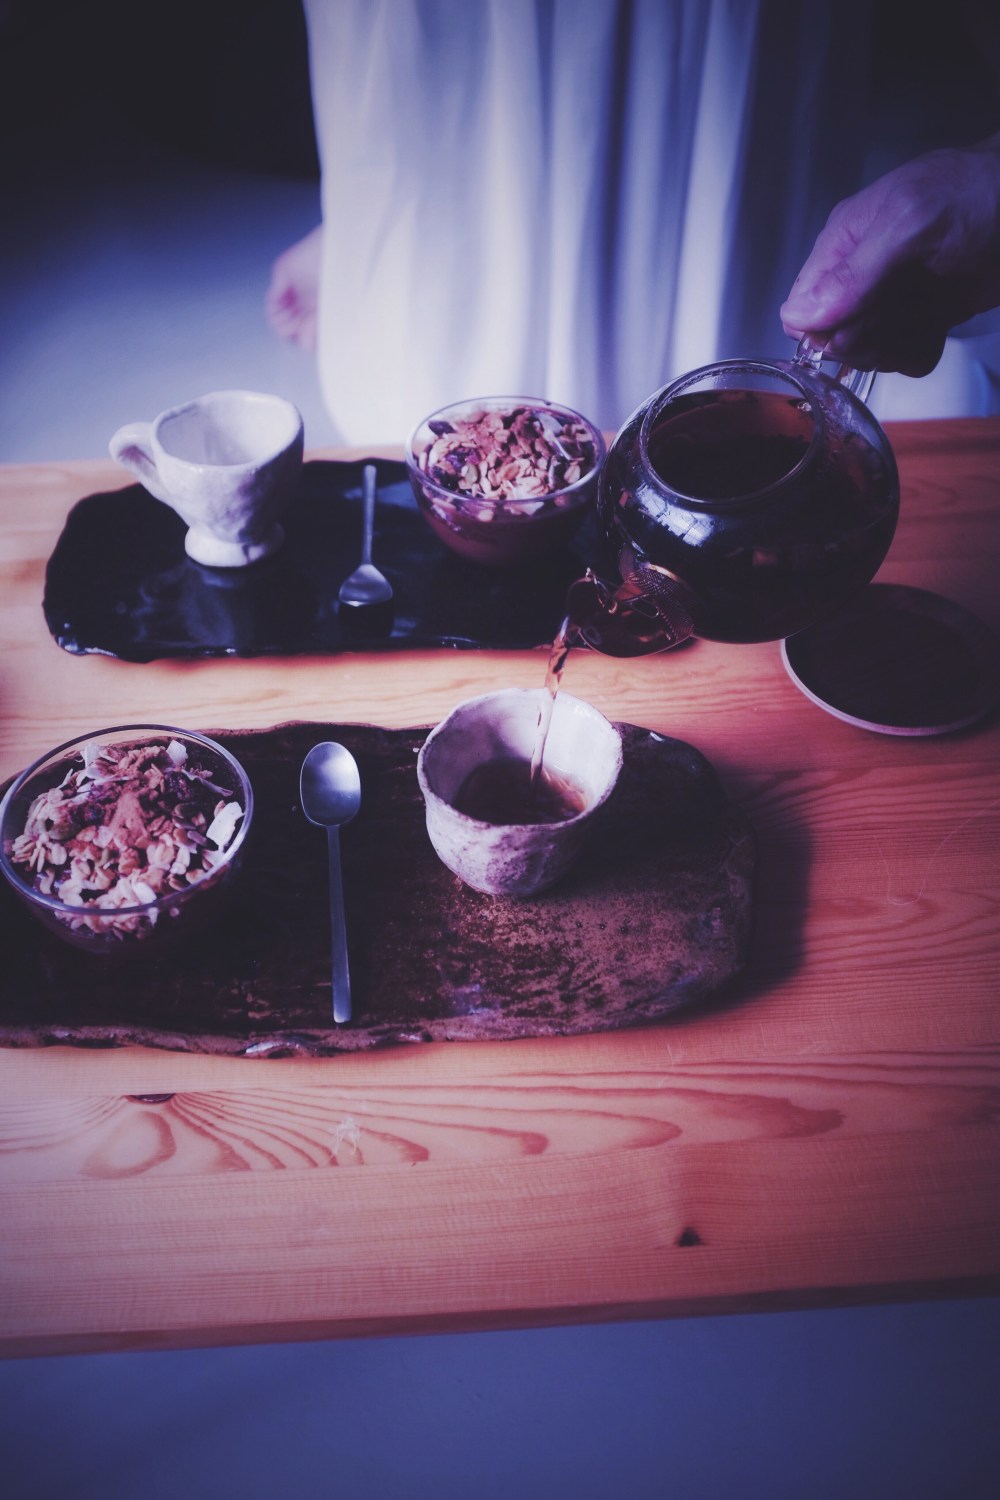
Nothing like sitting down in a cosy café to write up another yummy recipe. Just had a double salad full of gorgeous greens and beans, the sort of thing which this recipe perfectly complements. Going through recent journal entries always bring forth the necessity of consistency, self-belief, self-growth, and routine, but they also revealed how easy it is for me to get lost in a tangle of unhealthy mentality and unnecessary indecision. I guess it’s okay to excuse oneself for wondering which food photography backdrop to get next and whether the bananas I just caramelised with vegan butter and a lush deep muscovado sugar would pair better with melting dark chocolate or a simple cinnamon and coconut nectar drizzle (the former was quite the mouth show, and I need to do that more often. It’s basically a wholesome sundae for breakfast). The peril of freedom of choice! How superficial it seems, and yet, what changes they bring– to my entire outlook on life, on the way I behave. Just like how I had mushrooms on toast for brunch last Saturday and I could actually feel my heart leap with joy upon seeing perfectly caramelised onions, browned and gooey, stuffed between morsels of juicy oyster and morel mushrooms heaped on a bordering-carcinogenic piece of toast lovingly slathered with homemade hummus. Sweet moments make themselves known. Because they do make life that much sweeter.

Yesterday I ate a delicious carrot cake chockfull of walnuts. Not the most salubrious thing to have at 2pm, but it did hit the spot like nothing else. Typically a big green apple does it, but yesterday, that fine Tuesday, the cake was a brio in my mouth. If you’ve been following me for a while, you’d know just how much I resonate with the idea of moderation, so necessary in this age of health and nutrition information advertised to propagandic effect. Cake and coffee by myself, mindful and beautiful. Life is about health, and also about letting go. A pure, one-dimensional sweet this cake was, but what was missing was the hint of tart from the cream cheese component (if only vegan cream cheese wasn’t so pricey, right?) in the icing. Tart, the cousin of sweet, is sometimes necessary to balance whatever saccharine loveliness a baked good or breakfast item has to offer.

3575144 Processed with VSCO with a5 preset Processed with VSCO with f2 preset

Tart, this pinch of sour, to round off the sweet. Tart, like this rhubarb phyllo galette. Thank you Aldi for 50p on-sale fresh, seasonal rhubarb! This is a twist on a recipe recently written up by Linda Lomelino, one of my favourite baking and dessert bloggers. With plenty of phyllo pastry left over in my freezer, I thought it would be interesting to see what would become of it. Phyllo pastry may be delicate, but it’s also incredibly versatile, and should not be reserved just for baklava and other Middle Eastern desserts. Here is what happens: You layer half-sheets of phyllo pastry on top of each other, each layer brushed with a delicate layer of olive oil to help them stick together, whilst allowing the galette edges crisp up nicely in the oven (without burning). Broken pastry? No big deal. A galette is meant to be rustic, and tears and breaks here and there will only enhance, not detract, from this.

Processed with VSCO with a5 preset3427941 Processed with VSCO with a5 preset Processed with VSCO with f2 preset3653074 Processed with VSCO with a5 preset

Notes:

  • For whole, unscathed sheets of phyllo pastry, leave the frozen pastry in the fridge overnight, so do that the night before baking, or at least a couple of hours before. Microwaving the phyllo pastry to heat it up in a rush might leave some parts too delicate and others frozen stiff. That being said, you may still try microwaving the pastry (cover removed but still in its plastic wrap) for 30 seconds at a time, on medium power. Not the highest!
  • Cutting up the rhubarb into batons of equal length may leave you with little pieces of rhubarb. Don’t discard these, you could try fit a few cut-up pieces into nooks and crannies in the galette. Any remaining pieces can be eaten there and then.
  • The seeds and sugar sprinkled on top of the galette before baking is optional but highly recommended. The crunch gives the galette more textural fun.
  • It’s important to watch the galette carefully as it bakes– it’s done once the pastry is pale brown and edges are crisp. Baking time may vary depending on the brand of phyllo pastry you use, or strength of the oven.

3090366 Processed with VSCO with a5 preset Processed with VSCO with f2 preset3060263 Processed with VSCO with a5 preset Processed with VSCO with f2 preset

Rhubarb Phyllo Galette (adapted from Linda Lomelino’s recipe for a rhubarb almond galette– makes one 6-inch galette)

Ingredients

200g rhubarb (about 4 large stalks), washed and leaves/ other possible dirty bits and bobs cut off

juice and zest of half a lemon

1 tsp cornstarch

1 tbsp sugar (coconut or brown)

9 half-sheets of phyllo pastry, thawed (from frozen) in the fridge overnight

60ml vegetable oil or melted butter (use vegan butter or margarine if you are vegan)

2 tbsp granulated or turbinado sugar

*optional: sprinkle of mixed seeds (I used a very random mix of sunflower and pumpkin seeds, and some homemade buckwheat granola)

Directions 

Preheat your oven to 180C (350F). After weighing out the rhubarb, cut each stalk in half lengthways, then cut into batons, each 4cm in length. Put the rhubarb batons in a bowl, add the lemon juice and zest, cornstarch and sugar, and mix well with a spoon, until the batons are all coated in the lemony-sugar mix.

On your work surface, place one half-sheet of phyllo pastry down. Brush this with a thin layer of oil or melted vegan butter, then place a second layer on top. Repeat, until you have three layers on top. Rotate this thin stack 90 degrees, then do the same with the next three half-sheets, not forgetting to brush each layer with  oil each time. Rotate 90 degrees again until you are at the same orientation as you were in the beginning with the first three sheets, and then layer on the last three half-sheets so that all 9 half-sheets are used up at this point. You should get what looks like a thick cross shape, with 8 corners

Fold each of the 8 corners down, so that you have an octagon shape. Take your rhubarb batons and place them in whatever pretty pattern you wish, in the centre of the octagon. I did a series of horizontal and vertical batons, but you could also just heap the stuff in the middle. Then fold over, somewhat in a rough and random manner, the perimeter of phyllo pastry, over the border of rhubarb to get the shape of a galette. Brush the pastry with more butter/olive oil, sprinkle on the 2 tablespoons of sugar, and the optional sprinkle of mixed seeds. Bake in the preheated oven for 13 minutes. Watch the galette carefully– it’s done once the pastry is a pale brown.

Leave the galette to cool a while on the counter, before slicing and serving with coconut yoghurt or a refreshing scoop of vanilla bean ice cream.

Red (Adzuki) Bean Hand Pies

3339991 Processed with VSCO with f2 preset

So I brought these little hand pies to my mum and two friends for a taste test, and we were all floored. One of my friends, who doesn’t have the biggest sweet tooth, started off with an ‘omg, these are incredible’, before pausing and commencing to talk specifically about the balance in texture and flavour of his delicate, puffed-up pie. ‘I like how it’s mildly sweet and soft in the middle, and crazy crisp everywhere else. Not too sweet either. Whoa.’ I couldn’t agree more. As my mum and I shared one, a tingling warmth rippled through my being. There is nothing like sharing a delicious treat with those you love.

London’s cold spell was brief and impactful. Harsh winds and cancelled train rides aside, the most beguiling thing was to watch my gloved hand traverse the page in my diary, just this time last week. Not once did I ever have to write in my diary with a shivering hand.

3540479 Processed with VSCO with f2 preset3134746 Processed with VSCO with f2 preset

And so comfort had to be in tow. No question about it. Tinker tinker, tinker tinker. A brief encounter with the adzuki bean reminded me how powerful it can be in conjuring up such profound memories and nostalgia. Native to the Himalayas and Southeast Asia, it is especially common in Japan, where it is used in a variety of different desserts. Red bean mochi and red beans scattered in my ice kachang were some of my favourite desserts as a child, ones I appreciate now more than ever in London, where Asian desserts are still rather uncommon. If one is so lucky to find them, they still tend to bear ridiculous prices. Another reason to make these yourself at home!

The best thing about these hand pies, cute filling aside, is the delicious, outrageously crisp crust. Complementing it is the just-right sweetness of red bean paste, smooth and sticky. You could customise the filling by adding things like soft dates (deglet/medjool) and nuts for some interesting dimension and a different mouthfeel.

3339991 Processed with VSCO with f2 preset

Red Bean Hand Pies (makes 10-12 little hand pies)

Ingredients 

For the red bean paste:

200g (1 cup) adzuki beans

240ml (1 cup) water

pinch of salt

200g (1 cup) granulated sugar


For the puff pastry:

280g (about 2 and 1/4 cups) plain flour, and have a little bowl with some extra flour set aside for sprinkling later on (sub: half white and half whole-wheat, or use a gluten-free flour such as coconut or rice)

120ml (1/2 cup) vegan butter (sub: coconut oil)

120ml (1/2 cup) cold water

pinch of salt

1 tbsp sugar


Directions

The night before you make the pies, soak the adzuki beans in the water. In the morning, drain the beans, place them into a saucepan. Add fresh water to the saucepan until there is about an inch of water covering the beans. Turn on the heat and let the beans come to a boil. Once at a boil, reduce to a simmer and cook the beans for about 45 minutes. During this time, start making the pastry. You could use a food processor but I prefer using my hands in a bowl to get a good feel of the dough. In a bowl, mix together the flour, sugar and salt. Add the butter/coconut oil and squeeze it into the flour until you get floury clumps. You don’t have to make sure everything comes into clumps, you should just have a relatively dry and crumbly mixture. Add a quarter cup of water to start, then add the rest slowly until the dough just comes together in a large clump. The mixture will be quite dry. Add more or less water until you get to this point. Put the dough in a bowl and place this in the fridge.

After 45 minutes of cooking the beans (give them a stir every once in a while), add half of the sugar and salt. Continue cooking for 15 minutes. Squeeze one of the beans– if it breaks easily then you’re on the right track. If not, never mind, just continue cooking until most of the beans are easily smushed (I LOVE that word). Continue cooking until most water is evaporated. Add the rest of the sugar and cook for another 5 minutes before taking the pan off the heat. Use a fork to smush the beans more into a paste. Leave the beans to cool in the fridge; this is also when the paste (termed anko in Japanese) will thicken.

Preheat your oven to 190C. Lightly flour a work surface and, using a rolling pin, roll out your dough until about half a centimetre thick. Using the edges of a glass cup, cutters or a measuring cup, cut 5-inch circles in the dough, starting from the edges to save space. Take your bean paste from the fridge and place a heaped teaspoon of the paste in the centre of one circle. Wet your finger to draw a thin layer of water along the borders of the circle surrounding the paste, then place another circle of dough on top. Pinch the pie along its sides to seal the pie. Using a fork, make little fork marks (or claw marks, as I like to call them) around the edges, then flip the pie and do the same on the other side. Repeat until dough is finished. And now for the important part!! Brush the tops of the pies with water– this will make the tops super crisp once out of the oven. Then sprinkle some sugar on the tops, and place the pies in the preheated oven. Bake them for at least half an hour. Check on them at 25 minutes– if they are already golden-brown take them out, but mine took 30 or so minutes.


Matcha Coconut Adzuki Bean Tart

3385343 Processed with VSCO with f2 preset

The week in a nutshell?

Well.

Perhaps an abundance of small happenings and details that cumulated to form the realisation that the smallest changes can indeed lead to drastic changes. Things like goal setting and reading affirmations out loud (even if just in a whisper) have a tremendous impact on how you start and go through your day. Meditation. Another thing I’ve gotten into again, more recently. So many things which, just 2 years ago, I may have scoffed at, brushed aside as heeby-jeeby, loco, substance-less stuff. An amazing Harry Potter exhibition at the British Library, and finally becoming a member of the Wellcome Library. Delicate, lasting pleasures.

4318271C-9DF8-4D88-A862-E9A1C0F26ABC3240517 Processed with VSCO with f2 preset

I here conclude that centre of mind should be centre of gravity. Slip-ups happen, a day isn’t always that great, and that’s ok. Walk off the woes. Write. It’s about returning to those small, good things, and staying confident in their life-giving properties which may only be discovered upon closer inspection. Like pouring tea into your teacup, or savouring your first bite of dinner, or reading without your phone buzzing. There is a secret bonhomie even in the most inane things, or inanimate objects.

So I made this tart on Monday, and there is one last slice in the fridge. Waiting there for me, as I sit here typing in Waterstones. Stiffened just to the right degree, with a thin blanket of coconut cream gently melted before the drizzle, and lovingly homemade sweet red adzuki beans. Can you tell Japan is still on my mind?

With matcha, coconut, black sesame and adzuki bean, there’s a lot going on, but there’s a lot going on well. Ecstasy possessed me upon my finding these beans in a health shop near where I stay. They take quite a while to cook but the result is so worth it. These rigid, dark beans are harder, darker and smaller than your normal red kidney beans, and add a nice firm texture to any soft, sweet dessert. Dense and more earthy in flavour. In fact, you could throw these guys into your lunchtime salad or pasta and it probably wouldn’t be half bad (here’s to a new idea for tonight). The filling is not too rich, achieved by mixing coconut cream, coconut yoghurt and plant milk in the right ratio. You could do it all just with coconut cream, but that would totally overwhelm the addition of matcha. The light blend ensures all the flavours come through at the same time. As I wrote in my journal that day, it is ‘so sweet, matcha-y and creamy…!!’ Clearly I was too excited to English properly. Also, no baking needed! Just a little fridge hibernation, so make this the night before to enjoy the next day, or in the morning if you’re the sort who has time at home, and enjoy later on.

3342913 Processed with VSCO with a5 preset

A creamy matcha coconut tart with a black sesame crust and sweet adzuki beans (Japanese red bean)

Matcha Adzuki Bean Coconut Tart (makes one 7/8-inch tart)

Ingredients

For the crust:

35g roasted black sesame seeds

2 tbsp (50g) tahini

8 large medjool dates (120g)

100g raw cashews


For the filling:

2 tbsp matcha powder

150g coconut cream, from a package or scoop out the solid bits from a tin of coconut milk, and save some extra to drizzle on top

150g coconut yoghurt or any other plant-based yoghurt of choice, e.g. soy/almond etc

120ml almond milk (or any other plant milk)

50ml (45g or 3-4 tbsp) maple or agave syrup

4.5g (about 1 tbsp) agar powder or vegan gelatin

half a teaspoon of fine salt


For the bean topping:

100g adzuki beans (pre-soaked for 2-3 hours, or you can soak them while your tart is setting in the fridge)

5 tbsp granulated/coconut sugar

water

Directions

Using sesame oil or any other oil/margarine (sesame works well here because it matches the flavour of the crust but you don’t have to, really), liberally brush the base and all corners and crevices of your tart tin. Your tin should have a removable bottom. The liberal oiling is important because it’s easy for the sticky crust to stick to the sides! Now in a food processor, blend together all the ingredients for the crust. Wet your hands to stop so much of the batter sticking to them, and press the mixture evenly into your tart tin. Use the bottom of a glass to help, if you want. Set aside for now.

In a saucepan, whisk together the ingredients for the filling. Place on high heat and bring to boil. Once it is boiling, immediately reduce heat to low, let the mixture simmer for 30 seconds, then take off the heat. Pour this on top of the prepared black sesame crust and spread evenly. Place the tart into the fridge to set nicely.

Meanwhile, make the adzuki beans. Wash your saucepan. Take your pre-soaked beans and place them in the saucepan. Fill with water until the beans are just covered, then cook on medium-high heat for an hour. Now go read something, chat with your mum or watch an episode of Friends. When you come back, the beans should be relatively soft. If not, cook for another 10 minutes. There should still be a little resistance when you use a wooden spoon to break a few beans. Now add the sugar and stir until everything is dissolved. Take off the heat and set aside.

Finally, drizzle some extra coconut cream on the tart, then top with the cooked beans. Et voila! Serve cold from the fridge and enjoy with some green tea or coffee.

And to end on an inspirational quote…

‘Consistency is the playground of dull minds’